
Yohan Beschi
Developer, Cloud Architect and DevOps Advocate
Spring Boot in AWS Elastic Beanstalk with AWS CloudFormation

On paper AWS Elastic Beanstalk “is an easy-to-use service for deploying and scaling web applications and services developed with Java, .NET, PHP, Node.js, Python, Ruby, Go, and Docker on familiar servers such as Apache, Nginx, Passenger, and IIS”. With AWS Elastic Beanstalk we can deploy a web application with very little knowledge about AWS services. Furthermore, AWS Elastic Beanstalk can even build the application during the deployment (we only have to provide the source code with a build script - maven, gradle, etc. for java, composer for PHP, npm for NodeJS, etc.) and provision a RDS along the environment.
For testing purposes, it is a great service to have a web application up and running in no time. But for production environments the reality is much more dire and makes AWS Elastic Beanstalk one of the most complex AWS service to configure right.
Following, CI/CD best practices, the package of the application should be built only once, at the beginning of the pipeline and the same package should be used in each environment. First, to be sure that it is exactly the same version we tested in all the environments before going to production and second, to reduce the risk like an unavailable service (e.g. Maven Central if we build the application at deployment time).
Then, following DevOps best practices, stateful resources should not be tightly linked to stateless ones. Therefore, databases should never be created by AWS Elastic BeanStalk.
Finally, AWS Elastic BeanStalk default configuration is rarely what we want. In term of Load Balancer, system, logging configuration, etc. we end up having to configure everything exactly as if we did not use this service. Of course to do so we need knowledge of how to configure a Load Balancer, an Operating System, the AWS CloudWatch agent, Nginx, etc. with the extra difficulty of integrating everything with AWS Elastic BeanStalk deployment workflow.
In a previous article, we have already seen how simple it is to provision EC2 instances with Ansible, so why would anyone use AWS Elastic Beanstalk if it adds so much complexity ? The answer lies within the Shared responsibility model for Elastic Beanstalk platform maintenance and the Managed platform updates. With Elastic BeanStalk we (as customers) are responsible for our application and its network security, and AWS for everything else down to the Operating System maintenance (if we stick to some provided rules).
This article is the first part of a series on how to properly configure a production ready Elastic BeanStalk environment for a Java/Spring Boot application.
Table of Contents
- The application
- Packaging the application
- AWS Elastic BeanStalk environment
- Load Balancer and Auto Scaling Group configuration
- System configuration
- Nginx configuration
- Procfile
- Logging
- EBS Volumes tagging
- Rolling and Deployment updates Policy
- Conclusion
All the source code presented in this article is available in a Github repository.
Other articles of the AWS Elastic BeanStalk series
- Handling secrets with AWS Elastic BeanStalk
- AWS Elastic Beanstalk Blue/Green deployment with Ansible
- Always deploying the latest AWS Elastic Beanstalk Solution Stack
The application
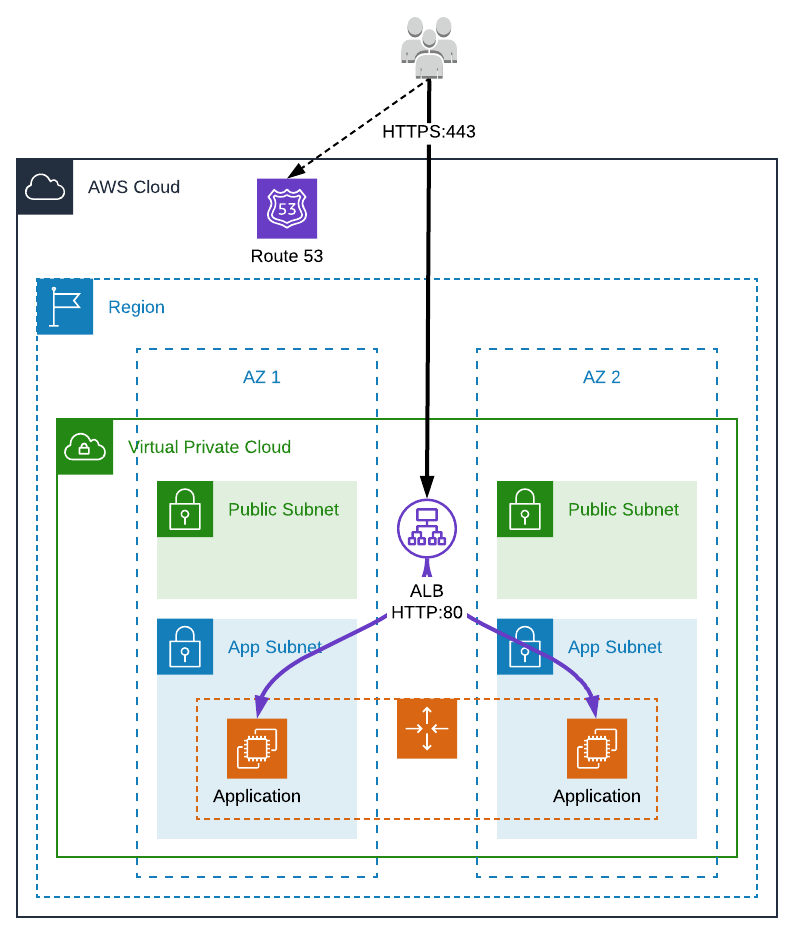
We are going to start with a very simple infrastructure, an AWS internet facing Application Load Balancer (ALB) listening to the HTTPS port only (without any redirection from the port 80 to 443) in front of an EC2 (managed by AWS Elastic BeanStalk) in a private subnet.
For the purpose of this article, the application does not need any bells and whistles, a simple Hello World Spring Boot application will be quite enough.
First, we define few dependencies in our pom.xml
1
2
3
4
5
6
7
8
9
10
11
12
13
14
15
16
<parent>
  <groupId>org.springframework.boot</groupId>
  <artifactId>spring-boot-starter-parent</artifactId>
  <version>2.4.1</version>
</parent>

<dependencies>
  <dependency>
    <groupId>org.springframework.boot</groupId>
    <artifactId>spring-boot-starter-web</artifactId>
  </dependency>
  <dependency>
    <groupId>org.springframework.boot</groupId>
    <artifactId>spring-boot-starter-actuator</artifactId>
  </dependency>
</dependencies>
And then we can add few classes: Application.java and HelloController.java
1
2
3
4
5
6
7
8
9
10
11
12
13
@RestController
@RequestMapping("/v1")
public class HelloController {

    private static final Logger LOGGER =
      LoggerFactory.getLogger(HelloController.class);

    @RequestMapping(path = "/hello", method = RequestMethod.GET)
    public Response health() {
        LOGGER.info("GET /v1/hello");
        return new Response(200, "OK");
    }
}
We can build and run the application locally:
1
2
$ mvn clean package
$ java -jar eb-springboot-demo-1.0.0-SNAPSHOT.jar
Then in a browser we can test:
Packaging the application
The generated JAR could be directly used by Elastic Beanstalk. But we want to be able to configure the environment to our liking, therefore we need to create a ZIP file, containing:
- the JAR of the application
- a logback.xml file
- a Procfile
- a .ebextensions folder
- a .platform folder
To do so we can use maven-assembly-plugin:
1
2
3
4
5
6
7
8
9
10
11
12
13
14
15
16
17
18
19
<plugin>
  <artifactId>maven-assembly-plugin</artifactId>
  <executions>
    <execution>
      <id>build-zip</id>
      <phase>package</phase>
      <goals>
        <goal>single</goal>
      </goals>
    </execution>
  </executions>
  <configuration>
    <finalName>eb-Spring Boot</finalName>
    <appendAssemblyId>false</appendAssemblyId>
    <descriptors>
      <descriptor>src/main/assembly/zip.xml</descriptor>
    </descriptors>
  </configuration>
</plugin>
Then create a folder src/main/assembly/package/ with all the folders and files described above.
And finally create the file src/main/assembly/zip.xml
1
2
3
4
5
6
7
8
9
10
11
12
13
14
15
16
17
18
19
20
21
<assembly [...]>
  <id>zip</id>
  <formats>
    <format>zip</format>
  </formats>
  <includeBaseDirectory>false</includeBaseDirectory>
  <files>
    <file>
      <source>${project.build.directory}/${project.artifactId}-${project.version}.jar</source>
      <outputDirectory>.</outputDirectory>
      <destName>eb-Spring Boot.jar</destName>
    </file>
  </files>
  <fileSets>
    <fileSet>
      <directory>src/main/assembly/package</directory>
      <filtered>false</filtered>
      <outputDirectory>.</outputDirectory>
    </fileSet>
  </fileSets>
</assembly>
Executing the command mvn package will create a zip file named eb-springboot.zip containing a JAR eb-springboot.jar and everything contained in the folder src/main/assembly/package.
AWS Elastic BeanStalk environment
AWS Elastic BeanStalk environment can be configured using AWS CloudFormation. In our example we are going to create the following resources (see. backend.cfn.yml):
- AWS::ElasticBeanstalk::Application - Creates an Elastic BeanStalk application with a name and a Service Role which has the permissions to create resources for us and execute Health Checks
- AWS::ElasticBeanstalk::ConfigurationTemplate - Defines how to configure an Elastic BeanStalk environment
- AWS::ElasticBeanstalk::ApplicationVersion - Links the
Applicationand a package stored in an AWS S3 Bucket - AWS::ElasticBeanstalk::Environment - The actual environment, linking the
Application,ConfigurationTemplateandApplicationVersion, and creating the required AWS resources. When an Elastic BeanStalk environment is created, options in the Configuration Template and the configuration defined in the package are used to generate a CloudFormation template (in JSON) and a new stack is created. This template contains resources to create:- a Security Group attached to the EC2 instances
- a Load Balancer
- one or more Target Groups
- one or more Listeners
- an Auto Scaling Group (extremely complicated to handle Elastic BeanStalk deployment workflow)
- an EC2 Launch Template
- Some AWS CloudWatch Alarms for scaling
Most of an Elastic BeanStalk environment configuration is done through options. And there are quite a lot. Let’s see few of them.
Health Checks
We can define two kinds of Health checks:
- One for Elastic BeanStalk
1
2
3
- Namespace: aws:elasticbeanstalk:application
  OptionName: Application Healthcheck URL
  Value: HTTP:80/actuator/health
- One for the Target Group
1
2
3
4
5
6
- Namespace: aws:elasticbeanstalk:environment:process:default
  OptionName: HealthCheckPath
  Value: /actuator/health
- Namespace: aws:elasticbeanstalk:environment:process:default
  OptionName: MatcherHTTPCode
  Value: 200
Server Port
By default, AWS Elastic Beanstalk setup an Nginx HTTP server in front of our Java application, listening to the port 80 and forwarding the requests to the port 5000. On the other hand, Spring Boot, by default listen to the port 8080. Therefore, we need to change this configuration.
Let’s first see how to change the configuration on Spring Boot side. With Spring Boot the listening port can be configured with the property server.port, that can be defined in the application.properties file or with the environment variable SERVER_PORT. In Elastic BeanStalk, environment variables can be set with the namespace: aws:elasticbeanstalk:application:environment:
1
2
3
Namespace: aws:elasticbeanstalk:application:environment
OptionName: SERVER_PORT
Value: 5000
EC2 Key Pair
If the option EC2KeyName is set, an ingress Rule will be created in the application Security Group to allow SSH access (port 22) from the world (0.0.0.0/0).
1
2
3
Namespace: aws:autoscaling:launchconfiguration
OptionName: EC2KeyName
Value: xxx
Of course, this should be avoided for obvious security reasons. Moreover, if we need to login to the server, Elastic BeanStalk using Amazon Linux 2 with SSM Manager agent already installed, we can use AWS Systems Manager Session Manager
Managed updates
Of of the main reasons to use Elastic BeanStalk are the managed updates. They can be configured this way:
1
2
3
4
5
6
7
8
9
- Namespace: aws:elasticbeanstalk:managedactions
  OptionName: ManagedActionsEnabled
  Value: true
- Namespace: aws:elasticbeanstalk:managedactions
  OptionName: PreferredStartTime
  Value: Sun:02:00
- Namespace: aws:elasticbeanstalk:managedactions
  OptionName: ServiceRoleForManagedUpdates
  Value: !Ref ElasticBeanstalkServiceRole
Load Balancer and Auto Scaling Group configuration
By default Elastic BeanStalk creates a Listener on the port 80, even if we don’t need one. To override this behavior we need to add the following line in a configuration file: AWSEBV2LoadBalancerListener: { "CmpFn::Remove" : {} }.
The public ALB being in front of our backend, it is usually a good practice to secure it, either by using a WAF or putting it behind a CloudFront distribution. As we have already seen it the article Protecting an AWS ALB behind an AWS Cloudfront Distribution, the easiest way is to have a default Action returning a fixed 403 (forbidden) action and to set a secured header shared between the CloudFront Distribution and the ALB.
1
2
3
4
5
6
7
8
9
10
11
12
13
14
15
16
17
18
19
20
21
22
23
24
25
26
27
28
29
30
  AWSEBV2LoadBalancerListener443:
    Type: AWS::ElasticLoadBalancingV2::Listener
    Properties:
      LoadBalancerArn:
        Ref: AWSEBV2LoadBalancer
      Port: 443
      Protocol: HTTPS
      DefaultActions:
        - Type: fixed-response
          FixedResponseConfig:
            StatusCode: 403
      Certificates:
        - CertificateArn: This property must be defined, but can be any value here (real value in main CFN template)

  AWSEBV2LoadBalancerListener443default:
    Type: AWS::ElasticLoadBalancingV2::ListenerRule
    Properties:
      Actions:
        - Type: forward
          TargetGroupArn:
            Ref: AWSEBV2LoadBalancerTargetGroup
      Conditions:
        - Field: http-header
          HttpHeaderConfig:
            HttpHeaderName: x-com-token
            Values:
              - 0123456789
      ListenerArn:
        Ref: AWSEBV2LoadBalancerListener443
      Priority: 1
In this example the secured header being x-com-token with the value 0123456789.
Moreover, by default, the Auto Scaling Group Health Check Type is EC2 and therefore does not use the health check status of the Target Group it is associated with. Which means that if the instance is up, but the health check is failing, the instance will not be replaced.
We again have to resort to an Elastic BeanStalk Custom Resource (00-config-eb.config):
1
2
3
4
AWSEBAutoScalingGroup:
  Type: AWS::AutoScaling::AutoScalingGroup
  Properties:
    HealthCheckType: ELB
System configuration
Sometimes we need to add some tools to the server or change the configuration like the Time Zone. This can easily be done using a configuration file:
1
2
3
4
5
6
7
8
9
10
packages:
  yum:
    unzip: []
    jq: []
  python:
    boto3: []

commands:
  O1_set_timezone:
    command: ln -f -s /usr/share/zoneinfo/Europe/Brussels /etc/localtime
Nginx configuration
We can have a custom Nginx configuration for various reasons: modifying the logs format, increasing the client_max_body_size, using Spring Boot default port, securing our application, etc.
To have a custom Nginx configuration we need to create two files:
With this configuration we want to:
- forward requests to the port 8080
- disable root access (
/) by returning a 404 error - define two
locationdirectives:/actuator/health^/api/(.*)$
This way, with a CloudFront distribution in front of the ALB we can secure the /actuator/health endpoint, only forwarding requests with the path /api/* to the ALB.
1
2
3
4
5
6
7
location /actuator/health {
    proxy_pass          http://127.0.0.1:8080;
}

location ~ ^/api/(.*)$ {
    proxy_pass          http://127.0.0.1:8080/$1$is_args$args;
}
Furthermore, in a usual Nginx configuration, the file 00_application.conf would be completely useless. The content could be added to the nginx.conf file. Unfortunately, Elastic BeanStalk generates a default 00_application.conf file which would be included with the directive include conf.d/elasticbeanstalk/*.conf; and then collide with our location /.
Procfile
To use a custom logging configuration file passed to the JVM (or any JVM option), we need to use a file named Procfile at the root of our bundle.
This file, if present, must at least contain the command to start our application preceded by web:
1
web: java -jar -Xms2g -Xmx2g eb-springboot.jar --logging.config=logback.xml
The logback.xml file being at the root of the bundle as-well.
One main issue with the Procfile is that we cannot use environment variables inside and therefore we need to resort to some tricks, like creating a start.sh file, which can use environment variables to configure the -Xms and -Xmx options depending on the instance type for example.
Logging
With the Procfile we now have a new log file (/var/log/eb-springboot/spring.log) but this file if not streamed to AWS CloudWatch or part of Elastic BeanStalk Logs Bundle. Once again we need to add a custom configuration:
1
2
3
4
5
6
7
8
9
10
11
12
13
14
15
16
17
18
19
20
21
22
23
24
25
26
27
28
29
30
31
32
33
34
35
36
37
38
39
40
41
42
43
44
45
46
47
48
49
50
51
52
53
54
55
56
57
58
59
60
61
packages:
  yum:
    awslogs: []

commands:
  00_create_folders:
    command: /home/ec2-user/create_logs_folders.sh
  01_enable_awslogsd_service:
    command: systemctl enable awslogsd.service
  02_restart_awslogsd_service:
    command: systemctl restart awslogsd

files:
  "/home/ec2-user/create_logs_folders.sh":
    mode: "000755"
    owner: root
    group: root
    content: |
      #!/bin/bash

      echo "Creating Logs directory"
      mkdir /var/log/eb-springboot
      chmod 755 /var/log/eb-springboot
      chown webapp:webapp /var/log/eb-springboot

  "/opt/elasticbeanstalk/tasks/bundlelogs.d/eb-springboot.conf" :
    mode: "000755"
    owner: root
    group: root
    content: |
      /var/log/eb-springboot/*

  "/etc/awslogs/awscli.conf" :
    mode: "000600"
    owner: root
    group: root
    content: |
      [plugins]
      cwlogs = cwlogs
      [default]
      region = `{"Ref":"AWS::Region"}`

  "/etc/awslogs/awslogs.conf" :
    mode: "000600"
    owner: root
    group: root
    content: |
      [general]
      state_file = /var/lib/awslogs/agent-state

  "/etc/awslogs/config/logs.conf" :
    mode: "000600"
    owner: root
    group: root
    content: |
      [/var/log/eb-springboot/spring.log]
      log_group_name = `{"Fn::Join":["/", ["/aws/elasticbeanstalk", { "Ref":"AWSEBEnvironmentName" }, "var/log/eb-springboot/spring.log"]]}`
      log_stream_name = {instance_id}
      datetime_format = %Y-%m-%d %H:%M:%S,%f
      multi_line_start_pattern = {datetime_format}
      file = /var/log/eb-springboot/spring.log
EBS Volumes tagging
Volumes attached to the EC2 instances launched by the Auto Scaling Group managed by Elastic BeanStalk cannot be tagged with options, which is a real issue for resource tracking and monitoring. To fix this problem we must resort to use a script which will be executed during the instance provisioning. The following Python script retrieves all the tags present on the current EC2 instance and copy them to all the attached volumes.
1
2
3
4
5
6
7
8
9
10
11
12
13
14
15
16
17
18
19
20
21
22
23
24
25
26
27
28
29
30
31
32
33
34
35
36
37
38
commands:
  01_tag_volumes:
    command: /home/ec2-user/tag-volumes.py

files:
  "/home/ec2-user/tag-volumes.py":
    mode: "000755"
    owner: root
    group: root
    content: |
      #!/usr/bin/env python

      from __future__ import print_function
      import boto3
      import json
      import urllib2

      ec2_document = urllib2.urlopen('http://169.254.169.254/latest/dynamic/instance-identity/document').read()
      aws_region = json.loads(ec2_document)['region']
      instance_id = urllib2.urlopen('http://169.254.169.254/latest/meta-data/instance-id').read()

      print('region: ' + aws_region)
      print('instance_id: ' + instance_id)

      ec2_client = boto3.client('ec2', region_name=aws_region)

      ec_instances = ec2_client.describe_instances(InstanceIds=[instance_id])
      instance = ec_instances['Reservations'][0]['Instances'][0]
      volumes = instance['BlockDeviceMappings']
      tags = instance['Tags']

      tags_to_copy = []
      for tag in tags:
        if not tag['Key'].startswith('aws:'):
          tags_to_copy.append(tag)

      for volume in volumes:
        ec2_client.create_tags(Resources=[volume['Ebs']['VolumeId']], Tags=tags_to_copy)
Rolling and Deployment updates Policy
Before concluding, it is worth mentioning that any update type other than Immutable should be considered an extremely bad practice when heavily customizing an Elastic BeanStalk environment (like we just did).
1
2
3
4
5
6
- Namespace: aws:autoscaling:updatepolicy:rollingupdate
  OptionName: RollingUpdateType
  Value: Immutable
- Namespace: aws:elasticbeanstalk:command
  OptionName: DeploymentPolicy
  Value: Immutable
This statement can easily be illustrated with a single command. Imagine that in one deployment we do chmod 777 /var/log/myfolder and in in the next one we remove it. With a rolling update policy, the folder /var/log/myfolder will still have the 777 permissions.
The same applies if one of our team members decides to login to an instance in production, does some modifications to “make it work”. It will work for the time being, but once we will redeploy the application or a managed update is executed (reminder: managed updates are immutable deployments) it will not work anymore.
Of course, Immutable deployments add more complexity as we cannot update the application and the infrastructure at the same time, the only solution we have is to use a Blue/Green deployment mechanism.
Conclusion
With this article we have seen the complexity of configuring AWS Elastic Beanstalk at any layer. To which we can add the complexity of the difference between each Platform. Something that works with the PHP Platform might not work with the Java one.
Once everything is setup correctly, AWS Elastic Beanstalk is great. But this setup can be time consuming and going this way should be considered carefully.