
Yohan Beschi
Developer, Cloud Architect and DevOps Advocate
AWS Elastic Beanstalk Blue/Green deployment with Ansible
To overcome AWS Elastic BeanStalk Immutable update limitations, we do not have any other choice than setting up a CI/CD pipeline with a Custom Blue/Green deployment, as AWS does not offer anything out of the box to do this.
But for once, everything is quite straight forward:
- Found out which color (Blue or Green) is currently deployed
- Create a new Elastic BeanStalk environment of the other color
- Run some Smoke Tests to see if everything is working fine with the new environment
- Switch the DNS from one environment to the other
- Delete the old environment
To help us orchestrate this, we are going to use Ansible alongside AWS CodePipeline and AWS CodeBuild.
Table of Contents
- Blue/Green deployments
- Splitting up the AWS CloudFormation template
- Ansible Playbook
- Logs
- Secured header
- CI/CD Pipeline
- Conclusion
We will start with the application and infrastructure described in the previous articles Spring Boot in AWS Elastic Beanstalk with AWS CloudFormation and Handling secrets with AWS Elastic BeanStalk.
All the source code presented in this article is available in a Github repository.
Other articles of the AWS Elastic BeanStalk series
- Spring Boot in AWS Elastic Beanstalk with AWS CloudFormation
- Handling secrets with AWS Elastic BeanStalk
- Always deploying the latest AWS Elastic Beanstalk Solution Stack
Blue/Green deployments
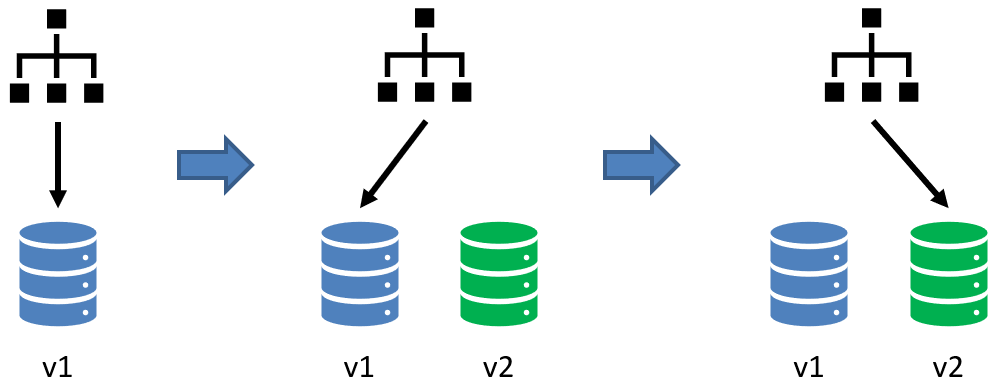
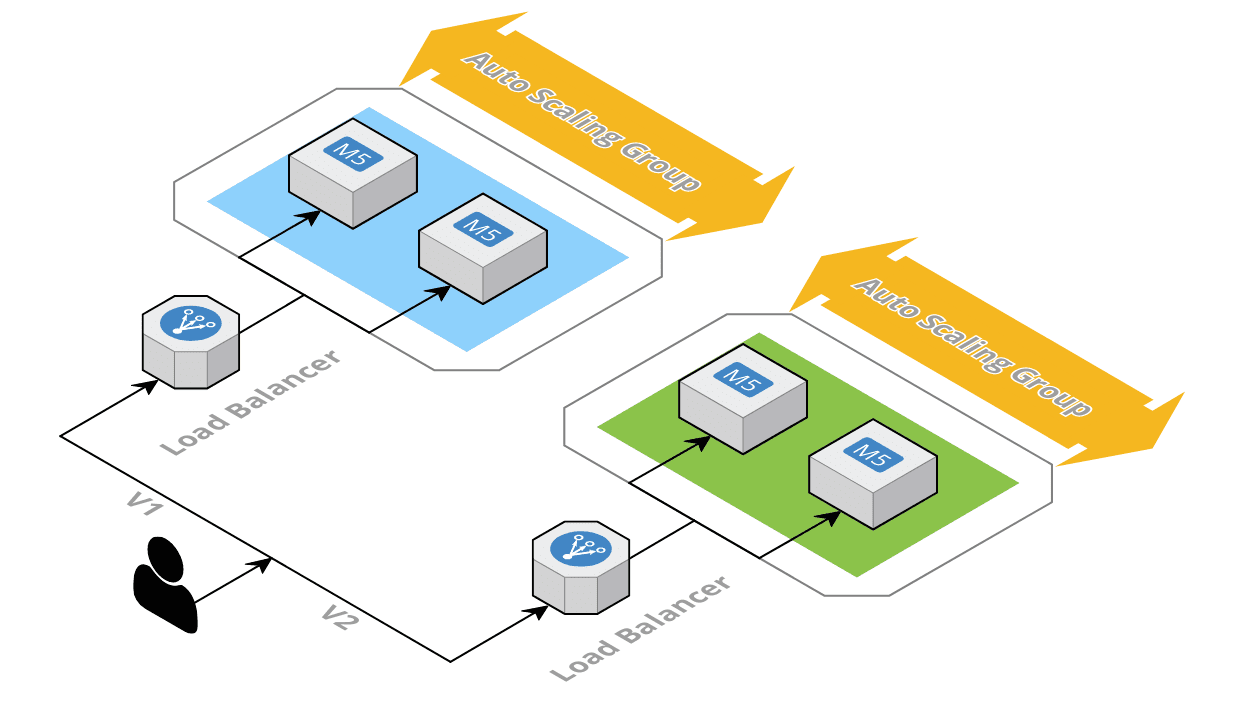
When a new release is available, a new set of servers is created with the new version of the application. The old (blue) and the new (green) servers are running until we make sure that the new version is working as expected and that we can switch the DNS (or anything that can reproduce this mechanism).
For slow application release models (e.g. applications released at most once a week), the old servers can still run for a few days after the DNS switch. If we realize after some time that the new version is not working properly, we can switch back the DNS easily.
With Blue/Green deployments we access either the blue environment or the green one, not both with some kind of weighted routing (at least from the main domain name). To route only few users to the new version and all the other ones to the old version we need to use Canary deployments.
Splitting up the AWS CloudFormation template
From our previous articles we have a single AWS CloudFormation template to create all the resources needed for an AWS Elastic BeanStalk environment. This template contains:
- A Service Role for Elastic BeanStalk
- A Role and an Instance Profile for the EC2 instances
- A Security Group for the Application Load balancer
- Few Elastic BeanStalk resources
- A DNS Record to have a custom DNS
But with Blue/Green deployment we do not want to create all the resources all the time. Because 1) they take time to be created and 2) it is not really useful. Furthermore, the DNS record should be part of a different stack to be able to switch between Elastic BeanStalk environments.
Therefore, we can create:
- a template for the Roles, Instance Profile and Security Group (backend-common.cfn.yml)
- a template with only Elastic BeanStalk resources (backend-eb.cfn.yml)
- a template to manage the DNS record (backend-dns.cfn.yml)
To share IDs, ARNs, etc. between stacks we can use AWS SSM Parameter Store.
1
2
3
4
5
6
7
8
9
10
11
12
13
14
15
16
17
18
19
20
21
22
23
24
25
26
27
28
29
30
31
32
33
34
35
36
37
# backend-common.cfn.yml
[...]
Parameter:
  SsmBackendAlbSecurityGroupIdKey:
    Type: String
    Default: /cfn/backend/ec2/sg/alb/id

Resources:
  AlbSecurityGroup:
    Type: AWS::EC2::SecurityGroup
    Properties:
      GroupName: !Sub ${AccountCode}-${RegionCode}-${Application}-${ServerType}-alb-eb
      GroupDescription: Allows access to the Backend ALB
      VpcId: !Ref SsmVpcIdKey
      SecurityGroupIngress:
        - CidrIp: 0.0.0.0/0
          IpProtocol: tcp
          FromPort: 443
          ToPort: 443
          Description: Allow Connection from the World
      Tags:
        - Key: Name
          Value: !Sub ${AccountCode}-${RegionCode}-${Application}-${ServerType}-alb-eb

  SsmBackendAlbSecurityGroupId:
    Type: AWS::SSM::Parameter
    Properties:
      Type: String
      Name: !Ref SsmBackendAlbSecurityGroupIdKey
      Value: !Ref AlbSecurityGroup

# backend-eb.cfn.yml
Parameters:
  SsmBackendAlbSecurityGroupIdKey:
    Type: AWS::SSM::Parameter::Value<String>
    Default: /cfn/backend/ec2/sg/alb/id
We won’t go into any further details as it’s only a matter of moving things around.
Ansible Playbook
Now that we have our three templates, it is time to orchestrate the deployment.
All the concepts used next are described in detail in the article CloudFormation with Ansible.
The backend-common.cfn.yml stack deployment not being part of the Blue/Green deployment we will skip the explanation.
First, we need to found out which color (Blue or Green) is currently deployed. The state will be stored in SSM Parameter Store (for the first deployment a parameter must be created manually, Key: /cicd/deploy/color, Value: blue).
1
2
3
4
5
6
- name: Get values from SSM Parameter Store
  ansible.builtin.set_fact:
    cicd_deploy_color: "{{ lookup( 'aws_ssm',
                           '/cicd/deploy/color',
                           region=default_aws_region,
                           aws_profile=pbk_account_name ) }}"
Then we are going to compute two variables. One to hold the new color and another to hold the new Elastic BeanStalk environment endpoint URL:
1
2
3
4
5
6
7
8
9
10
- name: Blue/Green Deployment variables
  ansible.builtin.set_fact:
    new_deploy_color:
      "{{ 'blue'
          if cicd_deploy_color == 'green'
          else 'green' }}"
    new_ssm_backend_eb_endpoint_url_key:
      "{{ '/cfn/backend/eb/endpointUrl/blue'
          if new_deploy_color == 'blue'
          else '/cfn/backend/eb/endpointUrl/green' }}"
Using two different parameters (/cfn/backend/eb/endpointUrl/blue and /cfn/backend/eb/endpointUrl/green) is not mandatory, but it could be useful if we want to switch back the DNS to the old Elastic BeanStalk environment.
Next, we can create the stack for the new Elastic BeanStalk environment.
1
2
3
4
5
6
7
8
9
10
11
12
13
14
15
16
17
18
19
- name: "Deploy CloudFormation stack {{ local_stack_name }}"
  amazon.aws.cloudformation:
    stack_name: "{{ local_stack_name }}"
    state: present
    region: "{{ local_region_name }}"
    profile: "{{ pbk_account_name }}"
    template: "templates/backend-eb.cfn.yml"
    tags: "{{ local_aws_tags }}"
    template_parameters:
      [...]
  vars:
    local_region_name: "{{ default_aws_region }}"
    local_region_code: "{{ default_aws_region_code }}"
    local_stack_name: "{{ pbk_account_code }}-{{ local_region_code }}-{{ application }}-backend-{{ new_deploy_color }}"
    local_aws_tags:
      Application: "{{ application }}"
      ServerType: backend
      Environment: "{{ pbk_account_env }}"
      Name: "{{ local_stack_name }}"
The code above is similar to backend-common.cfn.yml stack deployment, the only thing noticeable is the stack name. With Blue/Green deployment we need to have two environments (Blue and Green) running at the same time, therefore two CloudFormation stacks, which could be strictly identical if we did not make any changes to the infrastructure, but with different names by appending the color to it (new_deploy_color).
Now we have two running Elastic BeanStalk environments, the custom DNS is still pointing to the old one. But before switching the DNS and removing the old environment, we need to make sure that the new environment is working fine.
As we are only listening on the HTTPS port, we cannot make an HTTP request using Elastic BeanStalk endpoint URL as we do not have a certificate for it. Therefore, we need to use a simple trick, by creating a DNS record <color>.example.com pointing to the endpoint URL (our certificate attached to the HTTPS listener must include both FQDNs or *.example.com, in addition to example.com):
1
2
3
4
5
6
7
8
9
10
DnsRecords:
  Type: AWS::Route53::RecordSetGroup
  Properties:
    HostedZoneId: !Ref PublicHostedZoneId
    RecordSets:
      - Name: !Sub ${Color}.${BackendDns}
        Type: A
        AliasTarget:
          DNSName: !GetAtt ElasticBeanstalkEnvironment.EndpointURL
          HostedZoneId: !Ref AlbHostedZoneId
In this example we have added this piece of code to the backend-eb.cfn.yml template. But it could be created in a separate stack and removed after we are done with the smoke tests.
Then we can create a python script (it does not have to be a Python script, it could be any kind of script or even a tool like Newman, SoapUI, JMeter, etc. provided that it is installed in the CodeBuild container) taking two parameters:
- the endpoint to test
- the security header value
1
2
3
4
5
6
7
8
9
10
11
12
13
14
15
16
17
18
19
20
21
22
23
24
25
26
27
28
29
30
31
32
33
34
35
#!/usr/bin/env python3

import json
import sys
import time
import urllib
import boto3

def main(retries, sleep):
  endpoint = sys.argv[1]
  secured_header = sys.argv[2]

  current_retry = 0
  ok = False
  while current_retry < retries:
    req =  urllib.request.Request(f'{endpoint}/api/v1/hello', method='GET')
    req.add_header('x-com-token', secured_header)

    try:
      with urllib.request.urlopen(req) as response:
        if response.getcode() == 200:
          ok = True

      break
    except:
      pass # do nothing

    current_retry += 1
    time.sleep(sleep)

    if not ok:
      exit(1)

if __name__ == "__main__":
  main(10, 30) # 10 retries, sleeps 30s between retries
As it is only an example, this script does not do much. We are only testing that a request to https://<color>.example.com/api/v1/hello returns the status code 200.
Moreover, as the CloudFormation stack deployment can end in success before the Elastic BeanStalk Environment has been fully initialized, we have added a loop with 10 retries and a 30 second sleep between each retry.
This script is called from Ansible:
1
2
3
4
5
- name: "Run Smoke Tests"
  ansible.builtin.script: >-
    scripts/smoke_test.py
    https://{{new_deploy_color}}.{{pbk_account.backend_dns}}
    {{ pbk_account.backend_secured_header }}
If the smoke tests end in success, we can switch our main DNS (example.com) to the new Elastic BeanStalk environment, otherwise the Playbook execution fails, and the failing environment is left untouched for debugging purposes. It is worth mentioning that if the Target Group health check is failing, with our Auto Scaling Group configuration with Health Type ELB, EC2 instances will continuously be launched and terminated. To avoid this, the easiest solution is to change the Auto Scaling Group Health Type to EC2 (manually) during the debugging phase. And once we are done, we need to manually remove the failing stack.
1
2
3
4
5
6
7
8
9
10
11
12
13
14
15
16
17
18
19
20
21
22
- name: "Deploy CloudFormation stack {{ local_stack_name }}"
  amazon.aws.cloudformation:
    stack_name: "{{ local_stack_name }}"
    state: present
    region: "{{ local_region_name }}"
    profile: "{{ pbk_account_name }}"
    template: "templates/backend-dns.cfn.yml"
    tags: "{{ local_aws_tags }}"
    template_parameters:
      PublicHostedZoneId: "{{ public_hosted_zone_id }}"
      BackendDns: "{{ pbk_account.backend_dns }}"
      SsmBeanstalkEndpointUrlKey: "{{ new_ssm_backend_eb_endpoint_url_key }}"
      AlbHostedZoneId: "{{ aws_config[local_region_name].alb_hz_id }}"
  vars:
    local_region_name: "{{ default_aws_region }}"
    local_region_code: "{{ default_aws_region_code }}"
    local_stack_name: "{{ pbk_account_code }}-{{ local_region_code }}-{{ application }}-backend-dns"
    local_aws_tags:
      Application: "{{ application }}"
      ServerType: backend
      Environment: "{{ pbk_account_env }}"
      Name: "{{ local_stack_name }}"
Finally, we update the current deployment color in SSM Parameter store and remove the old environment.
1
2
3
4
5
6
7
8
9
10
11
12
13
14
15
16
17
18
- name: "Put new color: <{{ new_deploy_color }}> in SSM Parameter Store"
  aws_ssm_parameter_store:
    name: "{{ ssm_cicd_deploy_color_key }}"
    value: "{{ new_deploy_color }}"
    region: "{{ default_aws_region }}"
    profile: "{{ pbk_account_name }}"

- name: "Delete CloudFormation stack {{ local_stack_name }}"
  amazon.aws.cloudformation:
    stack_name: "{{ local_stack_name }}"
    state: absent
    region: "{{ local_region_name }}"
    profile: "{{ pbk_account_name }}"
    template: "templates/backend-eb.cfn.yml"
  vars:
    local_region_name: "{{ default_aws_region }}"
    local_region_code: "{{ default_aws_region_code }}"
    local_stack_name: "{{ pbk_account_code }}-{{ local_region_code }}-{{ application }}-backend-{{ cicd_deploy_color }}"
Logs
Now we have an Ansible Playbook orchestrating Blue/Green deployments. Unfortunately, we have introduced a little issue with the AWS CloudWatch log groups.
When using the following options:
1
2
3
4
5
6
7
8
9
- Namespace: aws:elasticbeanstalk:cloudwatch:logs
  OptionName: StreamLogs
  Value: true
- Namespace: aws:elasticbeanstalk:cloudwatch:logs
  OptionName: DeleteOnTerminate
  Value: false
- Namespace: aws:elasticbeanstalk:cloudwatch:logs
  OptionName: RetentionInDays
  Value: 3
Elastic BeanStalk creates the appropriate log groups and configure everything to stream the logs from the EC2 instances to CloudWatch. By default, the log group names are prefixed by /aws/elasticbeanstalk/<environment_name>. But with Blue/Green deployments we have two Elastic BeanStalk environments and therefore, each log will we be split in two different log groups which is not what we want and unfortunately, we cannot customize this name.
The only way to solve this issue is to first disable the managed logs and manage them on our own.
Then, in our current logs configuration file in the .ebextensions folder we can add all the relevant log files we want to stream:
1
2
3
4
5
6
7
8
9
10
11
12
13
14
15
16
17
18
"/etc/awslogs/config/logs.conf" :
  mode: "000600"
  owner: root
  group: root
  content: |
    [/var/log/messages]
    log_group_name = /aws/elasticbeanstalk/eb-bluegreen/backend/var/log/messages
    log_stream_name = {instance_id}
    file = /var/log/messages

    [...]

    [/var/log/eb-bluegreen/spring.log]
    log_group_name = /aws/elasticbeanstalk/eb-bluegreen/backend/var/log/spring.log
    log_stream_name = {instance_id}
    datetime_format = %Y-%m-%d %H:%M:%S,%f
    multi_line_start_pattern = {datetime_format}
    file = /var/log/eb-bluegreen/spring.log
And finally in the backend-common.cfn.yml CloudFormation template we can create all the log groups to configure the retention period:
1
2
3
4
5
6
7
8
9
10
11
12
13
LogGroupMessages:
  Type: AWS::Logs::LogGroup
  Properties:
    RetentionInDays: 60
    LogGroupName: /aws/elasticbeanstalk/eb-bluegreen/backend/var/log/messages

[...]

LogGroupDemoSpring:
  Type: AWS::Logs::LogGroup
  Properties:
    RetentionInDays: 60
    LogGroupName: /aws/elasticbeanstalk/eb-bluegreen/backend/var/log/spring.log
Now all the log groups prefix will be /aws/elasticbeanstalk/eb-bluegreen/backend/var/log no matter which color we are deploying.
Before closing this topic, and for completness sake, it is worth noting that environment-health.log logs are managed a little differently so we cannot do the same as before for them. But as their usefulness is questionable, we will not do anything about it.
Secured header
Application Load Balancers should not be directly accessible from the internet, but behind an AWS CloudFront distribution instead, to leverage the DDoS mitigation offered out of the box by the service, even without using any caching mechanism. Unfortunately, CloudFront origins must be publicly accessible. We have already discussed ALB security multiple times (Protecting an AWS ALB behind an AWS Cloudfront Distribution and Spring Boot in AWS Elastic Beanstalk with AWS CloudFormation). The easiest way to secure an ALB is to use a secret header, much like an API Key shared between CloudFront and API Gateway and in principle everything is quite easy to setup. But once again we have to work around CloudFormation and Elastic BeanStalk limitations. With CloudFormation SSM SecureStrings can only be used with a handful of resources and Elastic BeanStalk managed ALB listeners are not part of them. Furthermore, Elastic BeanStalk Custom Resources (the ALB listener in this case) have a limited way of using external parameter. Therefore, we must make some awful concessions.
Until now, the secret header was hardcoded in the file 00-config-eb.config. So, we need at least a way to easily change it and use a different value for each of our environment.
The concession will be to commit the secret into our VCS, passing it to the backend-eb.cfn.yml CloudFormation template from our main.yml Ansible template and creating a custom option which will be stored in clear text by Elastic BeanStalk. For a little more security we could store the values in SSM Parameter Store as simple Strings, but we would have to indicate the version we want to use ('{{resolve:ssm:parameter-name:version}}') which will make things more complicated for a very small improvement:
1
2
3
- Namespace: aws:elasticbeanstalk:customoption
  OptionName: HeaderXSecurityToken
  Value: !Ref SecurityToken
The last step is to use this Custom Option in the configuration file:
1
2
3
4
5
6
7
8
9
10
11
12
13
14
15
16
17
18
AWSEBV2LoadBalancerListener443default:
  Type: AWS::ElasticLoadBalancingV2::ListenerRule
  Properties:
    Actions:
      - Type: forward
        TargetGroupArn:
          Ref: AWSEBV2LoadBalancerTargetGroup
    Conditions:
      - Field: http-header
        HttpHeaderConfig:
          HttpHeaderName: x-com-token
          Values:
            - Fn::GetOptionSetting:
                OptionName: HeaderXSecurityToken
                DefaultValue: xxxxxxxxx
    ListenerArn:
      Ref: AWSEBV2LoadBalancerListener443
    Priority: 1
CI/CD Pipeline
The code related to the two previous Elastic BeanStalk articles already contain a CI/CD pipeline using AWS CodePipeline and AWS CodeBuild. It is time to have an in-depth look at it.
But before we start, let’s mention that as it’s only a demo, we are using only one AWS Account and one CodeBuild Project to build and deploy our application.
For a real project, things will be quite different. First, we would have an AWS account for each environment (Development, Staging, UAT, Production, etc.) and a central AWS Account which would have an S3 bucket to store the FAT JAR (built once and used in each environment), an AWS CodePipeline pipeline and multiple CodeBuid projects (one to build the FAT JAR and one for each environment to deploy the application). Moreover, in order to deploy the application from the central AWS account to environment AWS accounts we would have to create a role in each of these accounts and give the permission to CodeBuild to assume them.
Let’s start with the buildspec.yml file at the root of our application repository and used by AWS CodeBuild.
To build our application we need Java 11 and Maven (both already present in the aws/codebuild/amazonlinux2-x86_64-standard:3.0 image), and to deploy it, Python 3, Ansible and boto3.
1
2
3
4
5
6
7
8
9
runtime-versions:
  python: 3.8
  java: corretto11
commands:
  - pip install --upgrade pip
  - pip --version
  - pip install awscli --upgrade --user
  - pip install boto3 --upgrade
  - pip install ansible --upgrade
Then, to deploy our CloudFormation templates with Ansible and a IAM profile, we need to configure this profile in the container (the Role ARN is passed to the container with an environment variable through AWS CodeBuild configuration).
1
2
3
4
pre_build:
  commands:
    - aws configure set profile.spikeseed-labs.credential_source EcsContainer
    - aws configure set profile.spikeseed-labs.role_arn $ROLE_ARN
Finally, we can:
- build our FAT JAR
- push it to S3
- create a parameter in SSM Parameter Store which will hold the package key in S3
- execute our Ansible Playbook
1
2
3
4
5
6
7
8
9
10
11
12
13
14
15
16
17
18
19
20
21
build:
  commands:
    # Build
    - mvn package

    # Push to S3
    - UUID=$CODEBUILD_RESOLVED_SOURCE_VERSION-$(date "+%Y%m%d%H%M%S")
    - S3_KEY=backend/eb-bluegreen-$UUID.zip
    - echo "s3://$ASSETS_BUCKET_NAME/$S3_KEY"
    - |-
      aws s3 cp --quiet \
        target/eb-bluegreen.zip \
        s3://$ASSETS_BUCKET_NAME/$S3_KEY
    - |-
      aws ssm put-parameter \
        --name /eb-bluegreen/eb/backend/s3key \
        --value $S3_KEY --type String \
        --overwrite --profile spikeseed-labs

    # Deploy
    - ansible-playbook aws/main.asb.yml
The CI/CD pipeline is composed of:
- An S3 bucket which will hold AWS CodePipeline and AWS CodeBuild artifacts
- An AWS CodeBuild Project using an Amazon Linux 2 image
aws/codebuild/amazonlinux2-x86_64-standard:3.0and with two environment variables:- ASSETS_BUCKET_NAME: The S3 Bucket where the FAT JAR must be pushed
- ROLE_ARN: The role to be used by Ansible
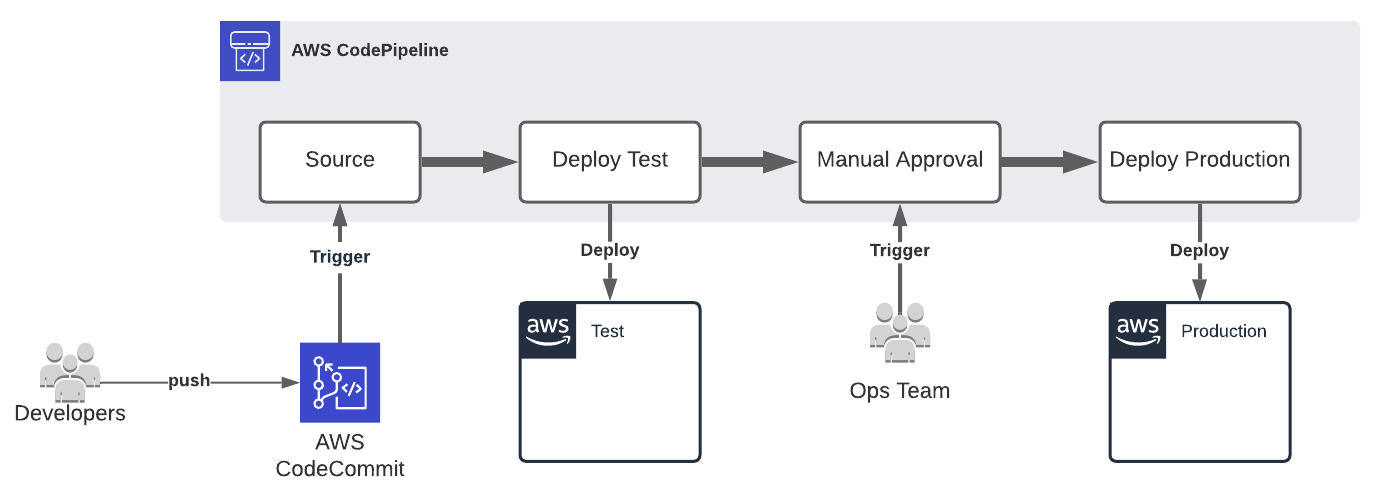
- An AWS CodePipeline Pipeline with a CodeCommit Source Stage followed by a Build Stage using the CodeBuild Project defined previously
- A CodePipeline Service Role to allow CodePipeline:
- to push objects into the artifacts S3 bucket
- to start CodeBuild builds
- to pull code from CodeCommit
- A CodeBuild Service Role to allow CodeBuild:
- to create log groups and log stream, and to push logs into CloudWatch
- to get objects from the artifacts S3 bucket
- to push objects into the assets S3 bucket
- A Role to be used by Ansible to allow Ansible to execute our playbook. To do so, a lot of permissions must be given to Ansible, and in our case, way too much, which is not following the Principle of Least Privilege and therefore can be very risky, like using
iam:*. For this example, this risk is acceptable, but we will see in an upcoming article how we can fix this.
Conclusion
In this end, setting up a Blue/Green CI/CD pipeline for Elastic BeanStalk, is not as easy as configuring an Auto Scaling Group Update Policy, which to be fair does not exactly match the Blue/Green deployment definition. And as a matter of fact, except for AWS Lambda, any Blue/Green Deployment on AWS requires a custom configuration, even for pure EC2 instances.
Before, concluding, it’s important to note that for a short period two Elastic BeanStalk environments will be up and running and therefore resources will be duplicated and we will be charged for them (mainly ALB and EC2 instances).
In September 2020, AWS introduces support for shared load balancers. Which means a Load Balancer that we manage and can be used by multiple Elastic BeanStalk environments or even multiple applications, to reduce the costs. But even if we manage the Load Balancer, we have even less control over the Listener Rules. By default, Elastic BeanStalk creates a Listerner Rule per environment routing the traffic the environment Target Group based on the Host header with the environment endpoint as the value. And even if we can add a custom domain in the rule, we cannot disable the Elastic BeanStalk one, and we cannot use Elastic BeanStalk Custom Resource to change the configuration (e.g. adding a custom HTTP Header condition like we did for the secured header).