
Yohan Beschi
Developer, Cloud Architect and DevOps Advocate
Provisioning EC2 instances with Ansible

While with Serverless architectures we leave the hassle of managing the underlying infrastructure of our applications to a third-party provider, with traditional architectures we have full control of our systems, down to the guest Operating System. Unfortunately, configuring an Operating System, keeping it up to date, installing softwares and so on, are tedious tasks.
We’ve already seen how to deploy Cloudformation templates using Ansible and create Golden AMIs. Now we will see how Ansible can help us provision EC2 instances easily and in clean way.
Table of Contents
- Golden AMIs
- A minimal example
- Ansible Roles
- Using Ansible Roles in an Ansible Playbook
- EC2 metadata and Tags
- Playbooks and Roles organization
- Variables
- Dynamic inventories
- Hosts pattern matching
- Third-party Softwares versions
- AWS CodeCommit Limitations
- Conclusion
Golden AMIs
In the article AMI factory with AWS we’ve seen how to build different kind of Golden AMIs using Packer, Ansible, CodePipeline and CodeBuild.
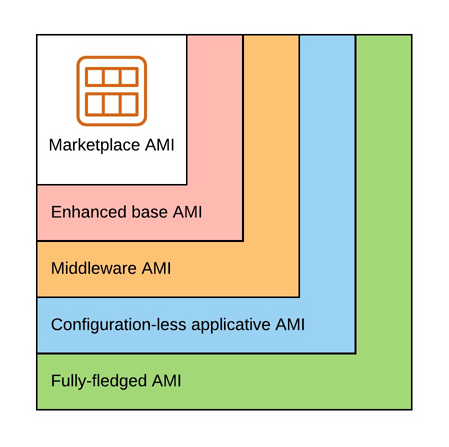
- Enhanced base AMI: minimal set of tools/configuration used by all our applications (configuration of a timezone, installation of AWS agents, etc.)
- Middleware AMI: everything up to the middleware (eg. HTTP Server, Web Application Server, etc.)
- Configuration-less applicative AMI: everything up to the application without the configuration
- Fully-fledged AMI: everything including the configuration
But it is only part of the story. In most cases we need to complete the installation/configuration of our application depending on the Golden AMI we use and this must be done in the user data of our EC2s.
A minimal example
Using a CentOS AMI from AWS Marketplace, let’s see how to use an Ansible playbook to install a simple web server.
Ansible works in 2 modes:
- remote - Ansible sends commands from a Machine A (containing the Ansible Playbooks and Roles) to a Machine B.
- local - the server to provision has all the Playbooks and Roles locally and therefore commands are executed locally.
The only - simple - way to use the remote mode in an automated fashion to provision EC2 instances is to use Ansible Tower, otherwise we need to use the local mode, which means that Playbooks and Roles must be downloaded from a remote repository (Github, CodeCommit, etc.) to the local server.
S3 could be used as-well to retrieve the Playbooks. Unfortunately, not being able to easily version a complete Playbook
without having to resort to an archive or the fact that ansible-galaxy cannot pull Roles from S3 are big issues. Therefore,
it is advised to store all Ansible artifacts into Git repositories as any other source code.
In order to clone a private Git repository, we need to use credentials (user/password or a private key) which will be retrieved from SSM Parameter Store or Secret Manager and copied on the OS in the user data. When using AWS CodeCommit we have another, more secured, option. With AWS CLI Credential Helper or even better git-remote-codecommit it is possible to use an AWS IAM Role, for example to restrict the use of AWS CodeCommit on an EC2 instance to only clone/pull the code from a repository .
git-remote-codecommit is a Python library allowing us to access CodeCommit repositories using the following URL format:
1
codecommit::${Region}://${Profile}@${RepositoryName}
where ${Profile} is a profile defined in the file ~/.aws/config:
1
2
3
4
[profile git-ansible]
region = eu-west-1
credential_source = Ec2InstanceMetadata
role_arn = arn:aws:iam::123456789:role/git-ansible-assumable-role
A git clone command can then be used (the region being defined in the profile it is not needed here):
1
git clone codecommit://git-ansible@ansible-demo
The IAM Role, named git-ansible-assumable-role previously, can be defined as follow:
1
2
3
4
5
6
7
8
9
10
11
12
13
14
15
16
17
18
19
20
GitAnsibleRole:
  Type: AWS::IAM::Role
  Properties:
    RoleName: git-ansible-assumable-role
    Path: /
    AssumeRolePolicyDocument:
      Version: 2012-10-17
      Statement:
        - Effect: Allow
          Principal:
            AWS: !Ref AwsPrincipals
          Action: sts:AssumeRole
    Policies:
      - PolicyName: git-ansible-assumable-role-policy
        PolicyDocument:
          Version: 2012-10-17
          Statement:
            - Effect: Allow
              Action: codecommit:GitPull
              Resource: !Sub arn:aws:codecommit:${RepositoriesRegion}:${AWS::AccountId}:demo-ansible*
Where AwsPrincipals is a list of AWS Accounts that will use the role (with the following format arn:aws:iam::${AWSAccountId}:root).
But this AWS IAM Role is not enough. To be able to use credential_source = Ec2InstanceMetadata and role_arn = arn:aws:iam::123456789:role/git-ansible-assumable-role, we need to authorize the EC2 Instance to assume the role. We can start by creating an IAM Managed Policy:
1
2
3
4
5
6
7
8
9
10
11
GitAnsiblePolicy:
  Type: AWS::IAM::ManagedPolicy
  Properties:
    ManagedPolicyName: git-ansible-policy
    Description: Allows the bearer to assume the git-ansible-assumable-role role
    PolicyDocument:
      Version: 2012-10-17
      Statement:
        - Effect: Allow
          Action: sts:AssumeRole
          Resource: !GetAtt GitAnsibleRole.Arn
This IAM Managed Policy can then be used in a IAM Role, which will be used in an Instance Profile:
1
2
3
4
5
6
7
8
9
10
11
12
13
14
15
16
17
18
19
20
21
22
  AppRole:
    Type: AWS::IAM::Role
    Properties:
      RoleName: ec2-demo-app-role
      Path: /
      AssumeRolePolicyDocument:
        Version: 2012-10-17
        Statement:
          - Effect: Allow
            Principal:
              Service: ec2.amazonaws.com
            Action: sts:AssumeRole
      ManagedPolicyArns:
        - !Ref GitAnsiblePolicyArn

  AppInstanceProfile:
    Type: AWS::IAM::InstanceProfile
    Properties:
      InstanceProfileName: demo-app-instance-profile
      Path: /
      Roles:
        - !Ref AppRole
Then we need an Ansible Playbook, a collection of tasks and/or roles (more on that later), that will be stored in a Git repository. It can be as simple as a single file:
1
2
3
4
5
6
7
8
9
10
11
12
13
14
15
16
17
18
19
20
21
22
---
- hosts: localhost

  task:
    - name: Enable nginx repo
      copy:
        dest: /etc/yum.repos.d/nginx.repo
        owner: root
        group: root
        mode: 0644
        content: |-
          [nginx]
          name=nginx repo
          baseurl=http://nginx.org/packages/mainline/centos/7/$basearch/
          gpgcheck=0
          enabled=1

    - name: Start nginx
      service:
        name: nginx
        state: started
        enabled: yes
Finally, to use Ansible locally on a new EC2 instance, we must install multiple tools in the user data before being able to execute the Playbook:
- AWS CLI
- pip (Python package manager) and few Python libraries
- Git
- Ansible
1
2
3
4
5
6
7
8
9
10
11
12
13
14
15
16
17
18
19
20
21
22
23
24
25
26
27
28
29
30
31
32
33
34
35
36
37
UserData:
  Fn::Base64:
    Fn::Sub: |
      #cloud-config
      output : { all : '| tee -a /var/log/cloud-init-output.log' }
      repo_update: true
      repo_upgrade: all
      runcmd:
        - [ sh, -c, "echo 'Deploying Demo Application'" ]

        - [ sh, -c, "echo 'Updating OS'" ]
        - yum update -y
        - yum install -y https://dl.fedoraproject.org/pub/epel/epel-release-latest-7.noarch.rpm
        - yum update -y
        - yum install -y git ansible unzip

        - [ sh, -c, "echo 'Installing AWS CLI v2'" ]
        - cd /tmp
        - curl https://awscli.amazonaws.com/awscli-exe-linux-x86_64.zip -o awscliv2.zip
        - unzip awscliv2.zip
        - ./aws/install

        - [ sh, -c, "echo 'Installing pip'" ]
        - curl https://bootstrap.pypa.io/get-pip.py -o get-pip.py
        - python get-pip.py
        - rm -f get-pip.py

        - [ sh, -c, "echo 'Installing Boto3 for ansible'" ]
        - pip install boto3 --upgrade

        - [ sh, -c, "echo 'Installing git-remote-codecommit'" ]
        - pip install git-remote-codecommit

        - [ sh, -c, "echo 'Configuring profile git-ansible'" ]
        - aws configure set profile.git-ansible.region ${AWS::Region}
        - aws configure set profile.git-ansible.credential_source Ec2InstanceMetadata
        - aws configure set profile.git-ansible.role_arn ${GitAnsibleRoleArn}
When possible, these tools should be installed and configured in a Golden AMI.
The last step of the user data is the retrieval of the Ansible Playbook from git and its execution.
1
2
git clone codecommit://git-ansible@demo-ansible /root/asbpb-demo
ansible-playbook /root/asbpb-demo/playbook.yml
Now when launching our EC2 instance all the right tools and softwares will be installed.
But we need to keep in mind that this example only purpose was to demonstrate how to use Ansible to provision an EC2 instance with minimal requirements. Usually Playbooks will be used as orchestrators, delegating the installation or configuration of any software to Roles.
Ansible Roles
Ansible Roles can be seen as atomic components (os, middleware, applicative, configuration) that can be shared between playbooks (but don’t have to), which help us follow the Separation of Concerns Principle.
Roles can either be part of the Playbook repository and placed inside a folder named roles or have their own repository. The choice will depend on multiple factors.
Structure
Roles have an established directory structure.
1
2
3
4
5
6
7
8
9
10
11
12
13
14
15
16
17
role/
|_ README.md
|_ defaults
|   |_ main.yml
|_ files
|_ handlers
|   |_ main.yml
|_ meta
|   |_ main.yml
|_ tasks
|   |_ main.yml
|_ templates
|_ tests
|   |_ inventory
|   |_ test.yml
|_ vars
    |_ main.yml
A Role must at least contain a folder tasks with a file main.yml. When using a Role in a Playbook,
Ansible will look for this file auto-magically and execute it.
Each folder has a purpose. For example, the Ansible template module will look for files in the folder templates:
1
2
3
4
- name: Replace variables and copy nginx.conf into /etc/nginx/
  template:
    src: nginx.conf
    dest: /etc/nginx/nginx.conf
Using Ansible Roles in an Ansible Playbook
Regardless where the Ansible Roles are defined, to use them in a Playbook is quite easy:
1
2
3
4
- hosts: localhost
  roles:
    - role-os
    - role-nginx
We can even pass variables for further configuration (with or without using the vars property):
1
2
3
4
5
6
7
- hosts: localhost
  roles:
    - role: role-os
      vars:
        role_os_install_ssm_agent: no
    - role: role-nginx
      role_nginx_version: 1.17.1
If the Roles are defined in the sub-folder roles of a Playbook, Ansible will find them on its own. If they are in a
separate Git repository we will have to use ansible-galaxy (which is installed alongside Ansible) with a new file named by convention requirements.yml (but it can be anything we want).
1
2
3
4
5
6
7
8
9
10
---
- name: role-os
  src: codecommit::eu-west-1://git-ansible@ansible-role-os
  scm: git
  version: 1.0.6

- name: spikeseed-labs
  src: https://github.com/arhs/spikeseed-cloud-labs
  scm: git
  version: master
Where scm is git or hg (for Mercurial) and version a branch or a tag.
The value of the name property is an alias of the repository name, to be used in Playbooks when referencing a Role. If it is not defined in the file requirements.yml, when referencing it we will have to use the name of the repository.
By executing the following command, Ansible will clone the repositories and checkout the appropriate branch or tag in a folder named ~/.ansible/roles
1
ansible-galaxy install -r /path/to/ansible/playbook/requirements.yml
When executing the ansible-playbook command, Ansible will then look for roles in the Playbook directory and in ~/.ansible/roles.
EC2 metadata and Tags
It is often useful to know in which AWS region, VPC, Subnet, etc. an EC2 instance has been launched during the provisioning. With the Ansible ec2_metadata_facts module it is possible to retrieve these information. This module is only a wrapper of AWS Instance metadata and user data API.
1
2
3
4
5
6
7
- ec2_metadata_facts:

- debug:
    msg: |-
      AWS Region: {{ ansible_ec2_placement_region }}
      Private IP: {{ ansible_ec2_local_ipv4 }}
      VPC CICR: {{ ansible_facts['ec2_network_interfaces_macs_' + ansible_ec2_mac|replace(':','_') + '_vpc_ipv4_cidr_blocks'] }}
When executed on a EC2 instance, the output of the debug task will be as follow.
1
2
3
4
5
ok: [10.68.100.15] => {
    "msg": "AWS Region: eu-west-1
            Private IP: 10.68.100.15
            VPC CICR: 10.68.100.0/26"
}
If ec2_metadata_facts: definition seems a little weird we can use:
1
2
- name: Gathering EC2 facts
  action: ec2_metadata_facts
Tags present on an EC2 instance are another piece of information that may be useful during the provisioning. The Ansible ec2_tag module can read and write tags.
1
2
3
4
5
6
7
8
9
10
11
12
13
14
15
16
17
- name: Gathering EC2 facts
  action: ec2_metadata_facts

- name: Retrieve all tags from EC2 instance
  ec2_tag:
    region: "{{ ansible_ec2_placement_region }}"
    resource: "{{ ansible_ec2_instance_id }}"
    state: list
  register: ec2_tags

- name: Displaying ec2_tags
  debug:
    msg: "{{ ec2_tags }}"

- debug:
    msg: "Tag Application: {{ ec2_tags.tags.Application }}"
Using the variable ec2_tags defined in register, we can then get each tag of our EC2 instance.
1
2
3
4
5
6
7
8
9
10
11
12
13
14
15
16
17
18
19
20
ok: [10.68.100.15] => {
    "msg": {
        "changed": false,
        "failed": false,
        "tags": {
            "Application": "demo",
            "Environment": "sandbox",
            "Name": "s-ew1-demo-application",
            "aws:cloudformation:logical-id": "AppInstance",
            "aws:cloudformation:stack-id": "arn:aws:cloudformation:eu-west-1:123456789:stack/s-ew1-demo-application/83514580-9f6b-11ea-bb7b-0a9bdcf5c20a",
            "aws:cloudformation:stack-name": "s-ew1-demo-application",
            "aws:ec2launchtemplate:id": "lt-02afeff2e8130d43d",
            "aws:ec2launchtemplate:version": "9"
        }
    }
}

ok: [10.68.100.15] => {
    "msg": "Tag Application: demo"
}
Playbooks and Roles organization
As already mentioned, we can have Ansible Roles in same repository as a Playbook or dedicated repositories. We can even have multiple Playbooks in the same repository.

Choosing which project structure fits the best is difficult and depends on multiple factors.
Roles used by multiple Playbooks (installing a JDK, Ruby, a web server, an application server, etc. are some of the many roles that can be shared between Playbooks) are usually stored in dedicated repositories. It gives great flexibility. We can have multiple teams working on different Roles and each Role can have its own lifecycle. But multiple repositories make everything more complicated and depending on the size of a project or even one’s organization, it sometimes makes little sense.
On the other hand, a mono-repository (a single repository with all the playbooks and roles) is the simplest way to manage multiple roles and playbooks. And even with thousands of files (excluding binaries that should be stored in S3) cloning the same repository for each application during the provisioning does not add a lot of overhead. But the main issue arises when it comes to version (branches and tags) the repository.
We will discuss about this in more depth in an upcoming article.
Variables
Variables are an invaluable feature when it comes to configure our servers. With Ansible we can have variables in multiple files. There are no less than 22 rules of precedence.
Let’s see a simple example using a mono-repository with the following structure:
1
2
3
4
5
6
7
8
9
10
11
12
repository
|_ group_vars/
|  |_ all
|_ roles
|  |_ role-test/
|  |  |_ defaults
|  |  |   |_ main.yml
|  |  |_ tasks
|  |  |   |_ main.yml
|  |  |_ vars
|  |      |_ main.yml
|_ playbook.yml
group_vars/all
1
a_var_in_group_vars: zzz
roles/role-test/defaults/main.yml
1
2
3
---
overrided_value: 1.1.1
a_default_value: xxxx
roles/role-test/vars/main.yml
1
2
3
---
overrided_value: 2.2.2
a_var_in_vars: aaa
roles/role-test/tasks/main.yml
1
2
3
4
5
6
7
8
9
---
- debug:
    msg: |
        Var in default: {{ a_default_value }}
        Var in vars: {{ a_var_in_vars }}
        Var in goup_vars: {{ a_var_in_group_vars }}
        Role var : {{ role_var }}
        Overrided value: {{ overrided_value }}
        External var : {{ external_var }}
playbook.yml
1
2
3
4
5
6
7
---
- hosts: localhost

  roles:
    - role: role-test
      role_var: playbook
      overrided_value: 3.3.3
If we execute ansible-playbook with the option -e to pass external variables:
1
ansible-playbook playbook.yml -e '{ "external_var": "some value" }'
We obtain the following result:
1
2
3
4
5
6
7
8
ok: [localhost] => {
    "msg": "Var in default: xxxx
            Var in vars: aaa
            Var in goup_vars: zzz
            Role var : playbook
            Overrided value: some value
            Version: 3.3.3"
}
External variables are useful to pass values from the user data, for example a bucket name:
1
2
touch /root/vars.yml
echo "my_bucket_name: demo-bucket" >> /root/vars.yml
This YAML file that we’ve just created can be used when executing ansible-playbook:
1
ansible-playbook playbook.yml -e "@/root/vars.yml"
Dynamic inventories
When having multiple playbooks in the same repository or when a playbook is used for multiple servers with different configurations, we need to tell Ansible which configuration we want.
The simple way to achieve this is to create a playbook file for each server, but it is not very flexible. Fortunately, Ansible comes with the aws_ec2 plugin that generates inventories dynamically.
Inventories help select which part of a Playbook to execute depending on the system. One possibility is to restrict the execution of a Playbook based on the Tags present on an EC2 instance.
We first need to create a file defining the plugin instructions (instances.aws_ec2.yml):
1
2
3
4
5
6
7
8
9
10
11
---
plugin: aws_ec2
regions:
  - eu-west-1
filters:
  instance-state-name: running
hostnames:
  private-ip-address
keyed_groups:
  - key: tags
    prefix: tag
One thing to remember is that the plugin retrieves information from all the EC2 instances of the AWS account restricted to the specified AWS regions, not only the current EC2 instance.
We can use ansible-inventory to test it:
1
ansible-inventory -i instances.aws_ec2.yml --graph
The output will look like something like this:
1
2
3
4
5
6
7
8
9
10
11
12
13
14
15
16
17
18
19
20
21
22
23
24
25
26
27
28
29
30
@all:
  |--@aws_ec2:
  |  |--10.68.2.17
  |  |--10.68.3.22
  |  |--10.68.3.40
  |  |--10.68.3.45
  |  |--10.68.3.77
  |--@tag_Application_demo:
  |  |--10.68.3.22
  |--@tag_Application_reverseproxy:
  |  |--10.68.3.40
  |  |--10.68.3.77
  |--@tag_Application_sentry:
  |  |--10.68.3.45
  |--@tag_Application_vpn:
  |  |--10.68.2.17
  |--@tag_AwsInspectorEnabled_true:
  |  |--10.68.2.17
  |  |--10.68.3.40
  |  |--10.68.3.45
  |  |--10.68.3.77
  |--@tag_Environment_development:
  |  |--10.68.3.45
  |--@tag_Environment_production:
  |  |--10.68.2.17
  |  |--10.68.3.40
  |  |--10.68.3.77
  |--@tag_Environment_sandbox:
  |  |--10.68.3.22
  |--@ungrouped:
From the output, in this example we have 4 applications, 3 environments and 5 instances:
- demo - sandbox - 1 instance
- reverseproxy - production - 2 instances
- sentry - development - 1 instance
- vpn - production - 1 instance
With this plugin, instead of using hosts: localhost in the Playbook we can use hosts: tag_Application_demo, where tag is the
prefix defined in the plugin configuration, Application the name of the tag and demo its value. These 3 elements are
concatenated using an underscore (_). If any element contains a hyphen (-) it is replaced by an underscore.
We could also create groups with a limited set of Tags:
1
2
3
4
5
6
7
8
9
10
11
12
13
14
15
---
plugin: aws_ec2
regions:
  - eu-west-1
filters:
  instance-state-name: running
hostnames:
  private-ip-address
keyed_groups:
  - key: tags.Application
    prefix: tag_Application
  - key: tags.Environment
    prefix: tag_Environment
  - key: tags.ServerType
    prefix: tag_ServerTag
Or even filter the EC2 instances from which the Tags will be retrieved:
1
2
3
4
5
6
7
8
9
10
11
12
13
---
plugin: aws_ec2
regions:
  - eu-west-1
filters:
  instance-state-name: running
  tag:Environment:
    - sandbox
hostnames:
  private-ip-address
keyed_groups:
  - key: tags
    prefix: tag
But for provisioning EC2 instances these are not really useful. The first example will be enough in most cases.
If we execute ansible-playbook playbook.yml we obtain the following result:
1
2
PLAY [tag_Application_demo] *****************
skipping: no hosts matched
As we can see, now the current instance doesn’t match the hosts value. To make it work, we need to tell Ansible to use the dynamic inventory:
1
2
PRIVATE_IP="$(curl http://169.254.169.254/latest/meta-data/local-ipv4)"
ansible-playbook -i instances.aws_ec2.yml -l $PRIVATE_IP -c local playbook.yml
In addition to the -i option used to specify the location of the aws_ec2 plugin configuration file, we have two more
parameters -l $PRIVATE_IP and -c local.
-c localforces Ansible to run in local mode, as before withhosts: localhost. Without this parameter Ansible would try to initiate a remote session.-l $PRIVATE_IPrestricts the elements to use in the inventory. Without this parameter if we hadhosts: tag_Application_sentryand theaws_ec2plugin finds an instance with the tagApplication: sentryin our AWS Account, it will run the playbook on any instance, even if the current instance has the tagApplication: demo.
Hosts pattern matching
We’ve seen how to select a configuration from a Playbook depending on EC2 Tags, but how to avoid duplicating the configuration if we want to use the same configuration for multiple servers or for all our servers but one, without adding more tags. Patterns are another useful Ansible feature to target specific servers.
To select a configuration for multiple Applications we separate the groups by a colon (:):
1
hosts: tag_Application_bastion:tag_Application_reverseproxy
To select a configuration for an Application and a specific environment we separate the groups by a colon followed by an ampersand (:&):
1
2
3
4
5
- hosts: tag_Application_demo:&tag_Environment_sandbox
  roles: [...]

- hosts: tag_Application_demo:&tag_Environment_production
  roles: [...]
To select a configuration for an Application that doesn’t have the tag AnsibleExclude: true, we separate the groups by a colon followed by an exclamation mark (:!):
1
hosts: tag_Application_demo:!tag_AnsibleExclude_true
We can use all the previous symbols at once to select a configuration for two Applications (demo and reverseproxy)
and a specific environment that don’t have the tag AnsibleExclude: true (to avoid having very long lines we can use
YAML multiline strings):
1
2
3
4
5
hosts: >-
    tag_Application_demo
    :tag_Application_reverseproxy
    :&tag_Environment_sandbox
    :!tag_AnsibleExclude_true
Third-party Softwares versions
It is production critical to not use public repositories that we don’t own and/or manage. We never know what can happen on them. And the same goes for binaries not available through a packet manager. These binaries should be downloaded from S3, not a third-party website that could remove them, go down, contain malware or have network issues which will less likely happen with S3.
Furthermore, it’s worth mentioning that only specific version of (most) softwares should be used. The principle of CICD
is to have the same infrastructure, OS configuration and application in all the environments of a Pipeline. If our
application is written in Python and one environment use Python 3.6 and another Python 3.8, there will most likely be
issues. For OSes the rule is exactly the same as for application libraries where versions are fixed in package.json (NodeJS),
Gemfile (Ruby), requirements.txt (Python), pom.xml (Java), etc.
AWS CodeCommit Limitations
It is worth mentioning that using AWS CodeCommit can be problematic due to CodeCommit limitations regarding throttling.
Launching more than 5 instances at the same time can result in an error when executing git clone.
The workaround is to create an alias for git which will retry the git command if it fails, waiting a random number of seconds between each retry:
We first create a script (/usr/local/bin/retry.sh) to handle the retry:
1
2
3
4
5
6
7
8
9
10
11
12
13
#!/bin/bash

RETRIES=6
DELAY=2
COUNT=0
while [ $COUNT -lt $RETRIES ]; do
  $* && break

  let COUNT=$COUNT+1
  VARIATION=$(shuf -i 90-110 -n 1)
  DELAY=$(( ( 2 ** $COUNT) * $VARIATION / 100 ))
  sleep $DELAY
done
We then give executable rights to the file and add the alias to /etc/profile.d/00-aliases.sh:
1
2
chmod +x /usr/local/bin/retry.sh
echo "alias git='/usr/local/bin/retry.sh git'" >> /etc/profile.d/00-aliases.sh
If these commands are executed in the user data we have to source /etc/profile.d/00-aliases.sh.
Conclusion
As we’ve seen in previous articles and in this one, Ansible offers a lot of interesting features to help us provision EC2 instances. It might be overwhelming at time, but it’s still more appealing than pure Bash. And while it won’t solve all our problems it is an extremely useful asset in our DevOps toolbox.