
Yohan Beschi
Developer, Cloud Architect and DevOps Advocate
AMI Factory with AWS (CodePipeline, CodeBuild, Packer and Ansible)

When launching an AWS EC2 instance it is possible to perform common automated configuration tasks by passing a user data to the instance. Unfortunately, it increases the start time and the more the user data do, the more things can go wrong.
In highly-available and auto-scalable environments, we want reproducibility and to reduce the risks during the deployment. In other words we want immutability, something that is not achievable using user data. We need to be able to configure our AMIs and test them along everything else in our CICD pipelines. To do so, the best solution is to use Golden AMIs.
Golden AMIs
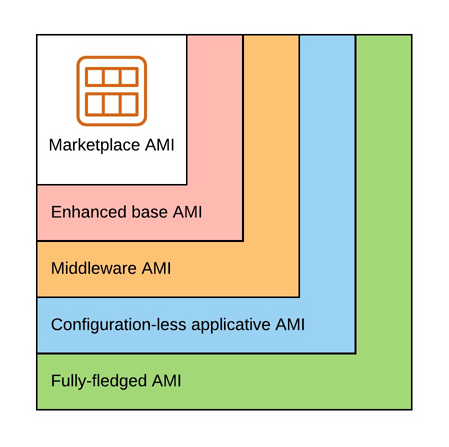
A Golden AMI can be simply viewed as an AMI configured for a generic or specific purpose.
There are multiple kinds of Golden AMIs:
- Enhanced base AMI: minimal set of tools/configuration used by all our applications (configuration of a timezone, installation of AWS agents, etc.)
- Middleware AMI: everything up to the middleware (eg. HTTP Server, Web Application Server, etc.)
- Configuration-less applicative AMI: everything up to the application without the configuration
- Fully-fledged AMI: everything including the configuration
Before choosing which kind of golden AMI will fit our requirements, we need to keep in mind that the more things we pack in them, the more specific they will become, the more AMIs we will have to manage, the more it will cost and as a consequence, we may need a cleanup strategy of these AMIs and their snapshots.
In any case, we should at least have an enhanced base AMI. We want an up-to-date OS, but not so much as it is not tested in every step of our CICD pipelines, which could lead to broken/conflicting packages going to production.
Middleware and configuration-less applicative AMIs offer a good trade-off between fast launch time and flexibility, to be able to use them in multiple AWS Accounts and Region. The only difference between both is how often we will have to build a new AMI:
- With a configuration-less applicative AMI, we will have to build an AMI every time we push code in the application’s git repository.
- With a middleware AMI, we will have to build an AMI at least once for every release (at least to keep the OS up-to-date) and in between if OS security updates are required.
Clouformation templates
All the source code presented in this article is available in a Github repository.
To make everything easier to test, we will use Cloudformation and Ansible. The article Cloudformation with Ansible explains how it works.
The repository is organized as follow:
- cloudformation - Cloudformation templates
- provisioning - Provisioning scripts and, Ansible playbook and roles
Please note that by deploying these stacks, you will be charged for the following resources:
- 1 NAT Gateway
- 2 EC2 t3.nano
- CodeCommit depending on the number of users (5 first actives users per month are always free)
- CodePipeline depending on the number of active pipelines (1 active pipeline per month is always free)
- CodeBuild depending on the number of build minutes (100 first minutes per month are always free)
General concepts
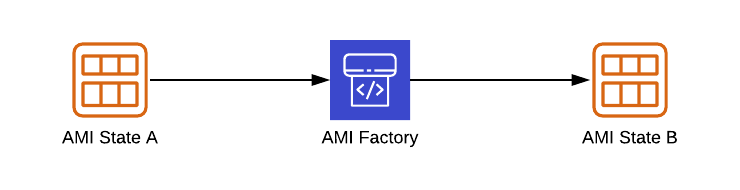
Conceptually, building a Golden AMI is extremely simple:
- We take an already existing AMI
- We apply the required changes
- We build the AMI
A more detailed description would be as follow:
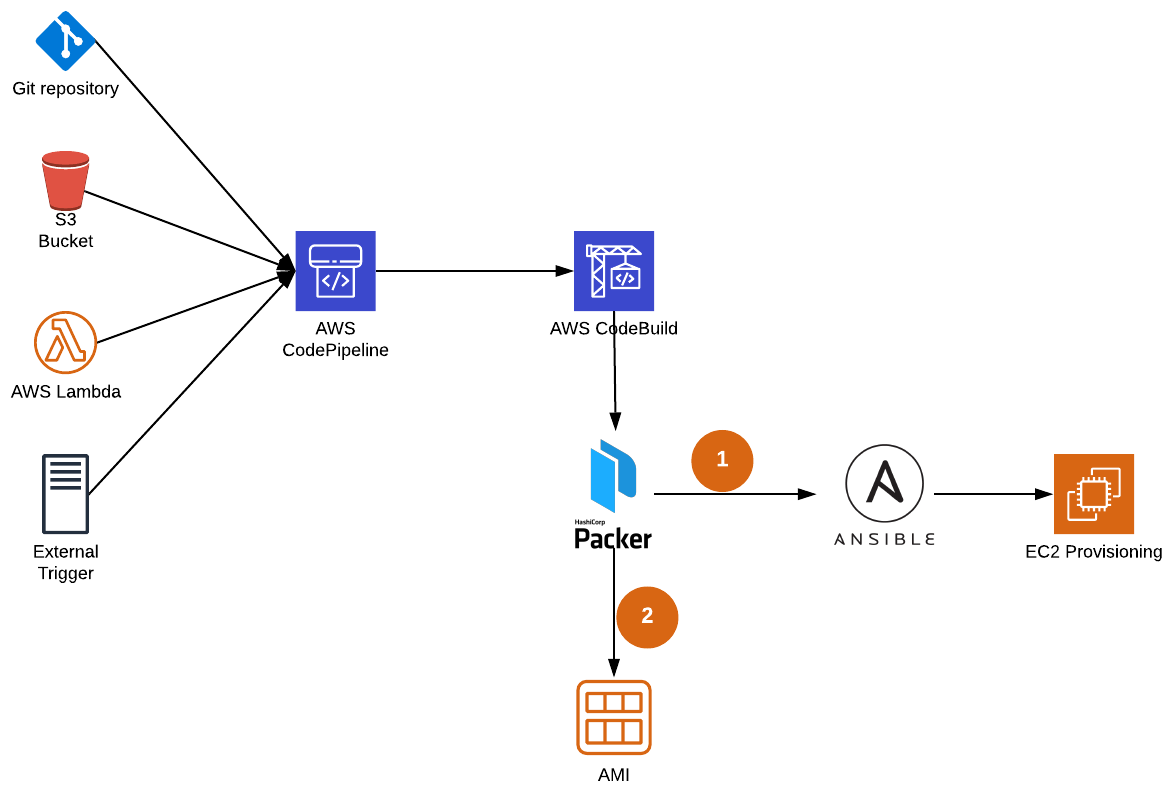
A git push, a file upload in a S3 Bucket, a trigger from a CICD pipeline, a manual trigger, etc. will trigger an AWS CodePipeline, which will trigger an AWS CodeBuild build. The AWS CodeBuild build will then install Packer and Ansible in a container and execute Packer which, in the end, will create a new AMI.
Furthermore, we could have multi-layered AMIs:
- Starting from an AMI in the AWS marketplace, we could build base AMIs to be used by all our applications ; then
- with a base AMI we could build middleware AMIs, if we use the same middleware for more than one application ; and finally
- from a middleware AMI we could build configuration-less applicative AMIs
Ansible
Ansible is a great tool to provision AMIs. It can be viewed as bash on steroids, with idempotency, templating, code reuse and more, out of the box.
To provision AMIs with Ansible we need playbooks and roles. Depending on the application(s) and requirements, each playbook and role can have its own git repository or everything can be stored in a single repository. For our example, we will keep things simple and use a single repository.
- roles
- role-os
- fix
cloud-init-output.logpath - set the timezone to
Europe/Luxembourg - install CloudWatch and SSM agents
- fix
- role-nginx
- configure Cloudwatch
- install and configure
nginx
- role-os
- playbook.yml - execute
role-osandrole-nginx
In our example, we will build a fully-fledged golden AMI. We will be able to launch EC2 instances using this AMI without a user data.
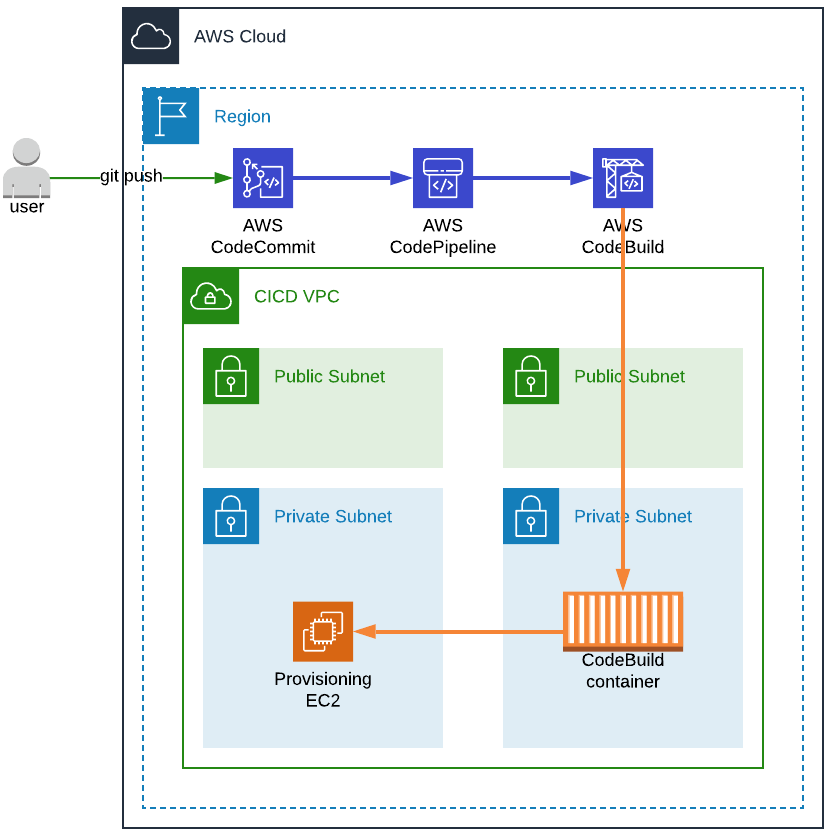
CICD VPC
As a prerequisite to AWS CodeBuild and Packer we need to set up a VPC and Subnets. We will then be able to launch CodeBuild containers and Packer EC2 instances used for the provisioning.
Moreover, as CodeBuild containers require elevated privileges (as might Packer provisioning EC2 instances) and as security should always be our top concern, everything will be launched in private subnets, in a dedicated CICD VPC.
HashiCorp Packer
Packer is the perfect tool to create Golden AMIs. With a simple configuration file, Packer will:
- Launch an EC2 instance
- Execute our provisioning scripts (Shell, PowerShell, Ansible, Puppet, etc.)
- Create an AMI
- Terminate the EC2 instance.
Furthermore, we can add tags to the new AMI, encrypt it or share it with other AWS Accounts.
A Packer configuration file is quite straightforward. We define (packer.json):
- The variables that will be used (the syntax
"{{ <variables> }}"allows us to use external variables and"{{ envBUILD_VPC_ID}}"to use environment variables). - How should be configured the EC2 instance on which the provisioning will happen and the produced AMI as-well.
- Which commands/scripts should be executed on the instance.
- Some post actions.
In the following example, we are defining:
- a CentOS AMI as a source AMI
- which VPC, Subnet and Security Group to use
- the tags to be created and the configuration of the EBS (we could have more than one)
- an Ansible playbook to execute
- a post action that will generate a manifest, from which we will be able to retrieve the AMI ID of the newly created AMI
1
2
3
4
5
6
7
8
9
10
11
12
13
14
15
16
17
18
19
20
21
22
23
24
25
26
27
28
29
30
31
32
33
34
35
36
37
38
39
40
41
42
43
44
45
46
47
48
49
50
51
52
53
54
55
56
57
58
59
60
61
62
63
{
  "variables": {
    "aws_region": "eu-west-1",
    "ssh_username": "centos",
    "ami_id": "ami-0ff760d16d9497662",
    "distribution": "centos7",
    "vpc_id": "{{ env `BUILD_VPC_ID` }}",
    "subnet_id": "{{ env `BUILD_SUBNET_ID` }}",
    "instance_sg_id": "{{ env `BUILD_INSTANCE_SG_ID` }}",
    "packer_id": "{{ uuid }}"
  },
  "builders": [
    {
      "type": "amazon-ebs",
      "region": "{{ user `aws_region` }}",
      "vpc_id": "{{user `vpc_id`}}",
      "subnet_id": "{{ user `subnet_id` }}",
      "security_group_id": "{{ user `instance_sg_id` }}",
      "instance_type": "t3.nano",
      "iam_instance_profile": "{{ user `iam_instance_profile` }}",
      "ssh_username": "{{ user `ssh_username` }}",
      "ssh_timeout": "5m",
      "run_tags": {
        "Name": "packer-ec2-instance",
        "PackerId": "{{ user `packer_id` }}",
        "Distribution": "{{ user `distribution` }}"
      },
      "run_volume_tags": {
        "Name": "packer-volume",
        "PackerId": "{{ user `packer_id` }}"
      },
      "tags": {
        "Name": "digit-baseline-{{ user `distribution` }}",
        "PackerId": "{{ user `packer_id` }}"
      },
      "source_ami": "{{ user `ami_id` }}",
      "ami_block_device_mappings": [
        {
          "device_name": "/dev/sda1",
          "delete_on_termination": true,
          "volume_size": 8,
          "volume_type": "gp2"
        }
      ],
      "ami_name": "demo-baseline-{{ user `distribution` }}-{{ timestamp }}",
      "ami_virtualization_type": "hvm"
    }
  ],
  "provisioners": [
    {
      "type": "ansible",
      "user": "{{ user `ssh_username` }}",
      "playbook_file": "ansible/playbook.yml"
    }
  ],
  "post-processors": [
    {
      "type": "manifest",
      "output": "manifest.json",
      "strip_path": true
    }
  ]
}
The environment variables BUILD_VPC_ID, BUILD_SUBNET_ID and BUILD_INSTANCE_SG_ID will be set in the CodeBuild
container and therefore be accessible from Packer.
They respectively hold the VPC et Subnet IDs in which the Packer EC2 instance will be launched and the
Security Group
ID of the Security Group attached to this instance, allowing only SSH access from the CodeBuild Container.
By using the provisioner ansible, all Ansible commands will be executed remotely (from the CodeBuild container).
To execute Ansible locally (on the provisioning EC2) we need to use ansible-local. But this solution has multiple
downsides. Ansible and a git client must to be installed on the provisioning EC2 prior to ansible-local provisioner execution,
which means the need of a Shell script and probably another one to remove tools that have nothing to do on a
production server, except when using Ansible Tower or executing Ansible playbooks
in EC2 user data.
1
2
3
4
5
6
7
8
9
10
11
12
13
14
15
16
17
18
19
20
21
22
23
24
25
ContainerSG:
  Type: AWS::EC2::SecurityGroup
  Properties:
    GroupName: !Sub ${AccountCode}-${RegionCode}-${Application}-packer-container
    GroupDescription: Allow access to the container
    VpcId: !Ref VpcId
    Tags:
      - Key: Name
        Value: !Sub ${AccountCode}-${RegionCode}-${Application}-packer-container

InstanceSG:
  Type: AWS::EC2::SecurityGroup
  Properties:
    GroupName: !Sub ${AccountCode}-${RegionCode}-${Application}-packer
    GroupDescription: Allow access to the instance
    VpcId: !Ref VpcId
    SecurityGroupIngress:
      - Description: Allow SSH access
        IpProtocol: tcp
        FromPort: 22
        ToPort: 22
        SourceSecurityGroupId: !Ref ContainerSG
    Tags:
      - Key: Name
        Value: !Sub ${AccountCode}-${RegionCode}-${Application}-packer
AWS CodeCommit
For our example, we will use AWS CodeCommit as our Git repository holding the Ansible Playbook and Roles, and CodeBuild buildspec.yml file.
Nothing fancy is required here. We don’t need to define a trigger at CodeCommit level.
1
2
3
4
5
CodeRepository:
  Type: AWS::CodeCommit::Repository
  DeletionPolicy: Retain
  Properties:
      RepositoryName: !Ref CodeCommitRepositoryName
AWS S3 Artifacts Bucket
To store artifacts from AWS CodePipeline and AWS CodeBuild we need a bucket:
1
2
3
4
5
6
7
8
9
10
11
12
13
14
15
16
17
CicdArtifactsBucket:
  Type: AWS::S3::Bucket
  Properties:
    BucketName: !Ref CicdArtifactsBucketName
    AccessControl: Private
    PublicAccessBlockConfiguration:
      BlockPublicAcls: true
      BlockPublicPolicy: true
      IgnorePublicAcls: true
      RestrictPublicBuckets: true
    BucketEncryption:
      ServerSideEncryptionConfiguration:
        - ServerSideEncryptionByDefault:
            SSEAlgorithm: aws:kms
    Tags:
      - Key: Name
        Value: !Ref CicdArtifactsBucketName
AWS CodeBuild
AWS CodeBuild is a very useful service in our CICD toolbox, but it is one of those that need a lot of investment to understand how it works and how to configure it.
We first need to define an IAM Role allowing CodeBuild to access AWS Resources.
For this article we will use the PowerUserAccess policy, but in a real case scenario we should only set the required
permissions (for CodeBuild to create CloudWatch LogGroups and LogStreams, and put Log Events,
and for Packer to create security groups, launch EC2 instances, create AMIs, etc.).
1
2
3
4
5
6
7
8
9
10
11
12
13
14
CodeBuildServiceRole:
  Type: AWS::IAM::Role
  Properties:
    RoleName: !Sub codebuild-${ServiceName}-role
    Path: /managed/
    ManagedPolicyArns:
      - arn:aws:iam::aws:policy/PowerUserAccess
    AssumeRolePolicyDocument:
      Version: 2012-10-17
      Statement:
        - Action: sts:AssumeRole
          Effect: Allow
          Principal:
            Service: codebuild.amazonaws.com
Then we can create our CodeBuild Project with CodePipeline as Source.
1
2
3
4
5
6
7
8
9
10
11
12
13
14
15
16
17
18
19
20
21
22
23
24
25
26
27
28
29
30
CodeBuildProject:
  Type: AWS::CodeBuild::Project
  Properties:
    Name: !Sub ${AccountCode}-${RegionCode}-${Application}-${ServiceName}
    ServiceRole: !GetAtt CodeBuildServiceRole.Arn
    LogsConfig:
      CloudWatchLogs:
        Status: ENABLED
        GroupName: !Sub /${AccountName}/aws/codebuild/${ServiceName}
        StreamName: !Sub ${AccountCode}-${RegionCode}-${Application}-${ServiceName}
    Source:
      Type: CODEPIPELINE
    Artifacts:
      Type: CODEPIPELINE
    VpcConfig:
      VpcId: !Ref SsmVpcIdKey
      Subnets: !Ref SsmPrivateSubnetsKey
      SecurityGroupIds:
        - !Ref ContainerSG
    Environment:
      Type: LINUX_CONTAINER
      ComputeType: BUILD_GENERAL1_SMALL
      Image: aws/codebuild/amazonlinux2-x86_64-standard:1.0
      EnvironmentVariables:
        - Name: BUILD_VPC_ID
          Value: !Ref SsmVpcIdKey
        - Name: BUILD_SUBNET_ID
          Value: !Select [0, !Ref SsmPrivateSubnetsKey ]
        - Name: BUILD_INSTANCE_SG_ID
          Value: !Ref InstanceSG
The Artifacts property is set to Type: CODEPIPELINE which is the only valid value when using CODEPIPELINE as Source.
Then we have VpcConfig to configure the VPC, Subnets and Security Group for the CodeBuild container.
And finally, Environment, the actual configuration of the container, with the environment variables that we’ve already
seen in the packer.json configuration file.
The actual build commands are in a separate Build Specification file. If the path to the buildspec file is not specified in the CodeBuild Project definition,
CodeBuild will look for a file named buildspec.yml at the root of the source directory (to run this example,
the content of the folder provisioning should be in a dedicated CodeCommit repository. see. README).
Our buildspec.yml file contains 4 phases:
install: installs the required tools (Packer and Ansible)pre_build: validates thepacker.jsonfilebuild: executes Packerpost_build: retrieves the AMI ID and stores it to SSM Parameter Store
1
2
3
4
5
6
7
8
9
10
11
12
13
14
15
16
17
18
19
20
21
22
23
24
25
26
27
28
29
30
31
32
33
34
version: 0.2
phases:
  install:
    runtime-versions:
      python: 3.7
    commands:
      - echo "Installing tools to create an AMI - $(date)"
      - echo "Installing ansible"
      - pip install ansible==2.9.6
      - echo "Installing Packer"
      - curl -o packer.zip https://releases.hashicorp.com/packer/1.5.4/packer_1.5.4_linux_amd64.zip
      - unzip packer.zip
  pre_build:
    commands:
      - echo "Starting building AMI - $(date)"
      - echo "Validating Packer template"
      - ./packer validate packer.json
  build:
    commands:
      - echo "Build"
      - ./packer build -color=false packer.json | tee build.log
  post_build:
    commands:
      # If there is an error in the build step, the post_build is still executed
      - test -f manifest.json || exit 1
      - cat manifest.json
      - AMI_ID=$(cut -d':' -f2 <<<"$(jq -r '.builds[0].artifact_id' < manifest.json)")
      # The file exist but there is no AMI ID
      - test "$AMI_ID" != "" && test "$AMI_ID" != "null" || exit 1
      - >-
        aws ssm put-parameter --cli-input-json
        '{"Type": "String", "Name": "/app/ami/id", "Value": "'"$AMI_ID"'", "Overwrite": true}'
      - echo "AMI ID $AMI_ID"
      - echo "Build completed on $(date)"
AWS CodePipeline
The last step is to create an AWS CodePipeline that will link our AWS CodeCommit repository and AWS CodeBuild project.
Once again we will start with an IAM Role to allow our CodeBuild project to:
- Access (get and put) artifacts from/to the Artifacts bucket
- Pull commits from CodeCommit
- Start our CodeBuild Project
1
2
3
4
5
6
7
8
9
10
11
12
13
14
15
16
17
18
19
20
21
22
23
24
25
26
27
28
29
30
31
32
33
34
35
36
37
38
39
40
PipelineExecutionRole:
  Type: AWS::IAM::Role
  Properties:
    RoleName: !Sub codepipeline-${ServiceName}-role
    Path: /managed/
    AssumeRolePolicyDocument:
      Version: 2012-10-17
      Statement:
        - Action: sts:AssumeRole
          Effect: Allow
          Principal:
            Service: codepipeline.amazonaws.com
    Policies:
      - PolicyName: !Sub codepipeline-${ServiceName}-role-policy
        PolicyDocument:
          Version: 2012-10-17
          Statement:
            - Action:
                - s3:GetObject
                - s3:GetObjectVersion
                - s3:GetBucketVersioning
                - s3:PutObject
              Effect: Allow
              Resource:
                - !Sub arn:aws:s3:::${CicdArtifactsBucketName}
                - !Sub arn:aws:s3:::${CicdArtifactsBucketName}/*
            - Action:
                - codecommit:GetBranch
                - codecommit:GetCommit
                - codecommit:UploadArchive
                - codecommit:GetUploadArchiveStatus
                - codecommit:CancelUploadArchive
              Effect: Allow
              Resource: !GetAtt CodeRepository.Arn
            - Action:
                - codebuild:StartBuild
                - codebuild:StopBuild
                - codebuild:BatchGetBuilds
              Effect: Allow
              Resource: !GetAtt CodeBuildProject.Arn
Special note: codecommit:*UploadArchive* grant permission to the service role for AWS CodePipeline to upload repository changes into a pipeline.
Finally we define our CodePipeline pipeline, with the first stage cloning the git repository and the second launching our CodeBuild Project.
1
2
3
4
5
6
7
8
9
10
11
12
13
14
15
16
17
18
19
20
21
22
23
24
25
26
27
28
29
30
31
32
33
34
35
36
37
Pipeline:
  Type: AWS::CodePipeline::Pipeline
  Properties:
    ArtifactStore:
      Location: !Ref CicdArtifactsBucketName
      Type: S3
    Name: !Sub ${AccountCode}-${RegionCode}-${Application}-${ServiceName}
    RoleArn: !GetAtt PipelineExecutionRole.Arn
    Stages:
      - Name: Source
        Actions:
          - Name: CodeCommitRepo
            ActionTypeId:
              Category: Source
              Owner: AWS
              Provider: CodeCommit
              Version: 1
            Configuration:
              RepositoryName: !Ref CodeCommitRepositoryName
              BranchName: master
            OutputArtifacts:
              - Name: SourceZip
            RunOrder: 1
      - Name: Build
        Actions:
          - Name: CodeBuild
            ActionTypeId:
              Category: Build
              Owner: AWS
              Provider: CodeBuild
              Version: 1
            Configuration:
              ProjectName: !Ref CodeBuildProject
            InputArtifacts:
              - Name: SourceZip
            OutputArtifacts:
              - Name: BuiltZip
And we are done.
Testing the AMI
To test the newly created AMI, we can create a VPC with only Public subnets and launch a single instance (see. README).
Then we can:
- check that Nginx has been successfully installed and configured using
http://<public_ip>/and see the message “Packer with remote Ansible provisioning” in the response - connect to the instance using SSM Session Manager
(with the SSM Agent installed on our instance we don’t need to allow SSH access in our Security Groups):
aws ssm start-session --target <instance_id> - check the date on the system:
date
Conclusion
Setting up AWS CodePipeline and AWS CodeBuild the first time is not an easy task, and neither is setting up a CICD pipeline to build a golden AMI. But once the principle is understood, you can tweak the configuration and do things on your own and appreciate all the new opportunities, even if - for now at least - a lot a features are missing compared to standard CICD tools like Jenkins, GitLab or GoCD.