
Yohan Beschi
Developer, Cloud Architect and DevOps Advocate
Relational Databases Continuous Integration
Nothing is worse than manually executing SQL scripts before deploying a new version of an application. This is not the DevOps way!
Like any server, accessing a database to execute commands manually should be avoided at all costs. Updating a database data model should be part of the deployment process, completely dissociated from the deployment of the application. With High Available applications the application must not control the update of the database. And obviously, letting an ORM updating the database model for us goes to the bad practice category.
One thing that should not be overlooked is that to make all this work we need an application that can work with multiple data model versions. In other words, to have high availability, some form of canary deployment or A/B testing, updating the database should not break the current running application.
Furthermore, with Infrastructure as Code and a CI/CD pipeline, we want to be able to create a completely new, up and running, environment with minimal user interaction.
In this article, we will see how to easily solve all these problems.
Table of Contents
- A quick word about Flyway
- Flyway Docker Image - Local Setup
- Flyway API
- AWS infrastructure example
- Migration Lambda
- Database initialization
- The sample application
- A Basic CI/CD pipeline
- Testing the deployed application
- Conclusion
All the source code presented in this article is available in a Github repository.
A quick word about Flyway
Flyway is based on SQL scripts versioning and incremental updates. We start with an initialization script and then add new scripts to change the model or add static data. Once a script is executed it cannot be modified as Flyway computes the checksum of each file content, if the file is modified the checksum will change and the migration will fail.
To keep track of the executed scripts, Flyway creates a flyway_schema_history table, into which will be stored:
- the version of the script;
- the name of the file;
- the checksum of the file;
- the status of the execution and;
- few other things.
Let’s see a very simple example.
First, we are going to use a MySQL Docker image and start a container (Basic Steps for MySQL Server Deployment with Docker) with a password for the root user and allowing remote access (% - outside the container):
1
2
3
4
5
6
7
docker pull mysql/mysql-server:5.7
docker run --name=mysqldemo \
    -e MYSQL_ROOT_HOST=% \
    -e="MYSQL_ROOT_PASSWORD=demo_root_password" \
    -p 3306:3306 \
    -d mysql/mysql-server:5.7
docker ps
With the root user we can then access the database from outside the container to check that everything is up and running:
1
2
3
4
5
6
7
8
9
10
11
12
13
$ mysql -u root -pdemo_root_password --host 127.0.0.1
mysql> SHOW DATABASES;
+--------------------+
| Database           |
+--------------------+
| information_schema |
| default            |
| mysql              |
| performance_schema |
| sys                |
+--------------------+
5 rows in set (0,00 sec)
mysql> exit
Then we need to download and install Flyway (download page):
1
2
3
4
5
6
7
8
curl -LSo /tmp/flyway.tar.gz \
  https://repo1.maven.org/maven2/org/flywaydb/flyway-commandline/7.10.0/flyway-commandline-7.10.0-linux-x64.tar.gz
sudo tar xzvf /tmp/flyway.tar.gz -C /usr/local
sudo chmod 755 /usr/local/flyway-7.10.0/flyway
sudo ln -s /usr/local/flyway-7.10.0/flyway /usr/local/bin

# Check that everything is working
flyway --version
Finally, we can create our first script (V1.0.0__Initial_Setup.sql in a folder named sql)
1
2
3
4
5
6
CREATE TABLE IF NOT EXISTS `user` (
  `id` int NOT NULL AUTO_INCREMENT PRIMARY KEY,
  `name` varchar(20),
  `email` varchar(50),
  `date_of_birth` timestamp
);
And execute it from the directory containing the folder sql (this directory is named sample in the following example):
1
2
3
4
5
6
cd <path_to_folder>/sample
flyway -url=jdbc:mysql://127.0.0.1:3306 \
    -schemas=default \
    -user=root \
    -password=demo_root_password \
    migrate
Which results in:
1
2
3
4
5
6
7
Flyway Community Edition 7.10.0 by Redgate
Database: jdbc:mysql://127.0.0.1:3306/demo (MySQL 5.7)
Successfully validated 1 migration (execution time 00:00.009s)
Creating Schema History table `demo`.`flyway_schema_history` ...
Current version of schema `demo`: << Empty Schema >>
Migrating schema `demo` to version "1.0.0 - Initial Setup"
Successfully applied 1 migration to schema `demo`, now at version v1.0.0 (execution time 00:00.039s)
If we execute the migrate command again, we get the following output:
1
2
3
4
5
Flyway Community Edition 7.10.0 by Redgate
Database: jdbc:mysql://127.0.0.1:3306/demo (MySQL 5.7)
Successfully validated 1 migration (execution time 00:00.011s)
Current version of schema `demo`: 1.0.0
Schema `demo` is up to date. No migration necessary.
Let’s add a second script (V1.0.1__Adding_table_country.sql) in the sql folder:
1
2
3
4
5
6
7
8
9
10
11
12
CREATE TABLE IF NOT EXISTS `country` (
  `alpha2` char(2) NOT NULL PRIMARY KEY,
  `alpha3` char(3) NOT NULL,
  `name` varchar(128)
);

INSERT INTO `country` (`alpha2`, `alpha3`, `name`)
VALUES
('be', 'bel', 'Belgium'),
('de', 'deu', 'Germany'),
('fr', 'fre', 'France'),
('lu', 'lux', 'Luxembourg');
And execute the migrate command:
1
2
3
4
5
6
Flyway Community Edition 7.10.0 by Redgate
Database: jdbc:mysql://127.0.0.1:3306/demo (MySQL 5.7)
Successfully validated 2 migrations (execution time 00:00.012s)
Current version of schema `demo`: 1.0.0
Migrating schema `demo` to version "1.0.1 - Adding table country"
Successfully applied 1 migration to schema `demo`, now at version v1.0.1 (execution time 00:00.071s)
To remove everything in the database we can use the clean command: flyway clean. We can even use the clean command on a Database that is not managed by Flyway.
And when we are done, we can remove the Docker Container:
1
2
docker stop mysqldemo
docker rm mysqldemo
As we have seen, Flyway is quite easy to use. It is heavily configurable, supports placeholders in scripts, multiple schemas, etc.
Furthermore, Flyway handles repeatable migrations. Instead of prefixing the scripts by V we use R. Repeatable scripts can be updated. They will be executed every time the checksum (the content of the file) changes. It is very useful for Views, Functions, Procedure, etc. Everything that can be created or replaced (CREATE OR REPLACE ...).
Flyway Docker Image - Local Setup
Having to use the CLI while coding is not very efficient. Luckily, a Docker image for Flyway is available which means we can easily create a Docker Compose file to create the database and execute the migration scripts.
1
2
3
4
5
6
7
8
9
10
11
12
13
14
15
16
17
18
19
20
21
22
23
services:

  mysql_demo:
    container_name: mysql_demo
    image: mysql/mysql-server:5.7
    cap_add:
      - SYS_NICE
    ports:
      - 3306:3306
    volumes:
      - ./provision/db:/docker-entrypoint-initdb.d
    environment:
      MYSQL_ROOT_HOST: '%'
      MYSQL_ROOT_PASSWORD: password

  flyway_demo:
    container_name: flyway_demo
    image: flyway/flyway:7.10
    command: -url=jdbc:mysql://mysql_demo -schemas=demo_database -user=root -password=password -connectRetries=10 clean migrate
    volumes:
      - ../aws/lambdas/migrations-helloworld/src/main/resources/db/migration:/flyway/sql
    depends_on:
      - mysql_demo
The MySQL container is configured with the same parameters (MYSQL_ROOT_HOST and MYSQL_ROOT_PASSWORD) we have used previously. In addition, we have a volume which map the folder ./provision/db from our local machine to /docker-entrypoint-initdb.d. In this folder we are going to add an SQL script (mysql-databases.sql) to create a database and a user with some permissions:
1
2
3
4
5
6
7
-- Create databases
CREATE DATABASE IF NOT EXISTS demo_database;

-- Create users and grant rights
CREATE USER 'user_demo'@'%' IDENTIFIED BY 'user_demo_password';
GRANT DELETE, INSERT, SELECT, UPDATE ON demo_database.*
  TO 'user_demo'@'%' WITH GRANT OPTION;
Then for the Flyway container, we map a local folder with all the migration scripts to /flyway/sql inside the container and a command with the same parameters we have used when executing the command from the terminal. But this time, as the MySQL and Flyway containers are running in the same Docker network we are using the name of the MySQL container in the JDBC URL: jdbc:mysql://mysql_demo.
To start everything, we can execute:
1
2
cd <path_to_folder>/aws-dbmigrator-app/docker
docker-compose -f compose.yml up
The MySQL container starts, the Flyway one starts, executes the migration scripts and stops.
To check if everything is working correctly, we can access the new database and list the tables:
1
2
3
4
5
6
7
8
9
10
11
12
13
14
15
16
17
18
19
20
21
22
mysql -u user_demo -puser_demo_password --host 127.0.0.1
mysql> use demo_database;
mysql> show tables;
+-------------------------+
| Tables_in_demo_database |
+-------------------------+
| country                 |
| flyway_schema_history   |
| user                    |
+-------------------------+
3 rows in set (0,00 sec)

mysql> select * from flyway_schema_history;
+----------------+---------+----------------------+------+----------------------------------+-------------+--------------+---------------------+----------------+---------+
| installed_rank | version | description          | type | script                           | checksum    | installed_by | installed_on        | execution_time | success |
+----------------+---------+----------------------+------+----------------------------------+-------------+--------------+---------------------+----------------+---------+
|              1 | 1.0.0   | Initial Setup        | SQL  | V1.0.0__Initial_Setup.sql        | -1237445590 | root         | 2021-06-16 14:32:29 |             24 |       1 |
|              2 | 1.0.1   | Adding table country | SQL  | V1.0.1__Adding_table_country.sql | -1351376662 | root         | 2021-06-16 14:32:29 |             21 |       1 |
+----------------+---------+----------------------+------+----------------------------------+-------------+--------------+---------------------+----------------+---------+
2 rows in set (0,00 sec)

mysql> exit
Once we are done, we can remove everything:
1
docker-compose -f compose.yml down --volumes --remove-orphans
Flyway API
To execute Flyway from the command line application or the Docker Image from a CI/CD pipeline, we need access to the Database deployed inside private subnets.
To do so, we can:
- adapt the network topology, with a Bastion Host, a VPN, a Transit Gateway or VPC peering
- deploy a CI/CD orchestrator runner (GitLab, Jenkins, AWS CodeBuild, etc.) inside the Database VPC
All these solutions will work fine. But a VPC peering from a VPC in a dedicated DevOps AWS Account to the Database VPC and shared a Security Group would be the best solution in term of security and global architecture if we had a complex architecture to manage from our CI/CD pipeline. On the other hand, deploying “runners” in a production environment should avoided, as it’s creating a broken architecture and put the whole application infrastructure at risk.
Fortunately for us, Flyway has an API written in Java and therefore can be easily used in an AWS Lambda, which seems a good trade-off between architectural design, security and ease of implementation.
AWS infrastructure example
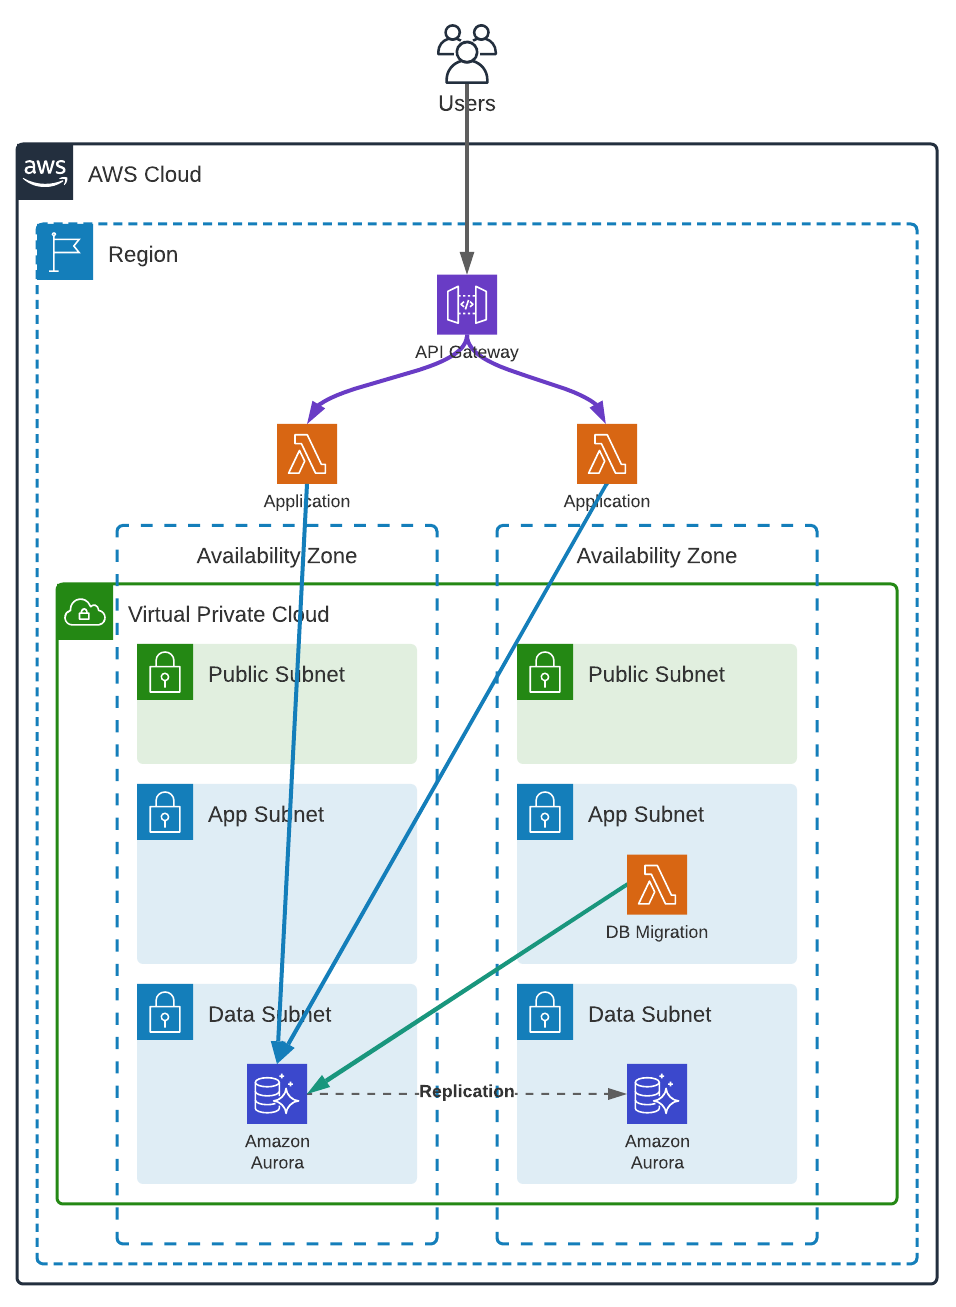
VPC
We are using a regular VPC topology, with 2 Availability Zones and 3 subnets in each. The App private subnets are routed to the NAT gateways for the lambdas to be able to send logs and retrieve secrets from AWS Secrets Manager (using VPC endpoints would be another solution), and the Data private subnets are isolated and cannot access internet.
The application is a simple Lambda running outside our VPC and accessing the Database using AWS RDS Data API.
For more detail concerning the VPC creation, you can have a look at the CloudFormation template.
Security Groups
Next, we need a security group, without any ingress rule, which could be attached to any AWS resource requiring access to the Database (securitygroups.cfn.yml). This security group will be used by the “migration Lambda”.
1
2
3
4
5
6
7
8
9
DbSqlSecurityGroup:
  Type: AWS::EC2::SecurityGroup
  Properties:
    GroupName: !Sub ${AccountCode}-${RegionCode}-${Application}-sql
    GroupDescription: Allows access to the Database to the bearer of this Security Group
    VpcId: !Ref SsmVpcIdKey
    Tags:
      - Key: Name
        Value: !Sub ${AccountCode}-${RegionCode}-${Application}-sql
In the Database security, we accept connection from the previously created one on port 3306 (database.cfn.yml).
1
2
3
4
5
6
7
8
9
10
11
12
DBClusterSecurityGroup:
  Type: AWS::EC2::SecurityGroup
  Properties:
    VpcId: !Ref SsmVpcIdKey
    GroupName: !Sub ${AccountCode}-${RegionCode}-${Application}-${ServerType}-cluster
    GroupDescription: Allows access to the Database
    SecurityGroupIngress:
      - IpProtocol: tcp
        FromPort: 3306
        ToPort: 3306
        SourceSecurityGroupId: !Ref SsmDbSqlSecurityGroupIdKey
        Description: Allow Connection from the bearer of the DB SQL Security Group
RDS Aurora Serverless V1 with MySQL compatibility
In this example, we will use an Amazon RDS Aurora Serverless, to 1) cut the costs and 2) be able to use the RDS Data API which will allow us to access the Database from the Application Lambda without the need to deploy it inside our VPC.
First, we create two secrets in AWS Secrets Manager. One will be used for the Master User (the Database administrator) and the other one with restricted access, used by the application (database.cfn.yml).
1
2
3
4
5
6
7
8
9
10
11
12
13
14
15
16
17
18
19
20
21
DBClusterSecret:
  Type: AWS::SecretsManager::Secret
  Properties:
    Name: !Ref DatabaseClusterSecretName
    Description: Master user credentials for the database-cluster
    GenerateSecretString:
      SecretStringTemplate: '{"username": "admin"}'
      GenerateStringKey: 'password'
      PasswordLength: 32
      ExcludeCharacters: '"@/\$`&'

DBHelloWorldSecret:
  Type: AWS::SecretsManager::Secret
  Properties:
    Name: !Ref DatabaseDbHelloWorldSecretName
    Description: Master user credentials for the helloworld database
    GenerateSecretString:
      SecretStringTemplate: '{"username": "user_helloworld"}'
      GenerateStringKey: 'password'
      PasswordLength: 32
      ExcludeCharacters: '"@/\$`&'
Then, the database, with an auto-pause after 10 min of inactivity database.cfn.yml:
1
2
3
4
5
6
7
8
9
10
11
12
13
14
15
16
17
18
19
20
DBCluster:
  Type: AWS::RDS::DBCluster
  Properties:
    DeletionProtection: true
    MasterUsername: !Sub '{{resolve:secretsmanager:${DBClusterSecret}::username}}'
    MasterUserPassword: !Sub '{{resolve:secretsmanager:${DBClusterSecret}::password}}'
    Engine: aurora-mysql
    EngineMode: serverless
    EngineVersion: !Ref DatabaseVersion
    StorageEncrypted: true
    DBClusterParameterGroupName: !Ref DBClusterParameterGroup
    DBSubnetGroupName: !Ref DBSubnetGroup
    VpcSecurityGroupIds:
      - !Ref DBClusterSecurityGroup
    ScalingConfiguration:
      AutoPause: true
      MaxCapacity: !Ref DatabaseMinCapacity
      MinCapacity: !Ref DatabaseMaxCapacity
      SecondsUntilAutoPause: 600
    EnableHttpEndpoint: true
And finally, we create some useful parameters in AWS SSM Parameter Store (database.cfn.yml).
1
2
3
4
5
6
7
8
9
10
11
12
13
14
15
16
17
18
19
20
21
22
23
24
25
26
27
SsmDbHelloWorldSecretArn:
  Type: AWS::SSM::Parameter
  Properties:
    Type: String
    Name: !Ref SsmDbHelloWorldSecretArnKey
    Value: !Ref DBHelloWorldSecret

SsmDatabaseClusterArn:
  Type: AWS::SSM::Parameter
  Properties:
    Type: String
    Name: !Ref SsmDatabaseClusterArnKey
    Value: !Sub arn:aws:rds:${AWS::Region}:${AWS::AccountId}:cluster:${DBCluster}

SsmJdbcUrl:
  Type: AWS::SSM::Parameter
  Properties:
    Type: String
    Name: !Ref SsmJdbcUrlKey
    Value: !Sub jdbc:mysql://${DatabaseFqdn}:3306?useSsl=true&enabledTLSProtocols=TLSv1.2

SsmJdbcUrlHelloWorld:
  Type: AWS::SSM::Parameter
  Properties:
    Type: String
    Name: !Ref SsmJdbcUrlHelloWorldKey
    Value: !Sub jdbc:mysql://${DatabaseFqdn}:3306/${SsmDatabaseNameHelloWorldKey}?useSsl=true&enabledTLSProtocols=TLSv1.2
The RDS Data API requires the Database Cluster ARN and the Secret ARN. Flyway, not having any integration with RDS Data API, we need JDBC URLs, one for the whole Cluster and another one for a specific Database (as in MySQL Database terminology). But more on that later.
Migration Lambda
Now that we have an infrastructure, we can create our migration Lambda.
In a previous article we have already seen how to create and build AWS Lambdas in Java. For our migration Lambda using Flyway we can start with the example using the AWS SDK for Java. From there, we only have to add a dependency for the MySQL driver and another one for Flyway in our pom.xml:
1
2
3
4
5
6
7
8
9
10
11
12
<!-- https://mvnrepository.com/artifact/mysql/mysql-connector-java -->
<dependency>
  <groupId>mysql</groupId>
  <artifactId>mysql-connector-java</artifactId>
  <version>${mysql-connector-java.version}</version>
</dependency>
<!-- https://mvnrepository.com/artifact/org.flywaydb/flyway-core -->
<dependency>
  <groupId>org.flywaydb</groupId>
  <artifactId>flyway-core</artifactId>
  <version>${flyway-core-version}</version>
</dependency>
We can then use Flyway to do our migrations.
1
2
3
4
5
6
7
var flyway = Flyway.configure().dataSource(
  "JDBC URL",
  "username",
  "password"
).load();

flyway.migrate();
By default, Flyway is looking for SQL scripts in a folder named db/migration. At this point, our only concern is to retrieve the JDBC URL, master user and master password. The easier solution is to use environment variables - one with the JDBC URL and another one with the name of the secret holding the master username and password (Configuration.java):
1
2
3
4
5
6
7
8
9
10
11
12
13
14
15
16
17
18
19
20
21
22
23
24
25
26
27
28
29
30
31
32
33
34
35
36
37
38
39
40
41
42
43
44
45
46
47
48
49
package cloud.spikeseed.helloworld;

import com.fasterxml.jackson.core.JsonProcessingException;
import com.fasterxml.jackson.databind.ObjectMapper;
import software.amazon.awssdk.services.secretsmanager.SecretsManagerClient;
import software.amazon.awssdk.services.secretsmanager.model.GetSecretValueRequest;

import java.io.IOException;
import java.util.Map;

class DbSecret {
  private final String username;
  private final String password;
  // [...]
}

public class Configuration {
  private static final ObjectMapper JSON_MAPPER = new ObjectMapper();

  private final String jdbcUrl;
  private final DbSecret dbSecret;

  public Configuration() {
    var smClient = SecretsManagerClient.create();

    this.jdbcUrl = System.getenv("DATABASE_JDBC_URL");
    var dbSecretName = System.getenv("DATABASE_SECRET_NAME");

    try {
      this.dbSecret = getDbSecret(smClient, dbSecretName);
    } catch (IOException e) {
      throw new RuntimeException(e);
    }
  }

  private DbSecret getDbSecret(SecretsManagerClient client, String secretName)
  throws JsonProcessingException {
    var secretResponse = client.getSecretValue(
        GetSecretValueRequest.builder().secretId(secretName).build()
    );
    @SuppressWarnings("unchecked")
    var secretJson = (Map<String, String>) JSON_MAPPER
                     .readValue(secretResponse.secretString(), Map.class);

    return new DbSecret(secretJson.get("username"), secretJson.get("password"));
  }

  // [...]
}
We can then use the Configuration class in our Handler:
1
2
3
4
5
6
7
8
9
10
11
12
13
14
15
16
17
18
19
20
21
22
23
24
25
26
27
package cloud.spikeseed.helloworld;

import com.amazonaws.services.lambda.runtime.Context;
import com.amazonaws.services.lambda.runtime.RequestHandler;
import org.flywaydb.core.Flyway;

import java.util.Map;

public class Handler implements RequestHandler<Map<String, String>, String> {

  @Override
  public String handleRequest(Map<String, String> input, Context context) {
    var config = new Configuration();
    var flyway = Flyway.configure().dataSource(
        config.getJdbcUrl(),
        config.getDbSecret().getUsername(),
        config.getDbSecret().getPassword()
    ).load();

    if (input != null && "clean".equals(input.get("action"))) {
      flyway.clean();
    } else {
      flyway.migrate();
    }
    return null;
  }
}
Executing the Lambda with the following payload {"action": "clean"} will do a flyway clean and everything else a flyway migrate.
The CloudFormation template used to deploy our Lambda is a regular template to deploy a Lambda inside a VPC (dbmigrations.cfn.yml).
What is important to remember is:
- The role of the Lambda must have the permissions to retrieve Secrets from AWS Secrets Manager and handle Network Interfaces
- The Lambda must be deployed in the App private subnets
- The Lambda must use the SQL security group created previously
Now we have an AWS Lambda deployed in a VPC with access to our Database. The last step is to integrate it into our CI/CD pipeline, but we will defer this discussion as we are missing one last piece of the puzzle.
Database initialization
When creating an Amazon RDS the database contains at most a database/schema (ignoring all the system elements) and a Master User.
Therefore, for an application (using a RDBMS) to run, we need to create:
- a User with minimal permissions (Principle of Least Privilege - An application should never use the Master User)
- additional databases/schemas (if needed)
To do so, we need to execute an SQL script after the Database creation and before deploying the application. The easiest way is to have an AWS Lambda which will take care of this. Unfortunately, this time Flyway will not be of any help, even if in theory we could make it work with some workarounds and loopholes it is not its purpose. To create users and database/schemas, we need to resort to a custom solution.
In the following example, we want to:
- create a database
- create a user
- give only CRUD permissions to the user only for that database
1
2
3
4
5
CREATE DATABASE IF NOT EXISTS <database_name>;

CREATE USER IF NOT EXISTS '<user_name>'@'%' IDENTIFIED BY '<user_password>';

GRANT DELETE, INSERT, SELECT, UPDATE ON <database_name>.* TO '<user_name>'@'%';
To be able to customize the name of the database, the name of the user and its password we can create a template.
1
2
3
4
5
CREATE DATABASE IF NOT EXISTS $db_name_helloworld;

CREATE USER IF NOT EXISTS '$db_user_name_helloworld'@'%' IDENTIFIED BY '$db_user_password_helloworld';

GRANT DELETE, INSERT, SELECT, UPDATE ON $db_name_helloworld.* TO '$db_user_name_helloworld'@'%';
In this example, we are using variables starting with a dollar ($) but it all depends on the programming language and templating library we use. As we already have a Lambda in Java, let’s continue this way and use StringUtils#replaceEach from Apache Commons Lang 3. Furthermore, as it is already a transitive dependency from the AWS SDK we don’t have to add it as an explicit dependency.
1
2
3
4
5
6
7
8
9
10
11
12
StringUtils.replaceEach(content,
    new String[]{
        "$db_name_helloworld",
        "$db_user_name_helloworld",
        "$db_user_password_helloworld"
    },
    new String[]{
        configuration.getDbHelloWorldName(),
        configuration.getDbHelloWorldSecret().getUsername(),
        configuration.getDbHelloWorldSecret().getPassword()
    }
);
As this article is not about Java or JDBC, we won’t dive into the code which is straightforward. We have:
- a Configuration class close to what we have seen previously with 2 more parameters. We still need the Cluster JDBC URL and the master user secrets. We also need the new database name and the new user secrets, hence 2 other environment variables
-
an SqlScriptLoader class which:
- loads the script from sql/Init.sql inside the JAR to a String
- replaces the variables with their actual values
- parses the script to remove comments
- splits everything else when a semi-colon is found, to create a list of SQL statements
- an SqlExecutor class which executes the SQL statements
- the Handler class which tights everything together
To create the AWS Lambda the CloudFormation template is exactly the same as the one we used previously but with 2 more environment variables.
The sample application
To check that everything is working correctly we are going to create a simple Lambda behind an API Gateway. The Lambda will return the list of countries in the Database using AWS RDS Data API (Amazon Aurora Labs for MySQL).
1
2
3
4
5
6
7
8
9
10
11
12
13
14
15
16
17
18
19
20
21
22
23
24
25
26
27
28
29
30
31
32
33
34
35
36
37
38
39
40
41
42
43
44
45
46
47
48
49
50
51
52
53
54
55
56
57
58
59
60
61
62
63
64
65
66
67
68
69
70
71
72
73
package cloud.spikeseed.helloworld;

import com.amazonaws.services.lambda.runtime.Context;
import com.amazonaws.services.lambda.runtime.RequestHandler;
import com.amazonaws.services.lambda.runtime.events.APIGatewayV2HTTPEvent;
import com.amazonaws.services.lambda.runtime.events.APIGatewayV2HTTPResponse;
import com.fasterxml.jackson.databind.ObjectMapper;
import com.fasterxml.jackson.databind.SerializationFeature;
import org.slf4j.Logger;
import org.slf4j.LoggerFactory;
import software.amazon.awssdk.services.rdsdata.RdsDataClient;
import software.amazon.awssdk.services.rdsdata.model.ExecuteStatementRequest;

import java.io.IOException;
import java.util.List;
import java.util.Map;
import java.util.stream.Collectors;

public class Handler implements
  RequestHandler<APIGatewayV2HTTPEvent, APIGatewayV2HTTPResponse> {

  private static final Logger LOG = LoggerFactory.getLogger(Handler.class);
  private final static ObjectMapper JSON_MAPPER = new ObjectMapper();

  private static final RdsDataClient rdsData = RdsDataClient.builder().build();

  private static final String DB_CLUSTER_ARN =
      System.getenv("DATABASE_CLUSTER_ARN");
  private static final String DB_SECRET_ARN =
      System.getenv("DATABASE_SECRET_ARN");
  private static final String DB_NAME =
      System.getenv("DATABASE_NAME");

  private List<Country> getCountries() {
    var statement = ExecuteStatementRequest.builder()
        .resourceArn(DB_CLUSTER_ARN)
        .secretArn(DB_SECRET_ARN)
        .database(DB_NAME)
        .sql("select alpha2, alpha3, name from country")
        .build();

    var result = rdsData.executeStatement(statement);

    return result.records().stream().map(fields -> {
      var alpha2 = fields.get(0).stringValue();
      var alpha3 = fields.get(1).stringValue();
      var name = fields.get(2).stringValue();
      return new Country(alpha2, alpha3, name);
    }).collect(Collectors.toList());
  }

  @Override
  public APIGatewayV2HTTPResponse handleRequest(
      APIGatewayV2HTTPEvent event, Context context){
    try {
      JSON_MAPPER.configure(SerializationFeature.FAIL_ON_EMPTY_BEANS, false);
      LOG.info("ENVIRONMENT VARIABLES: {}",
               JSON_MAPPER.writeValueAsString(System.getenv()));
      LOG.info("CONTEXT: {}", JSON_MAPPER.writeValueAsString(context));

      var countries = getCountries();

      return APIGatewayV2HTTPResponse.builder()
          .withStatusCode(200)
          .withHeaders(Map.of("Content-Type", "application/json"))
          .withBody(JSON_MAPPER.writeValueAsString(countries))
          .build();
    } catch (IOException e) {
      throw new RuntimeException(e);
    }
  }

}
To deploy this Lambda easily we can use a SAM template. The only thing worth mentioning in this template is that we are giving rds-data:* permissions to the Lambda’s role.
A Basic CI/CD pipeline
For our CI/CD pipeline we will use AWS CodePipeline and AWS CodeBuild (cicd-app.cfn.yml) with a buildspec.yml file which will:
- Build the Lambdas
- Push the Lambdas to S3
- Deploy the Lambdas
- Execute our Ansible Playbook
As we often did in previous articles, we will use Ansible to deploy our CloudFormation templates (for more details see. CloudFormation with Ansible). In addition, we will use Ansible to execute the init and migration Lambdas.
By creating a SSM Parameter holding the ARN of our Lambdas:
1
2
3
4
5
6
SsmLambdaArn:
  Type: AWS::SSM::Parameter
  Properties:
    Type: String
    Name: !Ref SsmLambdaArnKey
    Value: !GetAtt Lambda.Arn
We can easily invoke it from Ansible. First, for the dbinit Lambda:
1
2
3
4
5
6
7
8
9
10
11
12
13
14
15
16
- name: Retrieving DB Init ARN
  ansible.builtin.set_fact:
    lambda_dbinit_arn: "{{ lookup( 'aws_ssm', ssm_lambda_dbinit_arn_key, aws_profile=pbk_account_name, region=default_aws_region ) }}"

- name: Execute DB Init Lambda
  community.aws.execute_lambda:
    function_arn: "{{ lambda_dbinit_arn }}"
    region: "{{ default_aws_region }}"
    profile: "{{ pbk_account_name }}"
    tail_log: true
    wait: true
  register: lambda_dbinit_response

- name: Print DB Init Lambda execution
  debug:
    msg: "{{ lambda_dbinit_response }}"
And then the migration lambda:
1
2
3
4
5
6
7
8
9
10
11
12
13
14
15
16
17
18
19
20
21
22
23
24
25
26
27
- name: Retrieving DB Migrations Hello World ARN
  ansible.builtin.set_fact:
    lambda_dbmigrations_hw_arn: "{{ lookup( 'aws_ssm', ssm_lambda_dbmigrations_helloworld_arn_key, aws_profile=pbk_account_name, region=default_aws_region ) }}"

- name: Execute DB Migrations Hello World Lambda - Clean
  community.aws.execute_lambda:
    function_arn: "{{ lambda_dbmigrations_hw_arn }}"
    region: "{{ default_aws_region }}"
    profile: "{{ pbk_account_name }}"
    tail_log: true
    wait: true
    payload:
      action: clean
  register: lambda_dbmigrations_hw_response

- name: Execute DB Migrations Hello World Lambda - Migrate
  community.aws.execute_lambda:
    function_arn: "{{ lambda_dbmigrations_hw_arn }}"
    region: "{{ default_aws_region }}"
    profile: "{{ pbk_account_name }}"
    tail_log: true
    wait: true
  register: lambda_dbmigrations_hw_response

- name: Print DB Migrations Hello World Lambda execution
  debug:
    msg: "{{ lambda_dbmigrations_hw_response }}"
In this example, we invoke the Lambda twice to execute:
flyway cleanflyway migrate
Of course, we could add some mechanisms to not invoke the Lambdas if nothing has changed.
Testing the deployed application
Once the pipeline has been executed, we should have everything deployed and be able to retrieve our new AWS API Gateway’s endpoint:
1
2
3
4
5
6
7
8
9
10
11
12
$ aws apigatewayv2 get-apis \
  --profile spikeseed-labs \
  --region us-east-1 \
  --no-cli-pager
{
  "Items": [
    {
      "ApiEndpoint": "https://q2yc6iop5a.execute-api.us-east-1.amazonaws.com",
      // [...]
    }
  ]
}
Then with this endpoint, we can make an HTTP request (due to the current configuration of the Lambda, no matter the URL paths and query parameters, the response will always be the list of countries).
1
2
3
4
5
6
7
$ curl https://q2yc6iop5a.execute-api.us-east-1.amazonaws.com
[
  {"alpha2":"be","alpha3":"bel","name":"Belgium"},
  {"alpha2":"de","alpha3":"deu","name":"Germany"},
  {"alpha2":"fr","alpha3":"fre","name":"France"},
  {"alpha2":"lu","alpha3":"lux","name":"Luxembourg"}
]
Note: By using AWS RDS Aurora Serverless with auto-pause, the Database may be in pause when called by the Lambda, which will result in the following error:
Received error response: […].rdsdata.model.BadRequestException: Communications link failure
By making a call the RDS, even if an exception is thrown, it will unpause and be ready after 30 seconds or so.
To avoid having the exception and make a new call, we could implement a retry mechanism.
Conclusion
In this article, we have seen that Relational Databases migration can be part of a CI/CD pipeline as a fist class citizen as any application code and Infrastructure as Code. The initial setup requires a little work, but after that we must only care about our migration scripts and update the JDBC driver and Flyway dependencies occasionally.