Yohan Beschi
Developer, Cloud Architect and DevOps Advocate
Terraform 101
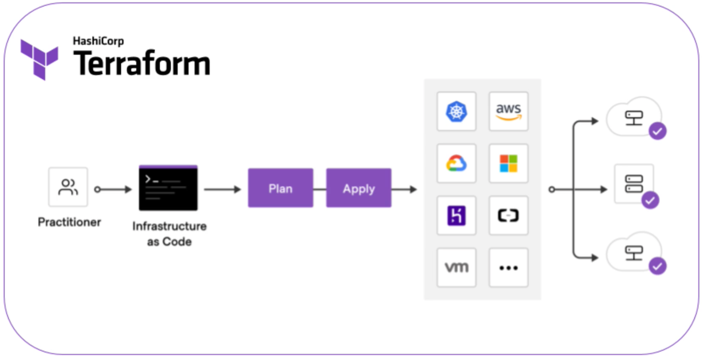
Since June 2021, Terraform is finally generally available after 6 years of beta versions.
At Arηs Spikeseed (pronounced [aris]), we love AWS CloudFormation for deploying infrastructures on AWS. Its integration with AWS, its stability, the ease to see/remove the deployed stacks, the full control over every resource, make it a wonderful service. Unfortunately, CloudFormation is missing quite important features which is a reason we always use it coupled with Ansible (for more details see CloudFormation with Ansible). But even so, sometimes it is not enough, we need to develop Custom Resources. When only a few Custom Resources are required, it is not a problem. But once we start using services partially covered by CloudFormation (like Amazon EKS) it is starting to feel like hell as Custom Resources development is not an easy ride (a simple typo can block a complete stack for hours between the retries and the long timeout). In these situations, Terraform is the perfect tool, providing that we give it a chance considering the mind switch required when coming from AWS CloudFormation.
Terraform has be around for quite some time and is considered as one of the few widely accepted tools by the DevOps community for Infrastructure as Code (IaC).
Sometimes the main reason to use Terraform is often based on a misunderstanding. Terraform can create resources for multiple cloud providers, but by no means it should be understood as writing a Terraform template compatible with every cloud provider.
Terraform itself intentionally does not attempt to abstract over similar services offered by different vendors, because we want to expose the full functionality in each offering and yet unifying multiple offerings behind a single interface will tend to require a “lowest common denominator” approach.
However, using Terraform is a way to not be tied up to a cloud provider, its IaC tool and consequently a knowledge that can be used for most cloud providers.
Table of Contents
- Getting Started
- HashiCorp Configuration Language
- Terraform modules
- State and Backend
- Bootstrapping a backend
- Terraform CLI
- TFSwitch
- Conclusion
Getting Started
The Terraform documentation is great but it’s scattered across multiple pages, and even multiple domains (HashiCorp Learn), which makes it quite hard to use if we do not know what we are looking for in the first place. A good starting point is the book Terraform: Up and Running by Yevgeniy Brikman, Co-founder of Gruntwork, the company behind Terragrunt.
This article does not intend to be a Terraform tutorial. But in 6 years a lot has changed, therefore, to be on the same page let’s consider this article to be an extended Cheat Sheet with Tips and a pinch of best practices.
Terraform’s purpose is to describe an infrastructure using the HashiCorp Configuration Language (HCL). The code is stored in text files encoded in UTF-8 with the .tf extension (or .tf.json). File names are not significant. All .tf files in a module are treated as a single document.
A folder with at least one .tf file makes it a Terraform module.
1
2
3
4
5
$ tree my-project/
.
├── main.tf
├── outputs.tf
├── variables.tf
Nested folders are considered different modules.
1
2
3
4
5
6
7
8
9
10
$ tree my-project/
.
├── modules/
│   ├── module_1/
│   │   ├── main.tf
│   │   ├── outputs.tf
│   │   ├── variables.tf
├── main.tf
├── outputs.tf
├── variables.tf
Terraform always runs in the context of a single root module. In Terraform CLI, the root module is the working directory where Terraform is invoked.
HashiCorp Configuration Language
The Terraform language syntax is built around two key syntax constructs:
- arguments (also named attributes)
1
  image_id = "ami-0123456789"
- blocks
1
2
3
4
5
6
7
8
  resource "aws_instance" "example" {
    instance_type = "t2.micro"
    ami           = var.image_id

    credit_specification { # Nested Block
      cpu_credits = "unlimited"
    }
  }
Comments
The Terraform language supports three different syntaxes for comments:
#begins a single-line comment, ending at the end of the line.//also begins a single-line comment, as an alternative to#./*and*/are start and end delimiters for a comment that might span over multiple lines.
Identifiers
Identifiers can contain letters, digits, underscores (_), and hyphens (-). The first character of an identifier must not be a digit.
Argument names, block type names, and the names of most Terraform-specific constructs like resources, input variables, etc. are all identifiers.
Providers
Terraform alone cannot do anything. It needs providers (plugins):
1
2
3
provider "aws" {
  region = "eu-west-1"
}
Each provider adds a set of resource types and/or data sources that Terraform can manage. Each provider has its own documentation, and most providers are available from Terraform Registry.
Some providers on the Registry are developed and published by HashiCorp, some are published by platform maintainers, and some are published by users and volunteers.
There are currently more than 1000 providers and most of them are not related to Public Cloud and infrastructure.
A few examples of providers:
- Utility providers:
- Archive provider
- Template provider to handle templates
- TLS provider to manage TLS certificates
- SaaS products providers:
- Softwares providers:
- CLI tools providers:
Versions
When declaring a provider or an external module (more on that later), if the required version is not specified, Terraform will always download the latest, which is usually not what we want. We should always use a fixed version (Version Constraints). Not that we don’t trust providers and modules developers, but we don’t want to run code in production that has never been tested before.
1
2
3
4
5
6
7
8
9
10
terraform {
  required_version = "1.0.1"

  required_providers {
    aws = {
      source  = "hashicorp/aws"
      version = "3.74.0"
    }
  }
}
Even if since version 0.14 Terraform generates a Dependency Lock File (much like package-lock.json or yarn.lock for NodeJS dependencies) at present, this file tracks only provider dependencies (not modules). Furthermore, the checksums in the Dependency Lock file are Platform dependant. If we are using MacOS or Windows for development, commit the file and then deploy the infrastructure from a CI/CD job running on Linux it will fail. To avoid this issue, we need to generate a lock file for all the platforms (terraform providers lock -platform=windows_amd64 -platform=darwin_amd64 -platform=linux_amd64) which is quite annoying. Therefore, we usually do not commit it to our version control repository.
Resources and Data Sources
Each provider defines its own set of resources and data sources. Resources and data sources can be seen as wrappers around APIs, where resources handle create, update, and delete operations and data sources handle read operations.
Let’s have a look at the AWS Provider:
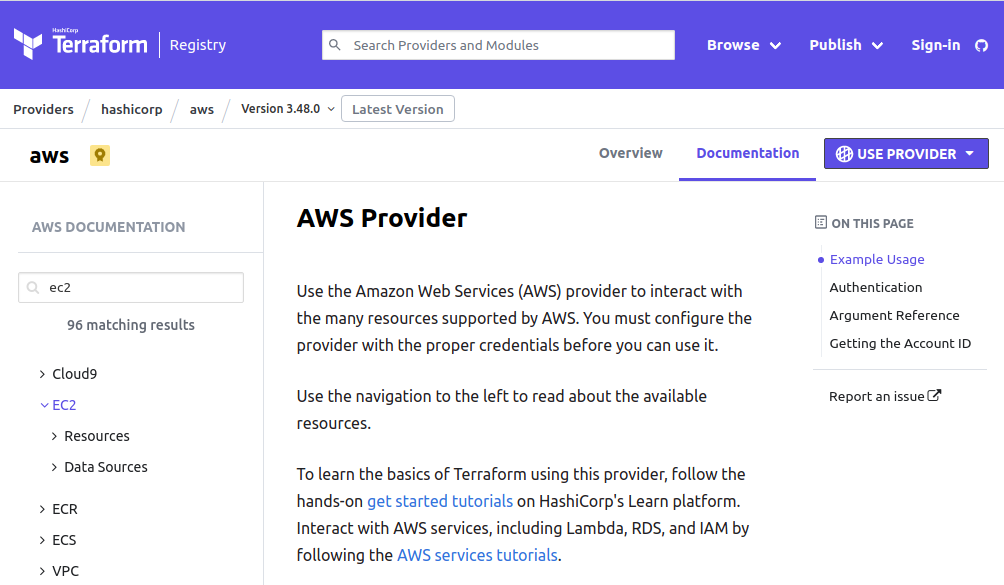
On the left side menu, we have few Guides and then AWS Services. Almost every service is split into “Resources” and “Data Sources” categories.
Let’s see an example which:
- retrieves the most recent Amazon Linux 2 AMI for the
x86_64architecture - creates a security group
- creates an EC2 instance with the AMI
- attaches the security group to the EC2 primary ENI
1
2
3
4
5
6
7
8
9
10
11
12
13
14
15
16
17
18
19
20
21
22
23
24
25
26
27
28
29
30
31
32
33
data "aws_ami" "al2" {
 most_recent = true
 owners      = "amazon"

 filter {
   name   = "name"
   values = ["amzn2-ami-hvm-*-x86_64-gp2"]
 }
}

resource "aws_security_group" "test" {
  name        = "test-sg"
  description = "Block access to test instance"
  vpc_id      = var.vpc_id

  egress {
    from_port        = 0
    to_port          = 0
    protocol         = "-1"
    cidr_blocks      = ["0.0.0.0/0"]
    ipv6_cidr_blocks = ["::/0"]
  }
}

resource "aws_instance" "test" {
 ami                         = data.aws_ami.al2.id
 instance_type               = "t3.micro"
}

resource "aws_network_interface_sg_attachment" "sg_attachment" {
  security_group_id    = "${aws_security_group.test.id}"
  network_interface_id = "${aws_instance.test.primary_network_interface_id}"
}
Variables
If we were to compare HCL to a programming language:
- Modules would be functions
- Input Variables would be function parameters
- Locals Values would be the function local variables
- Output Values would be return values of the functions
Input Variables
Input variables serve as parameters for a Terraform module.
1
2
3
4
5
6
7
8
9
10
11
variable "image_id" {
  type        = string
  default     = "ami-0123456789"
  description = "Amazon Linux 2 AMI ID for Region XYZ"
  sensitive   = false

  validation {
    condition     = length(var.image_id) > 4 && substr(var.image_id, 0, 4) == "ami-"
    error_message = "The image_id value must be a valid AMI id, starting with \"ami-\"."
  }
}
Every property is optional, but we need at least the type attribute or the default attribute. If both are defined, the default value must match the type.
In addition to string, HCL supports other types:
numberbool(for boolean)list(<TYPE>)set(<TYPE>)map(<TYPE>)object({<ATTR NAME> = <TYPE>, ... })tuple([<TYPE>, ...])
To define the absence of value, the keyword null can be used.
To use an input variable, we use var.<NAME>, where <NAME> matches the label given in the declaration block
1
2
3
4
resource "aws_instance" "example" {
  instance_type = "t3.micro"
  ami           = var.image_id
}
The sensitive attribute prevents Terraform from showing its value in the plan or apply output, but the value is still recorded in Terraform state.
Local Values
A local value assigns a name to an expression, so we can use it multiple times within a module without repeating it.
1
2
3
4
5
6
7
8
9
10
11
12
locals {
  service_name = "forum"
  owner        = "Community Team"
  instance_ids = concat(aws_instance.blue.*.id, aws_instance.green.*.id)

  common_tags = {
    Service = local.service_name
    Owner   = local.owner
  }

  colors = ["blue", "green"]
}
To use a local value, instead of using var., we must use local.<NAME>.
1
2
3
resource "aws_instance" "example" {
  tags = local.common_tags
}
As mentioned previously, multiple .tf files in a module should be viewed as a single document, therefore locals’ names can only be defined once per module, but they can be defined in one file and used in another one.
Output Values
Output values return values of a Terraform module to be used outside (e.g. the module caller).
1
2
3
4
5
output "instance_ip_addr" {
  value       = aws_instance.server.private_ip
  description = "The private IP address of the main server instance."
  sensitive   = true
}
To access an output value we need to use module.<MODULE NAME>.<OUTPUT NAME> (e.g. module.ec2.instance_ip_addr).
Calling a child module
Splitting our code into modules is a way to not repeat ourselves (DRY - Don’t Repeat Yourself - philosophy). We can have modules to:
- create VPCs, with subnets, Internet Gateways, NAT Gateways, Route Tables, etc.
- create Application Load Balancers with Target Groups, Listener Rules, etc.
- an EKS Cluster
- etc.
To include a module into our configuration with specific values for its input variables we use the module block:
1
2
3
4
5
6
7
module "vpc" {
  source = "../modules/aws-vpc"

  cidr             = "10.0.4.0/22"
  public_subnets   = ["10.0.4.0/26", "10.0.4.64/26", "10.0.4.128/26"]
  private_subnets  = ["10.0.5.0/26", "10.0.5.64/26", "10.0.5.128/26"]
}
The source attribute can be a local path, but also a path to Terraform registry (used with the version attribute), a git repository, an AWS S3 Bucket or a GCP Bucket.
In the caller module, we can then access the child module output values (from any .tf file in the caller module):
1
2
3
4
5
6
7
8
9
10
11
12
13
resource "aws_security_group" "test" {
  name        = "test-sg"
  description = "Block access to test instance"
  vpc_id      = module.vpc.vpc_id

  egress {
    from_port        = 0
    to_port          = 0
    protocol         = "-1"
    cidr_blocks      = ["0.0.0.0/0"]
    ipv6_cidr_blocks = ["::/0"]
  }
}
Built-in Functions
Terraform has numerous built-in functions to:
- manipulate strings
- manipulate numbers
- merge maps or objects
- concatenate lists
- convert a string to a JSON Object
- read the content of a local file
- etc.
Even if functions should be used sparingly, it is always useful to know what is at our disposal.
Meta-arguments
Terraform has special arguments that can be used with every resource type:
- depends_on - to handle dependencies that Terraform can’t automatically infer like CloudFormation
DependsOn - count - to create multiple instances of the same resource
- for_each - to create multiple instances of the same resource
- provider - to specify which provider configuration to use for a resource
- lifecycle - to control
terraform applycommand’s behaviour
The count and for_each meta-arguments may seem similar, but they have few important differences.
count should be used when we want to create multiple instances (as in object-oriented programming not EC2s) of the same resource without any per instance configuration.
1
2
3
4
5
6
resource "aws_instance" "example" {
  count = 10

  instance_type = "t3.micro"
  ami           = var.image_id
}
Here we are creating 10 EC2 instances. To refer to these instances we can use:
<TYPE>.<NAME>ormodule.<NAME>(e.g.aws_instance.example) refers to the resource block<TYPE>.<NAME>[<INDEX>]ormodule.<NAME>[<INDEX>](e.g.aws_instance.example[0],aws_instance.example[1], etc.) refers to individual instances.<TYPE>.<NAME>[*]ormodule.<NAME>[*](e.g.aws_instance.example[*]) refers to the list of instances.
count can also be used to condition the creation of a resource (e.g with the ternary operator).
1
2
3
4
5
6
resource "aws_instance" "example" {
  count = var.create_instance ? 1 : 0

  instance_type = "t3.micro"
  ami           = var.image_id
}
But count has two major limitations:
- it cannot be used in inline blocks (nested blocks)
-
when
countis used on a resource, as we’ve seen, that resource becomes a list of instances where each instance is identified with an index.1 2 3 4 5 6 7 8 9 10
variable "usernames" { description = "Create IAM users with these names" type = list(string) default = ["foo", "bar", "foobar"] } resource "aws_iam_user" "example" { count = length(var.usernames) name = var.usernames[count.index] }
After creation, if we decide to remove the user
bar, the userfoobarwould have the index 1 (instead of 2) and therefore will be deleted and then recreated which is usually not what we want.
With for_each we don’t have these limitations. In the next example we are using a dynamic block:
1
2
3
4
5
6
7
8
9
10
11
12
13
14
15
16
17
18
variable "custom_tags" {
  description = "Custom tags to set on the Instances in the ASG"
  type        = map(string)
  default     = {}
}

resource "aws_autoscaling_group" "example" {
  # [...]
  dynamic "tag" {
    for_each = var.custom_tags

    content {
      key                 = tag.key
      value               = tag.value
      propagate_at_launch = true
    }
  }
}
We must keep in mind that for_each only support sets and maps. To convert a list into a set, we can use the built-in function toset.
To retrieve a resource we use the value in the set or the key in the map: <TYPE>.<NAME>[<KEY>] (e.g. aws_iam_user.example["foo"])
Terraform modules
In most cases we strongly recommend keeping the module tree flat, with only one level of child modules, and use a technique similar to the above of using expressions to describe the relationships between the modules.
When we first start using Terraform, we might be tempted to define all of our infrastructure in a single Terraform file or a single set of files in one folder. The problem with this approach is that all our states is now stored in a single file too, and a mistake anywhere could break everything. To reduce the risk of accidentally breaking something during an update by doing partial updates or to be able to work in parallel with our teammates, splitting an infrastructure into multiple modules is a necessity. Choosing the right segregation of resources in an infrastructure is difficult but must be decided at the beginning of the project. And once the whole infrastructure is deployed into production there is no going back.
First, we need to make the distinction between generic modules (network, alb, eks, ec2, etc.) that can be reused and infrastructure layers (app1_network, bastion, app1_eks_cluster, etc.).
Then, simple rules of thumb must be applied:
- shared resources must be in dedicated modules
- if a file is starting to be too big, multiple modules must be used
- a resource should be managed in a single module (e.g. managing a VPC in one module and its tags in another one will create drifts in state files. Drifts are elements present on the deployed resource but not managed by the module)
1
2
3
4
5
6
7
8
9
10
$ tree my-project/
.
├── modules/
│   ├── vpc/
│   │   ├── main.tf
│   │   ├── outputs.tf
│   │   ├── variables.tf
├── main.tf
├── outputs.tf
├── variables.tf
In this very simple example, we have the project module (the files directly under my-project - Terraform commands should be executed from this module) and a reusable module named vpc in a modules folder. Everything that can be reused across a project or even multiple projects (VPCs, EKS clusters, etc.) should be modules, either directly included in the project’s version control repository, from Terraform registry or a git repository.
State and Backend
Terraform uses a state file to map real world resources to our configuration and can contain sensitive data. Therefore, a state file should never be part of a version control repository. Even if state files are just JSON, manual editing is discouraged.
By default, Terraform stores state locally in a file named terraform.tfstate. But to be shared between a team, a “backend” (a shared remote storage) must be used. Backends are responsible for storing state and providing an API for state locking to avoid concurrent updates and potentially corrupting our state. Several remote backends are supported, including Amazon S3, Azure Storage, Google Cloud Storage, HashiCorp’s Terraform Cloud, Terraform Pro, and Terraform Enterprise.
When using a non-local backend, Terraform will not persist the state anywhere on disk except in the case of a non-recoverable error where writing the state to the backend failed.
With a remote backend and locking, collaboration is no longer a problem.
Following AWS Best Practices to ensure maximum segregation when working with multiple environments we should have at least:
- one AWS Account per environment
- one central AWS Account to share resources like ECR, CodeCommit, Assets, centralized logging, etc and for DevOps (CI/CD pipelines, Bastion Hosts, etc.)
In consequence, Terraform state files should be stored in AWS S3 dedicated bucket in each AWS Account. If an infrastructure in deployed in multiple regions, we have two acceptable solutions:
- one S3 bucket per region
- one root folder per region in a shared bucket (e.g.
tfstate/eu-west-1/vpc/terraform.tfstateandtfstate/eu-central-1/vpc/terraform.tfstate)
Bootstrapping a backend
To store a state remotely, we need to have a backend, but at the start of a project this backend does not exist.
To solve this chicken and egg problem we first need to create a versioned and encrypted S3 bucket to store the state files with regional replication (even with a durability of 99.999999999% we cannot afford to lose a state or we will be in big trouble) and an Amazon DynamoDB table for locking.
As while doing this operation, we do not have an backend it is the only exception where a state file can be committed into a version control repository.
Terraform CLI
The Terraform CLI has dozens of commands. We rarely use most of them, some should be avoided, and others are usually used from time to time for inspection:
- terraform init - initializes a working directory (e.g. downloading providers and modules, accessing backends).
Theinitcommand is idempotent, and will have no effect if no changes are required.
The generated.terraformfolder should not be committed in a version control repository. - terraform fmt - rewrites Terraform configuration files to a canonical format and style. This command applies a subset of the Terraform language style conventions, along with other minor adjustments for readability.
- terraform validate - validates the configuration files in a directory
- terraform plan - creates an execution plan
- terraform apply - executes the actions proposed in a Terraform plan
- terraform destroy - destroys all remote objects managed by a particular Terraform configuration
In addition, we have other useful commands for inspection:
- terraform graph - generates a visual representation of either a configuration or execution plan
- terraform output - extracts the value of an output variable from the state file
- terraform show - provides human-readable output from a state or plan file
- terraform state list - lists resources within a Terraform state
- terraform version - displays the current version of Terraform and all installed plugins
TFSwitch
TFSwitch is the perfect tool to easily switch between versions of Terraform (prior to version 1.0 breaking changes were quite common). After being installed, we can execute the command: tfswitch, which will display a list of Terraform versions. Once a version is selected, tfswitch will install it if it’s not present on our machine and create a symbolic link to /usr/local/bin/terraform (on Linux). We can also directly specify the version to use in the command: tfswitch 1.0.1.
It is worth mentioning that usually only the root user can write into the /usr/local/bin/ folder. Therefore, when using tfswitch on a computer with a single user changing the owner is not an issue: chown <user> /usr/local/bin/ (e.g. chown yohan /usr/local/bin/). It is not a perfect solution, but it is better than executing tfswitch with sudo.
Conclusion
Today, in IT, Infrastructure as Code (IaC) is a requirement. But finding the right tool is not easy and once we have chosen one there is no turning back. Terraform is quite different from AWS CloudFormation but it is a great addition to our toolbox.
In a next article, we will discuss about Terragrunt to keep our code KISS and DRY.