
Charles Guebels
Compliance reporting with Steampipe
Having an overview about the compliance, security, costs, etc. of our AWS resources is very important. Some commercial tools already exist to do that (like Cloud Conformity or Prisma) but some open-source and free tools also exist. In this article we will present one of them called Steampipe.
We will first set up the demo environment, then install and configure Steampipe. After these quick setup tasks, we will see how to use Steampipe to generate static reports and start live dashboards. This article will also explain basic Steampipe concepts such as plugins and mods. At the end of the article, some limitations and advantages will be listed.
Initially, Steampipe is a tool with which we are able to query our resources using SQL. So for example if we want to know which security groups are open for connections from internet, we can do this Steampipe SQL query:
1
2
3
4
5
6
7
8
select
  group_name,
  group_id
from
  aws_vpc_security_group_rule
where
  type = 'ingress'
  and cidr_ip = '0.0.0.0/0';
In the scope of this article, we will not use this feature at all but only the ability of Steampipe to generate reports. We will also focus on AWS resources, but it is important to point out that Steampipe is compatible with many cloud providers, and that we can also query resources from Gitlab, Confluence, Datadog, Jenkins, etc.
Setup
For this article, we will use an AWS Cloud9 environment. We will first set up this Cloud9 environment and then proceed with the pure installation and configuration of Steampipe. It is very easy to do.
IAM role
To give Steampipe the necessary permissions to access the AWS resources, an IAM role with sufficient permissions (through IAM policies) must be used by Steampipe.
To do this we have to create a specific IAM role, let’s call it war-role. To this role we have to attach the AWS managed ReadOnlyAccess policy.
As we will see in the next section, we will use a Cloud9 environment for the purpose of this article. It is why it is also necessary to attach the AWS managed AWSCloud9SSMInstanceProfile policy.
For more complex access configurations like multi-accounts or multi-regions, refer to this page.
Cloud9 configuration
Cloud9 environments are very useful, among others for tool experiments. With just a few clicks in the AWS Console, we can have a completely new isolated environment. We won’t go into detail about the Cloud9 service, but it is good to at least know that each environment is hosted by an EC2 instance. There is also an environment timeout, this means that after a specific time of inactivity the EC2 will shutdown to save costs. Of course the environment can be restarted later in a few seconds.
Follow the instructions below to set up and configure a new Cloud9 environment ready to use Steampipe:
- In the AWS Console, open the AWS Cloud9 service.
- Click on the “Create environment” button.
- Give a name to the environment, select at least a t3.small instance, select a VPC and a subnet to host the environment and click on the “Create” button.
- On the “Environments” page, click on the name of the new environment.
- On the new page, click on the “Manage EC2 instance” button.
- A EC2 service page opens, check the checkbox next to the EC2 instance name, click on the “Action” button and select “Security” and then “Modify IAM role”.
- It is now possible to change the EC2 (and then Cloud9 environment) IAM role to the war-role one, created in the previous section. Click on the “Update IAM role” button.
- We can now re-open the Cloud9 service and, in the “Environments” page, click on “Open”.
- Once the Cloud9 environment is open. Press the “ALT-T” keyboard combination to open a new terminal.
This terminal is the only thing required for this article.
Steampipe installation
In the Cloud9 terminal, execute the command below to install Steampipe:
1
sudo /bin/sh -c "$(curl -fsSL https://raw.githubusercontent.com/turbot/steampipe/main/install.sh)"
That’s it, Steampipe is now installed!
Steampipe plugins and mods installation
Now we will install some Steampipe plugins and mods. Here is a simple definition of these two concepts:
- Plugins: The plugins allow Steampipe to interact with the different service APIs like AWS, GCP, Azure, Gitlab, etc. In our case, without plugin, Steampipe will not able to interact with the AWS API to retrieve the different resources. Consult the documentation to find the list of plugins.
- Mods: The mods are a collection of control rules, dashboards, reports and visualizations related to specific frameworks, standards or topics. Consult the documentation to find the list of mods.
As we are working with AWS, we have to install the AWS plugin:
1
steampipe plugin install aws
In this article we will install the AWS Well Architect mod, corresponding to a collection of rules to validate to be compliant with the AWS Well Architected Framework. It can be installed with the command below:
1
git clone https://github.com/turbot/steampipe-mod-aws-well-architected.git
It will create a directory named steampipe-mod-aws-well-architected.
Please note that the AWS Well Architected Framework Steampipe mod only supports checks for the Operational Excellence and Security pillars.
Please find a list of some other AWS Steampipe mods below:
- AWS Compliance: This mod is able to generate reports about different compliance benchmarks like GDPR, NIST etc.
- AWS Insights: This mod creates dashboards for different AWS services like EBS, S3, etc.
- AWS Perimeter: This mod is able to identity the resources publicly available and network configuration issues.
- Tags Mod: This mod reports all the AWS resources without tags.
- AWS Thrifty: This mod is able to suggest cost optimization.
Generate report
Each Steampipe mod is able to generate a report in several formats: .html, .csv, .md and .json. To generate a report, simply enter into the mod directory and execute the command “steampipe check all –export
1
2
cd steampipe-mod-aws-well-architected
steampipe check all --export aws-war.html
It is possible to replace the all parameter by the name of a specific named collection of control checks. In our case, for the AWS Well Architected mod, we can replace all by benchmark.well_architected_framework_security to only run the rules related to the security pillar. Refer to Steampipe CLI documentation and to the mods documentation for more information.
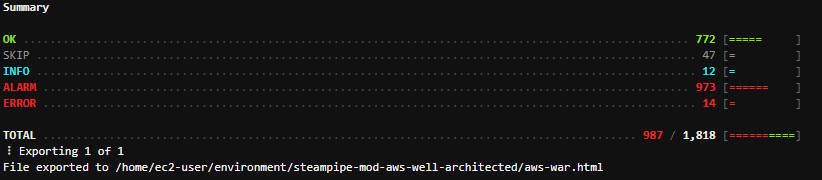
Once the command above finished, we can get a very raw summary in the terminal:
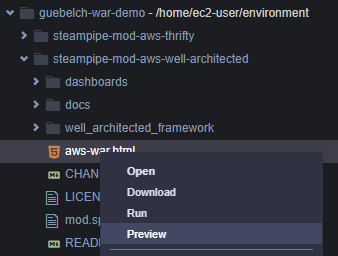
It is also possible to open the generated report in Cloud9 by right-clicking on the aws-war.html file and selecting “Preview”:
The full report opens in a Cloud9 browser:
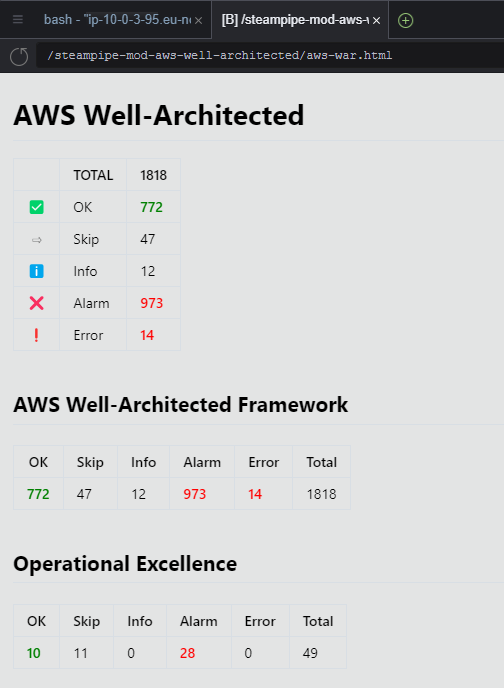
This AWS Well Architected report presents the summary for the different compatible cloud pillars and for the specific AWS Well Architected Framework rules.
Start dashboard
The HTML report have two main disadvantages:
- Non interactive: We cannot hide or filter sections.
- Static content: We have to rerun the command each time we want to refresh the results.
The Steampipes dashboards address these issues and provide additional features.
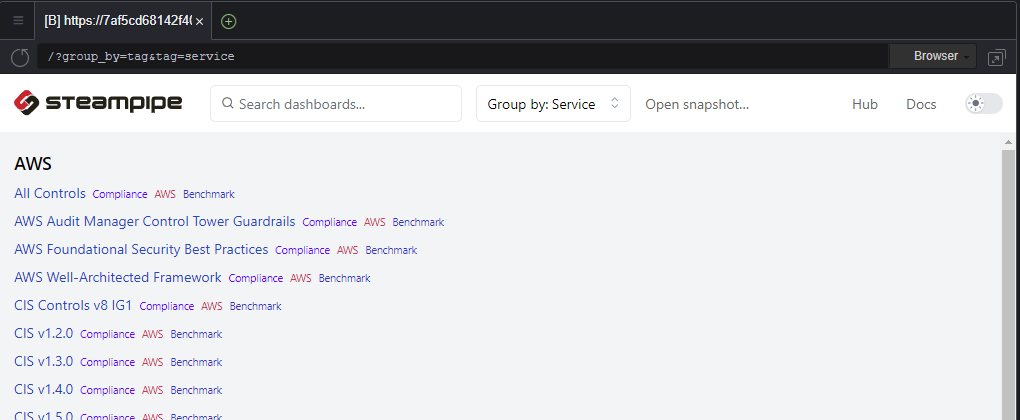
Steampipe dashboards provide rich visualizations of Steampipe data. Dashboards are written in simple HCL, and packaged in mods. It is simple to create your own, but there are also hundreds of dashboards available on the Steampipe Mods section of the Steampipe Hub.
To start a dashboard, simply enter into the mod directory and execute the command “steampipe dashboard –dashboard-port 8080”. So for example:
1
2
cd steampipe-mod-aws-well-architected
steampipe dashboard --dashboard-port 8080
After this last command, a web server starts. In the Cloud9 environment the red message “Could not start web browser.” appears, we can ignore it. To see the dashboard we can click on the “Preview” button at the top of the Cloud9 interface and select “Preview Running Application”. A browser starts and the dashboard appears.
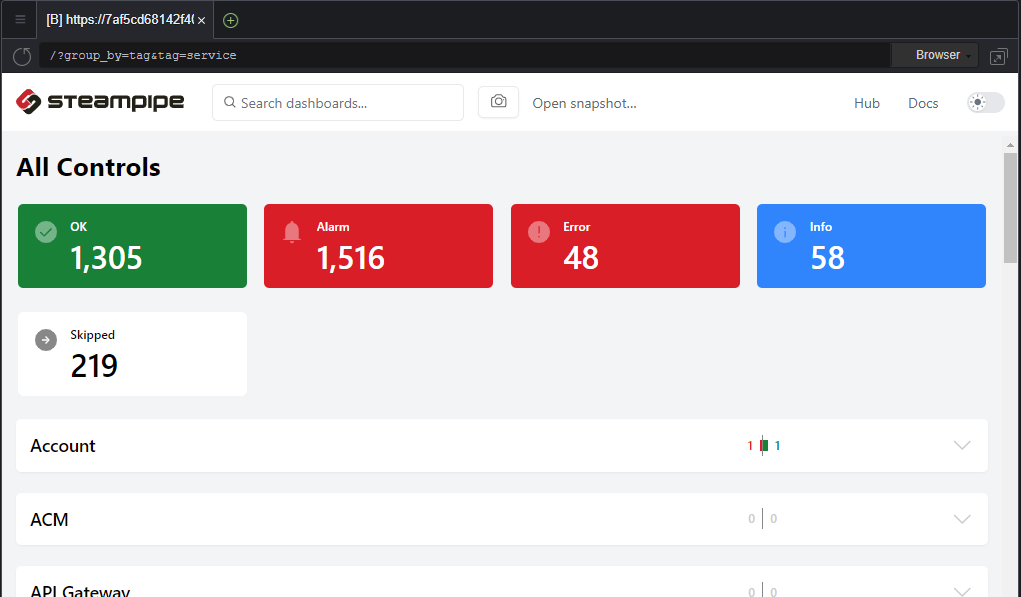
Each time a dashboard section is consulted, Steampipe automatically rescan partially the AWS account to refresh the findings related to this section.
Advantages
Some advantages can be assigned to Steampipe. Please find a non-exhaustive list of them:
- Interactive dashboard.
- Live dashboard.
- Open-source so it is possible to customize the UI or even develop custom rules or dashboards.
- Easy to install, configure and use.
- Free.
- Multi accounts and multi regions.
- Multi cloud.
Limitations
Despite all the advantages listed above, we can find some limitations to the current version of Steampipe:
- Static html reports, not possible to filter.
- We cannot add several mods per report / dashboard.
- Failed checks are not really detailed in the report / dashboard.
- It is not possible to exclude some AWS resources (false positive management for example) or to restrict the resources to check (thanks to AWS tags for example).
Conclusion
The Steampipe open-source tool is very easy to install and use, it not only provides reports but also interactive dashboards. Its community constantly delivers new control rules and dashboards. With the mods, it is possible in a few minutes to have a good view of the level of conformity according to a specific compliance framework.