
Pierre Renard
Cloud technologies addict. Pierre enjoys making awesome cloud-based solutions.
Building a cross-account CI/CD pipeline with AWS CodePipeline

When building applications, we want to be alerted as soon as possible when errors occur (fail fast philosophy) and to release new features fast. This goal can be easily achieved by using CI/CD (Continuous integration / Continuous delivery and deployment) pipelines. Nowadays, CI/CD is essential for any organization. Teams are more productive when they can release new code frequently and deliver a new version of an application without disruption. A CI/CD pipeline ensures that an application is built and tested on every commit (CI) before been deployed in all environments (CD).
AWS provides multiple services to create CI/CD pipelines. In this blog post, we will focus on AWS CodePipeline and AWS CodeBuild.
All the source code presented in this article is available in a Github repository.
Architecture
The following diagram shows the steps and resources required to have a working CI/CD pipeline on AWS.
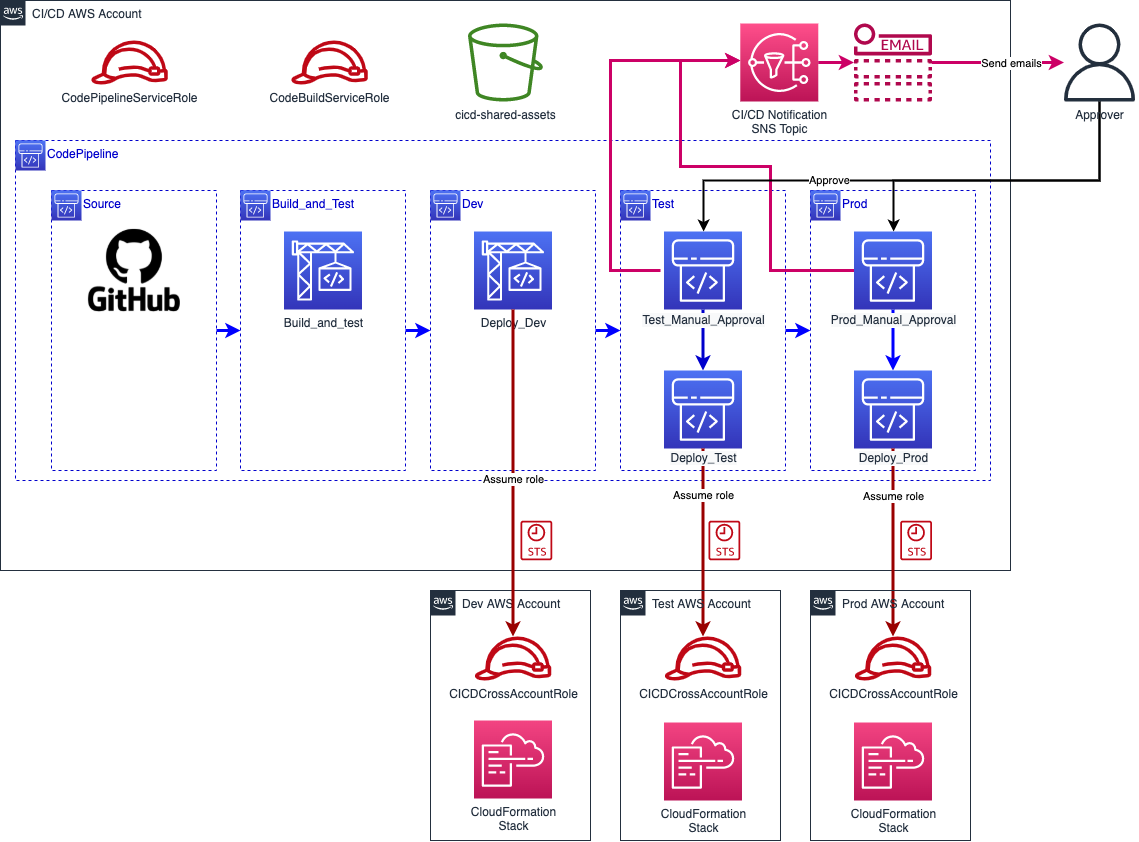
With this architecture a complete CI/CD solution is deployed in a dedicated AWS account (named CI/CD). All assets of the pipeline are deployed with CloudFormation. The bucket cicd-shared-assets is used to store artifacts produced by the pipeline like test reports or application archives. Two IAM roles are used: CodePipelineServiceRole for the pipeline itself and CodeBuildServiceRole for all AWS CodeBuild containers.
How it works?
- The pipeline is triggered by a GitHub commit on a given branch.
- Sources are downloaded and stored on the S3 bucket (
Sourcestep). - The
Build_and_Teststep retrieves the source code from the bucket, builds the application and runs the test suite. The application archive (zip file) and the test report are uploaded to the S3 bucket. - The
Devstep is triggered. It deploys the application in the development environment hosted in another AWS account. To do so, a CodeBuild project assumes theCICDCrossAccountRolerole (previously deployed in all AWS accounts) which allows the CI/CD account to perform actions in the AWS “environment” accounts. Once the role is assumed, CodeBuild deploys the new version of the application in the development environment. - Once the application is successfully deployed the
Test_Manual_Approvalaction (Teststep) sends a notification to theCI/CD Notification SNS topic, which in turn sends an email to notify key people that a new release for the test environment is ready and is waiting for approval. At this point, the pipeline is paused. - Once the manual approval is validated, the
Deploy_Testaction deploys the application in the test environment. - Finally, the
Prodstep is similar to theTeststep but to deploy the application into production.
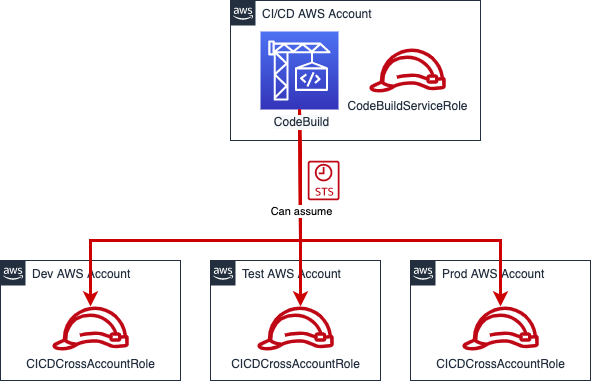
Create cross-account IAM roles
To setup our CI/CD solution, first, we must create IAM roles that grants the permissions to the AWS CodeBuild projects in our CI/CD AWS account to deploy resources in all other AWS accounts.
app-cross-account-roles.cfn.yml
1
2
3
4
5
6
7
8
9
10
11
12
13
14
15
16
17
18
19
20
21
22
23
24
25
26
27
28
29
30
31
32
33
---
AWSTemplateFormatVersion: 2010-09-09

Parameters:
  AccountId:
    Description: The AWS account ID of the CI/CD AWS account
    Type: String

Resources:
  CICDCrossAccountRole:
    Type: AWS::IAM::Role
    Properties:
      RoleName: CICDCrossAccountRole
      Path: /
      AssumeRolePolicyDocument:
        Statement:
        - Action:
            - sts:AssumeRole
          Effect: Allow
          Principal:
            AWS: !Sub arn:aws:iam::${AccountId}:root
          Condition:
            StringEquals:
              aws:PrincipalServiceName: codebuild.amazonaws.com
        Version: 2012-10-17
      Policies:
        - PolicyName: CICDCrossAccountAccess
          PolicyDocument:
            Version: 2012-10-17
            Statement:
              - Effect: Allow
                Action: '*'
                Resource: '*'
An “Hello world” application powered by the Serverless Framework
Then our CI/CD pipeline needs an application to test and deploy. We will use a simple Lambda function which will always return “Hello world!” (handler.js).
1
2
3
4
5
6
7
8
9
10
11
12
13
module.exports.hello = async event => {
  return {
    statusCode: 200,
    body: JSON.stringify(
      {
        message: 'Hello world!',
        input: event,
      },
      null,
      2
    ),
  };
};
To deploy the AWS Lambda and an API gateway, we can use the Serverless framework with the Serverless CLI and a serverless.yml file.
By calling serverless deploy, the serverless.yml is transformed into a CloudFormation template and then used to deploy all the resources into the AWS account.
Now, let’s focus on the big part of this article, the CI/CD pipeline.
Buildspec files
Buildspec files are used to define shell commands executed by AWS CodeBuild (AWS CodeBuild projects are executed into Docker containers). By default, AWS CodeBuild looks into the source files (files from a Github repository in this example) for a file named buildspec.yml and executes it. If we have more than one AWS CodeBuild project in our pipeline, we need to define the paths of each buildspec file.
In this example we are using two buildpsec files.
The first, buildspec_test.yml gets libraries from npm and run the test suite.
1
2
3
4
5
6
7
8
9
10
11
12
---
version: 0.2
phases:
  install:
    runtime-versions:
      nodejs: 10
  build:
    commands:
      - npm -v
      - npm install
      - mkdir junit
      - npm test --coverage
The second, buildspec_deploy.yml takes care of the deployment. The install phase assumes the CICDCrossAccountRole role and the build phase installs the Serverless framework and deploys the application.
1
2
3
4
5
6
7
8
9
10
11
12
13
14
15
16
17
18
19
20
21
---
version: 0.2
env:
  variables:
    ROLE_SESSION_NAME: CICDCrossAccountRole
phases:
  install:
    runtime-versions:
      nodejs: 10
    commands:
      - echo $ASSUME_ROLE_ARN
      - echo $ROLE_SESSION_NAME
      - echo $ENVIRONMENT
      - TEMP_ROLE=`aws sts assume-role --role-arn $ASSUME_ROLE_ARN --role-session-name $ROLE_SESSION_NAME`
      - export AWS_ACCESS_KEY_ID=$(echo "${TEMP_ROLE}" | jq -r '.Credentials.AccessKeyId')
      - export AWS_SECRET_ACCESS_KEY=$(echo "${TEMP_ROLE}" | jq -r '.Credentials.SecretAccessKey')
      - export AWS_SESSION_TOKEN=$(echo "${TEMP_ROLE}" | jq -r '.Credentials.SessionToken')
  build:
    commands:
      - npm i -g serverless
      - sls deploy --stage $ENVIRONMENT
The buildspec file contains generic commands to deploy the application and uses several environments variables to target the correct environment (AWS Account).
Environment variables can be defined either in the buildspec file or in the AWS CodePipeline actions definition in a CloudFormation template. ROLE_SESSION_NAME has been defined directly in the buildspec file. But since ASSUME_ROLE_ARN and ENVIRONMENT are different for each environment they have been defined in a CloudFormation template (app-cross-account-roles.cfn.yml).
1
2
3
4
5
6
7
8
9
10
11
12
13
14
15
16
17
18
19
20
21
22
23
- Name: DEV
  Actions:
    - Name: DEV_Deploy_Serverless
      ActionTypeId:
        Category: Build
        Owner: AWS
        Version: 1
        Provider: CodeBuild
      Configuration:
        ProjectName: !Ref CodeBuildDeployProject
        PrimarySource: Source
        EnvironmentVariables:
          - name: ASSUME_ROLE_ARN
            type: PLAINTEXT
            value: !Sub arn:aws:iam::${AccountId}:role/CICDCrossAccountRole
          - name: ENVIRONMENT
            type: PLAINTEXT
            value: !Ref Environment
      InputArtifacts:
        - Name: Source
      OutputArtifacts:
        - Name: DEV_Templates
      RunOrder: 1
Pipeline deployment
Once IAM roles are deployed in all our environments, we can now deploy the CloudFormation template (app-cicd-pipeline.yml) in our CI/CD AWS account. It contains the pipeline, the SNS topic for notifications, AWS CodeBuild projects to run the code and an AWS Secrets Manager secret to store our Github oauth-token (which is hardcoded in the CloudFormation template in this example but should not be for a real project).
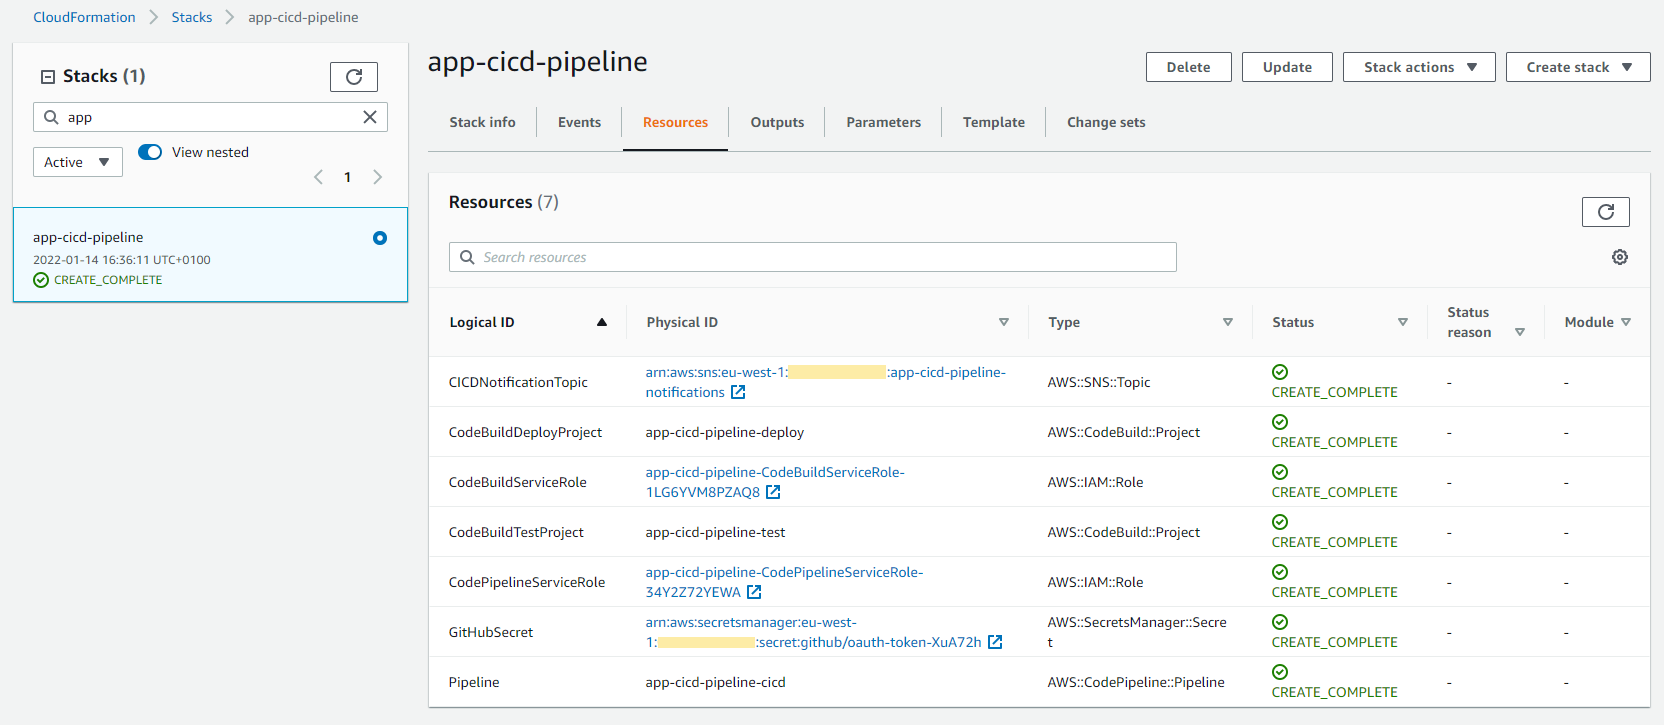
Once deployed, we can replace the TO_BE_DEFINED placeholder our GitHub OAuth token and rerun the pipeline.
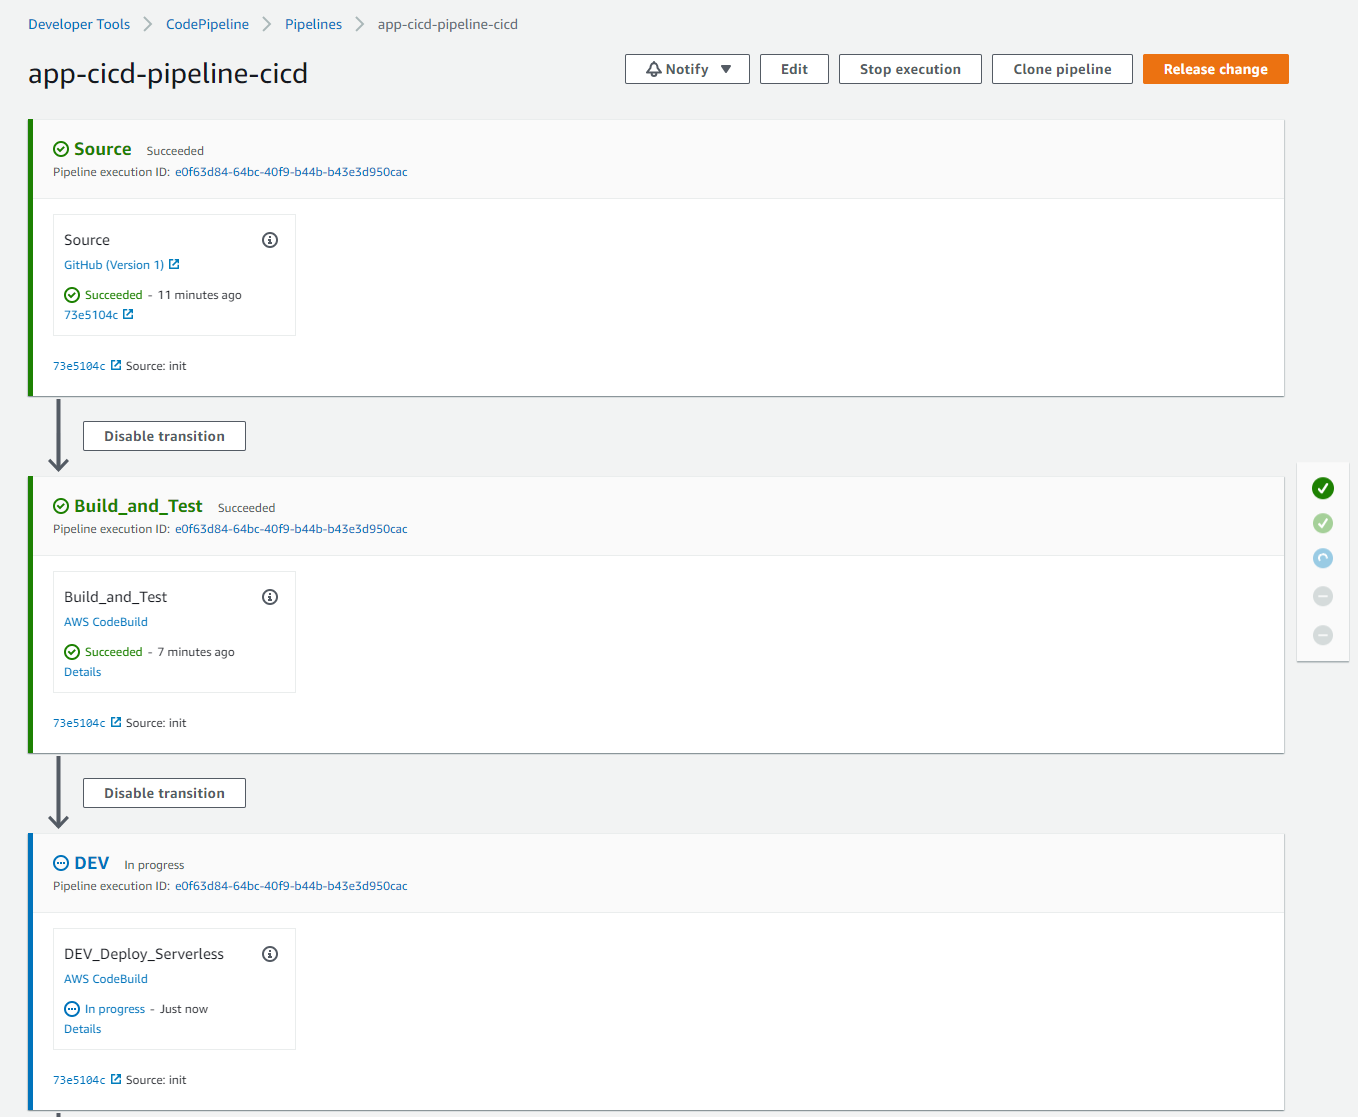
We now have a working example of a CI/CD pipeline which deploys our application into two other AWS accounts.
Additional notes about the CloudFormation action and KMS key
In the template app-cicd-pipeline.yml, we have commented-out a few lines related to a KMS key (which is used for encryption).
To use this feature, we need to:
- Create a KMS key in the CI/CD AWS account
- Grant other AWS accounts access to the KMS key
- Modify the AWS CodePipeline to use this KMS key (Artifacts will be encrypted with it)
- Create a bucket policy and attach it to the S3 bucket to allow other AWS accounts to retrieve artifacts stored in it
Features & limits
Compared to other CI/CD solutions like GitHub actions, Jenkins or GitLab, AWS CodePipeline lacks some features. Let’s have a look at the most annoying.
Trigger by branches
An AWS CodePipeline pipeline can only be triggered by a specific branch. We cannot use wildcard like features/* to trigger the pipeline on feature branches. If we want the pipeline to be triggered by another branch, we must create a new pipeline with a step that retrieves the new branch. Not having this feature can be painful when working with feature branches. To fill the gap AWS suggests to use a Multi-branch CodePipeline strategy with event-driven architecture. Unfortunately, it is very complicated to setup and hard to maintain.
Pipeline configuration file
With some CI/CD pipelines like GitHub Actions, Jenkins or GitLab, it is possible to define a complete pipeline in a YAML or a JSON file and store it in our application/infrastructure source code repository. If such a file is detected by the CI/CD platform, a pipeline is automatically created for us. Unfortunately, with AWS CodePipeline this is not possible. The best we can do is to have a dedicated CI/CD pipeline to update others CI/CD pipelines.
Manual approvals
The manual approval is a nice feature when it comes to do manual checks of the application before deploying the application into another environment. But validating/testing a application can take some time. Unfortunately, AWS CodePipeline approval process is limited to 7 days. After this delay the pipeline execution is marked as failed and we have to rerun the whole pipeline. Of course, while waiting for the approval, the development team may have released new features and as it is not possible to run a pipeline with a specific commit SHA or tag, we must reset the branch to the state it was previously.
Conclusion
To conclude, AWS CodePipeline and AWS CodeBuild are great tools to automate process and create CI/CD pipelines. However, it is not as mature as others CI/CD solutions on the market.
The lack of key features is quite annoying and time consuming sometimes. The user interface could be better by displaying all runs in a compact mode while keeping all steps visible. We often have to build around the AWS CodePipeline solution to have a fully featured CI/CD pipelines
In summary, AWS provides a good solution for CI/CD but with room for improvements.