
Charles Guebels
Protect a CloudFront distribution with Cognito or BasicAuth
Amazon CloudFront is a very useful service for exposing multiple origin types like ALB, custom domains or S3 buckets. However, CloudFront does not provide a direct way to restrict access to certain users based on username/password credentials. Indeed, CloudFront security features (like signed URL, signed cookies or OAI) are not based on username/password.
In this article we will see two methods to protect a CloudFront distribution with username/password credentials:
- The first one uses Amazon Cognito. This is probably the best we can do as Cognito provides many features and customizations. It can also be plugged to an enterprise active directory or to Facebook, Google accounts etc.
- The second way is through a Basic Authentication. It is a good protection with minimal effort.
The common goal of both methods is to display a login form when a user tries to access our CloudFront distribution.
Secure CloudFront distribution with Cognito
The first way to control access to our CloudfFront distribution is to use Amazon Cognito. This is the most flexible solution since we can use all the Cognito features to protect our pages, this means account creation, password reset, MFA, etc.
Technically this solution is based on a Lambda@Edge using a JavaScript Library named cognito-at-edge developed by AWS teams.
The following sections explain how to configure the different AWS resources. The CloudFront distribution will be reused throughout this article.
Creation of the CloudFront distribution
Let’s create our CloudFront distribution following the steps below:
- Open the CloudFront AWS Console.
- On the left side menu, click on “Distribution” and on the “Create distribution” button.
- We have to select the CloudFront origin, i.e. the resources to protect. It can be an S3 bucket, an ELB, an API Gateway, a custom domain etc. In our case we will enter the Spikeseed website domain “spikeseed.cloud”.
- Enter an origin name.
- In “Cache policy”, select “CachingDisabled”.
- In the “WAF” section, select “Do not enable security protections”.
- Click on “Create distribution”.
After a few minutes, the CloudFront distribution is deployed and if we access the associated CloudFront distribution domain, we can access our origin without restriction.
Creation of Cognito User Pool
We will now create the Cognito User Pool, it will contain the list of users authorized to access the protected resources. We will not go into the Cognito configuration details because the goal here is rather to set up the working base. It is still possible to improve the Cognito configuration after. It is why we will keep the configuration as easy as possible.
- Open the Cognito AWS Console in a chosen AWS region.
- On the left side menu, click on “User pools” and click on “Create user pool”.
- In the “Cognito user pool sign-in options” section, select “User name” and click on the “Next” button.
- In the “Multi-factor authentication” section, select “No MFA”.
- In the “User account recovery” section, uncheck “Enable self-service account recovery” and click on the “Next” button.
- In the “Self-service sign-up” section, uncheck “Enable self-registration”.
- In the “Attribute verification and user account confirmation” section, uncheck “Allow Cognito to automatically send messages to verify and confirm” and click on the “Next” button.
- In the “Email” section, select “Send email with Cognito” and click on the “Next” button.
- In the “User pool name” section, enter a user pool name.
- In the “Initial app client”, enter a name.
- In the “Hosted authentication pages” section, check the box “Use the Cognito Hosted UI” and enter a name in the field “Cognito domain”.
- Click on the “Next” button.
- On the last page click on the “Create user pool” button.
Now that the user pool is created, we will add a user in it following the steps below:
- Click on the user pool name and in the “Users” tab click on the “Create user” button.
- Enter a user username and password respecting the security policy, for example “Spikeseed1!”.
- Click on the “Create user” button.
Create the Lambda@Edge
We will now implement the last part of the configuration. To do this, we need to create a Lambda@Edge in the us-east-1 AWS region and link it to the Cloudfront distribution.
Lambda@Edge is a CloudFront feature capable of executing a Lambda when a request hits a CloudFront distribution, the goal is to modify the content of the request. In our case we will create a Lambda capable of “redirecting” to the Cognito login page.
As already specified above, our Lambda@Edge will execute a code based on the JavaScript Library named cognito-at-edge. However, to be able to use this library in the Lambda code, we need to integrate it. The steps below explain how to do this:
- On our local file system, create a directory named “cognito”.
- Enter this “cognito” directory and run the command “npm install cognito-at-edge”.
- Still in the “cognito” directory, create a file named “index.js” and copy the code below:
1
2
3
4
5
6
7
8
9

const { Authenticator } = require('cognito-at-edge');
const authenticator = new Authenticator({
  // Replace these parameter values with those of your own environment
  region: 'eu-north-1', // user pool region
  userPoolId: 'eu-north-1_qepnsjmdo', // user pool ID
  userPoolAppId: '6cpa6eem0nl9e5jmhlfd7sdsvq', // user pool app client ID
  userPoolDomain: 'cloudfront.auth.eu-north-1.amazoncognito.com', // user pool domain
});
exports.handler = async (request) => authenticator.handle(request);
In this code four parameters must be modified:
- region: It is the region where we created our Cognito User Pool resource.
- userPoolId: This value can be found in the Cognito AWS Console when we consult the User Pool details, it is the value of the “User pool ID” field.
- userPoolAppId: This value can be found in the Cognito AWS Console when we consult the User Pool details and select the tab “App integration”, it is the value in the column “Client ID”.
- userPoolDomain: This value can be found in the Cognito AWS Console when we consult the User Pool details and select the tab “App integration”, it is the value of the field “Domain”.
Once all these parameters specified, we can create our Lambda code archive:
- Save the “index.js” file.
- Still inside the “cognito” directory, run the command “zip -r cognito.zip *”.
Now we can create the Lambda to be executed as Lambda@Edge:
- Open the Lambda AWS Console in the us-east-1 region.
- On the left side menu, click on “Functions” and on the “Create function” button.
- Give a name to the Lambda, check that NodeJS runtime is well selected and click on the “Create function” button.
- Once in the created Lambda page, click on the “Code” tab, click on the “Upload from” dropdown and select “zip file”, choose the “cognito.zip” archive file on the disk and click on the “Save” button.
- Click on “Deploy”.
- On the “Versions” tab, click on the “Publish new version” button and click the “Publish” button in the pop-up window that appears.
- Once the version published, copy the Lambda version ARN.
It is now time to link this Lambda to the CloudFront distribution to become a real Lambda@Edge:
- Open the CloudFront distribution created previously and open the “Behaviors” tab.
- Select the behavior to secure and click the “Edit” button.
- At the bottom of the page, in the “Function associations” section, for “Viewer request”, select “Lambda@Edge” as “Function type” and copy the Lambda version ARN.
- Click on the “Save changes” button and wait until the CloudFront distribution is completely deployed, it can take a few minutes.
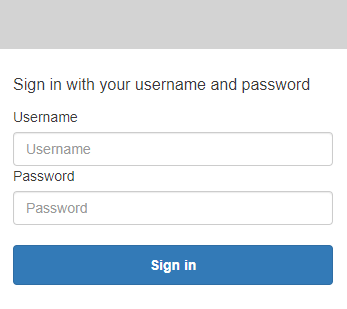
We can now access our CloudFront distribution domain and we will reach the default Cognito login page. We can try to log in with the user we created in the Cognito User Pool.
In command line, using curl for example, it is possible to access the CloudFront distribution by setting the correct Basic Auth HTTP headers:
1

curl https://dfwfvf3thjl1he.cloudfront.net -H "Authorization: Basic dXNlcm5hbWU6cGFzc3dvcmQ="
Same if we use a specific HTTP library, like the “Requests” Python one, it is possible to add specific HTTP headers to each call.
Secure CloudFront distribution with Basic Authentication
If using Amazon Cognito is too complex for our purposes, it is also possible to protect a CloudFront distribution using the Basic Authentication scheme. With this method, we will see two levels of complexity:
- Using a CloudFront Function and hard-coding the credentials into it. This solution is simple and cheap but the credentials are visible from the AWS CloudFront console.
- Using a CloudFront Lambda@Edge retrieving the credentials from an AWS Secrets Manager secret. This solution provides more security but is a little more complex to implement. It also costs a bit more in terms of secret retrieval and Lambda running costs).
CloudFront Function solution
This solution uses the CloudFront Functions feature. Like Lambda@Edge, already seen above, in the Cognito solution, the CloudFront Functions allow to “intercept” HTTP requests / responses to and from CloudFront and update them by, for example, adding or removing headers, modifying the content etc. It is important to know that the CloudFront Function code is executed in the closest AWS region of the client’s location.
We will create a CloudFront Function to verify that the Authorization header, required for Basic Authentication, is in the request with correct values. If it is the case, the CloudFront origin will appear, otherwise a 401 Unauthorized response code will be sent and a header will be added in the response to inform the client’s browser that this URL is protected by Basic Authentication and that it should display the login form popup. CloudFront Function only supports the NodeJS language.
To create this CloudFront Function, the steps below are performed:
- Open the CloudFront AWS Console.
- On the left side menu, click on “Functions” and click on the “Create function” button.
- Give a name to the function (“basic-auth” for example) and click on the “Create function” button.
- Once on the page of the function, replace the existing code by the code below:
1
2
3
4
5
6
7
8
9
10
11
12
13
14
15
16
17
18
19
20
21
22

function handler(event) {
  var authHeaders = event.request.headers.authorization;
  const username = "admin" //TO BE UPDATED
  const password = "password1" //TO BE UPDATED
  const encodedCredentials = Buffer.from(`${username}:${password}`).toString('base64');
  var expected = `Basic ${encodedCredentials}`;

  if (authHeaders && authHeaders.value === expected) {
    return event.request;
  }

  var response = {
    statusCode: 401,
    statusDescription: "Unauthorized",
    headers: {
      "www-authenticate": {
        value: 'Basic realm="Enter credentials"',
      },
    },
  };
  return response;
}
- Click on the “Save changes” button.
- Open the “Publish” tab and click on the “Publish function” button.
- Open the CloudFront distribution to secure and open the “Behaviors” tab.
- Select the behavior to secure and click on the “Edit” button.
- At the bottom of the page, in the “Function associations” section, for “Viewer request”, select “CloudFront Functions” as “Function type” and choose the name of the function created just above (“basic-auth” in our example).
- Click on the “Save changes” button and wait until the CloudFront distribution is completely deployed, it can take few minutes.
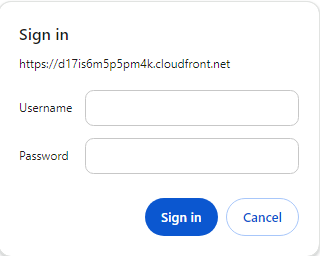
We can now try to access our CloudFront distribution domain and verify that it is indeed protected by the Basic Authentication form and that the hardcoded credentials are correct.
Improved solution using AWS Secrets Manager and Lambda@Edge
The solution above, using a CloudFront Function, totally works but the credentials are directly hardcoded in the function code. This means that any cloud engineer with access to the Cloudfront service can access this password. This also means that if we use Infrastructure A Code templates (CloudFormation or Terraform for example), the credentials will be available directly in the code.
To improve this, we will place the credentials in a AWS Secrets Manager secret and access it via the AWS API. Unfortunately, CloudFront Functions don’t allow loading the API library, so we cannot access the secret directly from the CloudFront Function code. Instead, we will use CloudFront Lambda@Edge. As already explained earlier in this article, a Lambda@Edge works exactly like a CloudFront Function but the code is executed in a Lambda. As with CloudFront Functions, it is important to specify that the Lambda will be executed in the closest AWS region based on the client’s location. For example if the user is located in Luxembourg, the Lambda@Edge will be executed in the Frankfurt AWS region.
CloudFront Lambda@Edge allows Python or NodeJS languages. In our case the choice of Python is mandatory for the reasons below:
- We will bind our Lambda@Edge on the “Viewer request” event and there is a Lambda size restriction on it: 1MB maximum.
- This size restriction prevents including the AWS NodeJS API in the Lambda, even if we use a lightweight version with only the Secrets Manager API.
- With Python we can simply import the boto3 AWS python library (using the “import boto3” python statement) to have access to the AWS API without impacting the Lambda size.
To implement this solution we have to create a certain number of resources:
- An AWS Secrets Manager secret containing the Basic Authentication credentials.
- An IAM role and an IAM policy used by the Lambda@Edge to access the secret.
- The Lambda@Edge accessing the secret and implementing the same logic as above with the CloudFront Function.
Secret creation
As already specified above, the AWS region in which the Lambda@Edge is executed depends on the user’s location. For this reason, the resources use by the Lambda@Edge (the secret in our case) must exist in multiple regions. Fortunately, the AWS Secrets Manager service allows us to replicate a same secret in multiples regions.
To create the secret the steps below can be followed:
- Open the AWS Secrets Manager service in a region we know we have users located.
- In the left side menu, click on “Secrets”.
- Click on the “Store a new secret” button.
- Select “Other type of secret” as secret type.
- In the “Key/value pairs”, select the “Plaintext” tab and enter {“username”:”admin”,”password”:”password1”}. Of course the values must be changed.
- Select a specific KMS key if needed and click on the “Next” button.
- Give a name to the secret. For example “basicauth”.
- In the “Replicate secret” section, we have the opportunity to replicate this secret in multiple regions and to assign specific KMS keys.
- Click on the “Next” button and then this same button again on the next page.
- On the last configuration page click on the “Store” button.
IAM resources creation
Two IAM resources must be created: A role and a policy.
Let’s start with the IAM policy, it defines the Lambda@Edge permissions. An example can be found below:
1
2
3
4
5
6
7
8
9
10
11
12
13
14
15
16
17
18
19
20
21
22
23
24
25

{
	"Version": "2012-10-17",
	"Statement": [
		{
			"Effect": "Allow",
			"Action": [
				"logs:CreateLogGroup",
				"logs:CreateLogStream",
				"logs:PutLogEvents"
			],
			"Resource": [
				"arn:aws:logs:*:*:*"
			]
		},
		{
			"Effect": "Allow",
			"Action": [
				"secretsmanager:GetSecretValue"
			],
			"Resource": [
				"arn:aws:secretsmanager:*:123456789123:secret:basicauth-b0jkcq"
			]
		}
	]
}
We can see that a wildcard is present in the ARN of the Secrets Manager resource. This is due to secret replication in multiple regions, the wildcard allows not specifying each region.
If the secret is encrypted by a specific KMS key, the kms:decrypt permission must be present in this policy for each KMS key’s region.
Regarding the IAM role, it is important to configure it with the trusted relationship below:
1
2
3
4
5
6
7
8
9
10
11
12
13
14
15

{
    "Version": "2012-10-17",
    "Statement": [
        {
            "Effect": "Allow",
            "Principal": {
                "Service": [
                    "edgelambda.amazonaws.com",
                    "lambda.amazonaws.com"
                ]
            },
            "Action": "sts:AssumeRole"
        }
    ]
}
This trusted relationship policy means that the Lambda service and the Lambda@Edge services can assume this role.
The IAM policy created just above must be attached to this role.
Lambda@Edge creation
Now it is time to create the Lambda@Edge itself. For that we can follow the steps below:
- Open the Lambda service in us-east-1 region. Indeed all the Lambda@Edge must be created in this region.
- Click on the “Create function” button.
- Let “Author from scratch” checked, give a name to the Lambda (“basicauth” in our example), and select Python 3.12 (may vary) runtime version.
- Click on the “Create function” button.
- In the “Code” tab add the code below. It is needed to replace the name of the secret if it is not “basicauth”.
1
2
3
4
5
6
7
8
9
10
11
12
13
14
15
16
17
18
19
20
21
22
23
24
25
26
27
28
29
30
31
32

import boto3
import json
import base64

session = boto3.Session()
secrets_manager_client = boto3.client('secretsmanager')

def lambda_handler(event, context):
    response = secrets_manager_client.get_secret_value(SecretId="basicauth")
    secret_value = response['SecretString']
    secret_json = json.loads(secret_value)

    username = secret_json['username']
    password = secret_json['password']
    username_password_concat = f"{username}:{password}"
    byte_data = username_password_concat.encode('utf-8')
    base64_secret = base64.b64encode(byte_data)

    request = event['Records'][0]['cf']['request']
    headers = request['headers']

    if "authorization" in headers and headers["authorization"][0]["value"] == f"Basic {base64_secret.decode('utf-8')}":
        return request
    else:
        return  {
            "status": "401",
            "statusDescription": "Unauthorized",
            "body": "Unauthorized",
            "headers": {
                'www-authenticate': [{ "key": "WWW-Authenticate", "value": "Basic realm='Restricted Area'" }],
            }
        }
- Click on Deploy
- On the “Versions” tab, click on the “Publish new version” button and click on the “Publish” button in the pop-up window that appears.
- Once the version published, copy the Lambda version ARN.
It is now time to link this Lambda to the CloudFront distribution to become a real Lambda@Edge:
- Open the CloudFront distribution to secure and open the “Behaviors” tab.
- Select the behavior to secure and click on the “Edit” button.
- At the bottom of the page, in the “Function associations” section, for “Viewer request”, select “Lambda@Edge” as “Function type” and copy the Lambda version ARN.
- Click on the “Save changes” button and wait until the CloudFront distribution is completely deployed, it can take few minutes.
Now we can try to access our CloudFront distribution domain and verify that it is well protected by the Basic Authentication form and that the credentials stored in the AWS secret are correct.
Conclusion
It is not complex or expensive to protect a web service using CloudFront and its edge features. Cognito is the most flexible way but requires more configuration. Basic Authentication method provides a non-configurable but working solution.