
Yohan Beschi
Developer, Cloud Architect and DevOps Advocate
AWS Copilot, a friend that we all need
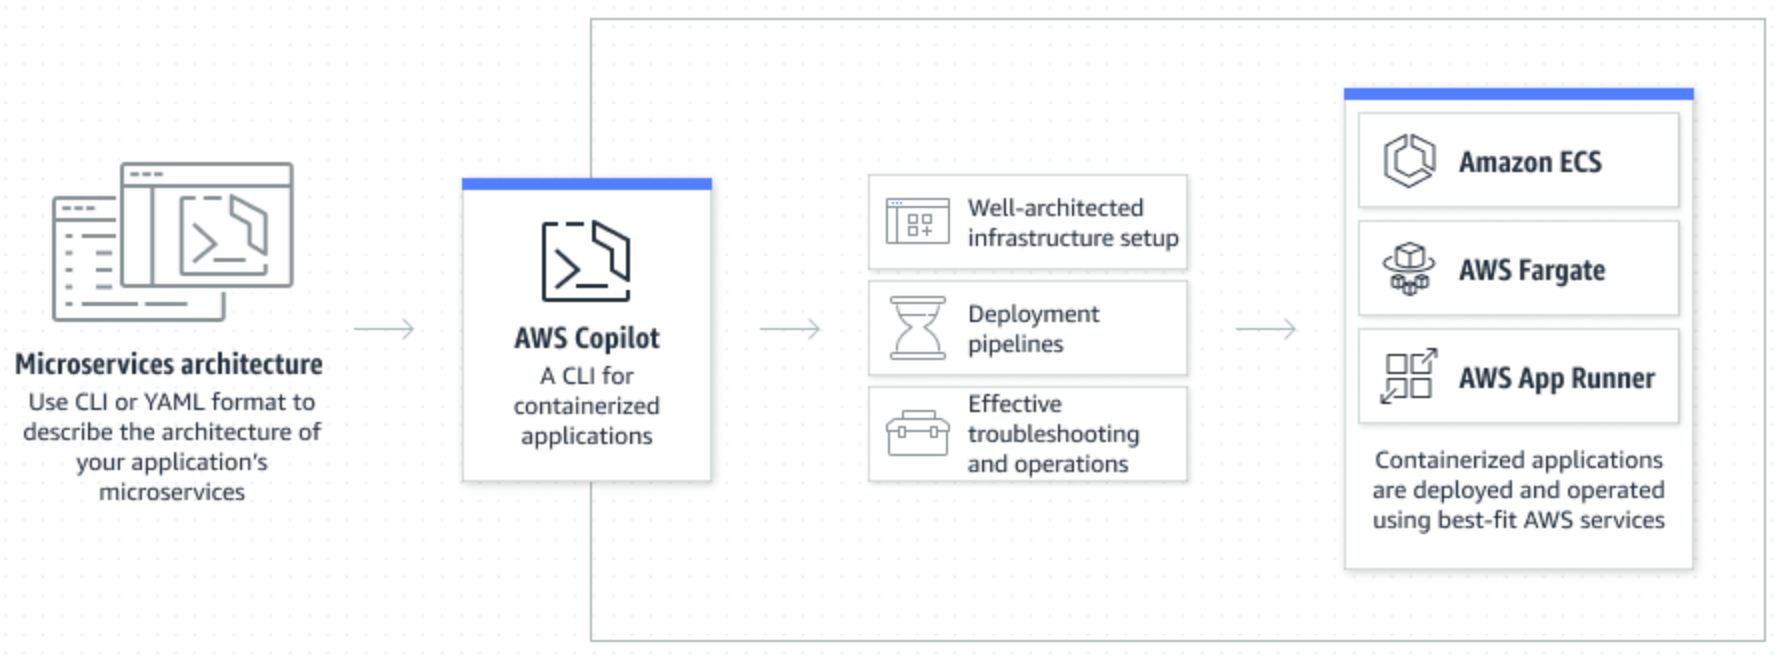
Sometimes we want to quickly deploy a container without the hassle of Infrastructure as Code. It can be because, we have limited AWS or infrastructure knowledge and we want to easily deploy an application without spending weeks to understand how every building block works, to test a third-party application, to do a Proof of Concept or any other use case. For these, AWS Copilot is the perfect tool.
The AWS Copilot CLI is a tool for developers to build, release, and operate production ready containerized applications on Amazon ECS and AWS Fargate.
A word about containers
The EC2 service is an AWS core building block. EC2 instances are a fantastic way to easily deploy applications with full control over (almost) everything to have a traditional infrastructure. However, once the setup phase is completed, we enter the operations phase. And while the application can still be in development, we hope to forget about the infrastructure part. Unfortunately, with EC2s it is not possible, even with configuration management tools, we still have to update the system and all the libraries required by the applications, do major OS upgrades, etc. And of course, without even considering all the things that can go wrong, as a library version not available anymore, a broken package, etc. Which means that every change on the VM requires a whole new testing phase to validate the system of an application that already had been tested.
These examples, like dozen we could add, are the main reasons why containers are becoming the new normal. Furthermore, containers are faster and smaller than VMs, fully embrace immutability, Git, and CI/CD methodologies and the same artifact can be deployed on laptop, data centre, and cloud.
A running container in under 5 min
Once AWS Copilot installed we can dive-in.
First, we clone the sample repository which contains a Dockerfile to build a Nginx Docker image with a custom index.html page.
1
2
git clone https://github.com/aws-samples/aws-copilot-sample-service copilot-101
cd copilot-101
Then we can initialize the project and deploy the application in a single command.
But before executing it the following items must be considered:
- AWS Copilot uses the default AWS CLI credentials. It is recommended to use a specific profile by exporting the appropriate environment variables (
AWS_PROFILEandAWS_REGION) - The
initcommand can be run without any argument and will go through each element of the configuration to let us choose what we want - Docker must be installed and running on the machine executing the command, otherwise, the location of an existing Docker image must be provided with the flag
--image - Executing the following command will deploy resources in your AWS account and you will be charged for them
1
2
3
4
5
6
copilot init \
--app demo-copilot \
--name demo-copilot \
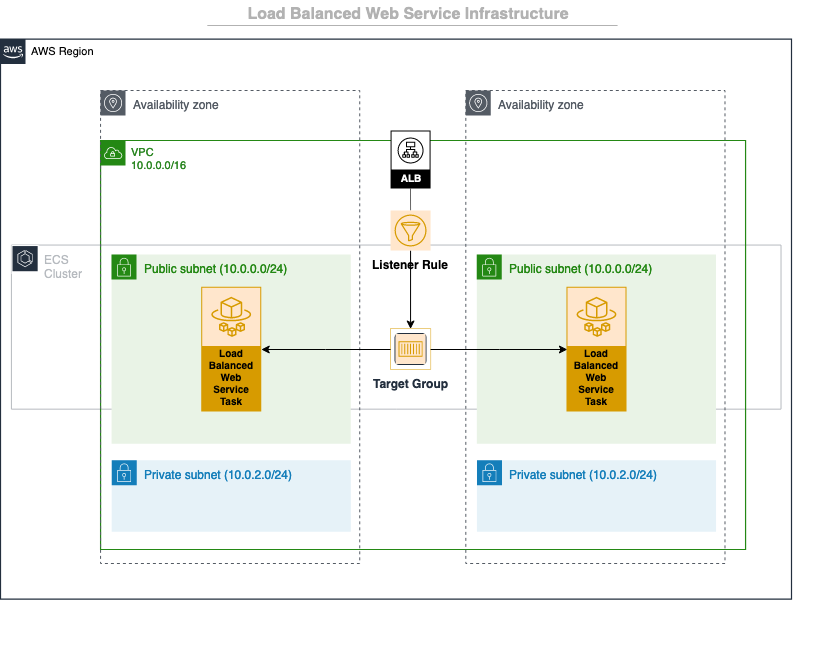
--type "Load Balanced Web Service" \
--dockerfile "./Dockerfile" \
--deploy
Where:
--appis the name of the application--nameis the name of the service--typeis the type of job or service to create (Request-Driven Web Service,Load Balanced Web Service,Backend Service,Worker Service,Scheduled Job)--dockerfileis the path to the Dockerfile--deploydeploys the service
Once everything has been built and deployed, after about 15 min, the ALB URL will be printed in the console. It can then be copied/pasted in a browser to access the deployed application over HTTP.
1
2
Recommended follow-up action:
  - You can access your service at http://demo-Publi-1QGOP7RNI2CWH-554165981.us-east-1.elb.amazonaws.com over the internet.
Behind the hood, AWS Copilot does a lot of things:
- create an
<app_name>folder with amanifest.ymlfile (this folder is created as a sibling of the one containing the Dockerfile) - create an
environments/testfolder with anothermanifest.ymlfile (this folder is created as a sibling of the one containing the Dockerfile) - build the image and push it to ECR
- deploy 4 Cloudformation templates:
- one to create roles to manage the Cloudformation stacks
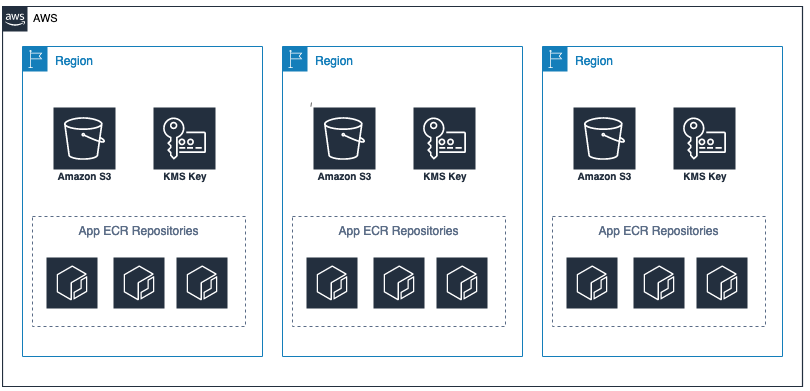
- one to create supporting assets (an S3 buckets for all the assets, a KMS key used to encrypt the bucket and an ECR repository name
<app_name>/<service_name>) - one to create the infrastructure (a VPC with 2 public and 2 private subnets, an ALB, an ECS Cluster, a ServiceDiscoveryNamespace and 2 IAM roles, one for AWS CloudFormation to manage resources and another one to describe resources in our environment)
- one to create all resources related to the application deployed as an ECS Service (
LogGroup,TaskDefinition,TaskRole,ExecutionRole,DiscoveryService,Service, ALBTargetGroup, ALBListenerRuleand 2 custom resources, env-controller.js to update the stack previously created and alb-rule-priority-generator.js to update theListenerRulepriority of the HTTP:80Listener)
Exploring the deployed resources
AWS Copilot comes with a few commands which help us easily see what has been deployed.
We can start to list the environments:
1
2
$ copilot env ls
test
At this point we only have one, test created for us. To see what is deployed for the test environment:
1
2
3
4
5
6
7
8
9
10
11
12
13
14
15
16
17
18
19
20
$ copilot env show
Only found one environment, defaulting to: test
About

  Name        test
  Region      us-east-1
  Account ID  012345678901

Workloads

  Name          Type
  ----          ----
  demo-copilot  Load Balanced Web Service

Tags

  Key                  Value
  ---                  -----
  copilot-application  demo-copilot
  copilot-environment  test
Adding the --resources flag will display all the deployed resources linked to the environment (Roles, VPC, ECS Cluster, ALB, etc.).
We can even download the Cloudformation template and its parameters:
1
copilot env package -n test --output-dir ./infrastructure --upload-assets
Going a little deeper, the same can be done with the application:
1
2
$ copilot app ls
demo-copilot
1
2
3
4
5
6
7
8
9
10
11
12
13
14
15
16
17
18
19
20
21
22
23
24
$ copilot app show
About

  Name                  demo-copilot
  Version               v1.1.0
  URI                   N/A
  Permissions Boundary  N/A

Environments

  Name    AccountID     Region
  ----    ---------     ------
  test    012345678901  us-east-1

Workloads

  Name          Type                       Environments
  ----          ----                       ------------
  demo-copilot  Load Balanced Web Service  test

Pipelines

  Name
  ----
And the same goes for the services:
1
2
3
4
$ copilot svc ls
Name                Type
----                ----
demo-copilot        Load Balanced Web Service
1
2
3
4
5
6
7
8
9
10
11
12
13
14
15
16
17
18
19
20
21
22
23
24
25
26
27
28
29
30
31
32
33
34
35
36
$ copilot svc show
Only found one service, defaulting to: demo-copilot
About

  Application  demo-copilot
  Name         demo-copilot
  Type         Load Balanced Web Service

Configurations

  Environment  Tasks     CPU (vCPU)  Memory (MiB)  Platform      Port
  -----------  -----     ----------  ------------  --------      ----
  test         1         0.25        512           LINUX/X86_64  80

Routes

  Environment  URL
  -----------  ---
  test         http://demo-Publi-1PUMYXNK7YZH-1421987776.us-east-1.elb.amazonaws.com

Internal Service Endpoint

  Endpoint                                 Environment  Type
  --------                                 -----------  ----
  demo-copilot:80                          test         Service Connect
  demo-copilot.test.demo-copilot.local:80  test         Service Discovery

Variables

  Name                                Container     Environment  Value
  ----                                ---------     -----------  -----
  COPILOT_APPLICATION_NAME            demo-copilot  test         demo-copilot
  COPILOT_ENVIRONMENT_NAME              "             "          test
  COPILOT_LB_DNS                        "             "          demo-Publi-1PUMYXNK7YZH-1421987776.us-east-1.elb.amazonaws.com
  COPILOT_SERVICE_DISCOVERY_ENDPOINT    "             "          test.demo-copilot.local
  COPILOT_SERVICE_NAME                  "             "          demo-copilot
With services we can even easily see logs:
1
copilot svc logs --since 1h
Multiple flags can be used to display the logs, in real-time (--follow), between 2 dates (--start-time and --end-time), etc.
To conclude this part, it is worth mentioning that the -h/--help flag can be used on every command.
1
2
3
$ copilot --help
$ copilot app --help
$ copilot svc logs --help
There are not many options for each command, consequently it is quite easy to see what can be done with AWS Copilot CLI.
Cleaning up
Once we are done, we can delete everything with another single command:
1
copilot app delete
The previous command does not delete the files generated locally, but we can remove them:
1
2
rm -rf ../demo-copilot
rm -rf ../environments
Going further
As we have seen, deploying a contrainerized application with AWS Copilot can be extremely easy and fast. Unfortunately, as-is, its usefulness is very limited and we are missing key features for a real life application like:
- A custom domain
- HTTPS only access
- Controlling the CPU and RAM required for our container
- Build and deployment of ARM Docker images
- A CDN
- Storages (Relational Databases, File Systems, etc.)
- Communication between multiple services
- Accessing resources in a customer managed VPC
- Multiple environments to have different versions of an application
- …
From this point nothing will be straight forward and the AWS Copilot documentation can be quite confusing for newcomers.
We will not go through every bullet point, but we will see how to deploy an application with the most important ones.
Once deployed, AWS Copilot backed infrastructure are not very flexible. Therefore, will start again from scratch.
We start by creating an application with a custom domain:
1
copilot app init demo-copilot --domain labs.spikeseed.cloud
Where:
demo-copilotis the name of the application--domainis the domain we want to use (this domain must have an existing Route 53 Hosted Zone)
This command:
- creates a local file named
.workspacecontaining the name of the application - creates an SSM Parameter
/copilot/applications/demo-copilot - deploys a Cloudformation stack with:
- a new hosted zone (
<application_name>.<domain>) - a delegation from
<domain>to<application_name>.<domain> - the 2 IAM roles mentioned previously
- an additional IAM role to manage the new delegated hosted zone
- a new hosted zone (
Then we initialize a new environment:
1
2
3
4
5
6
copilot env init \
    --name lab \
    --app demo-copilot \
    --profile spikeseed-labs \
    --region us-east-1 \
    --default-config
Where:
--nameis the name of the environment--appis the name of the application created previously--profileis the AWS profile we want to use (defined in~/.aws/credentialsor~/.aws/config)--regionis the AWS region into which we want to deploy the environment (it can be different from the application region)--default-configtells AWS Copilot to use the default configuration for the VPC, ALB, etc.
This command:
- creates a local file
environments/lab/manifest.yml - creates an SSM Parameter
/copilot/applications/demo-copilot/environments/lab - deploys 2 Cloudformation stacks:
- one to create the KMS Key and the bucket
- another one to create
CloudformationExecutionRoleandEnvironmentManagerRoleIAM roles
The resources mentioned previously will be created in each region used with the copilot env init command (ECR repositories are added later on).
It is important to note that the profile defined for the environment will only be used for the copilot env ... commands.
Now the environment has been initialized, some resources have been deployed, but we still have to deploy it:
1
2
3
copilot env deploy \
    --name lab \
    --app demo-copilot
This command creates multiple AWS resources through the second Cloudformation stack created by the init command:
- a new hosted zone (
<environment>.<application_name>.<domain>) - an ACM certificate for
<environment>.<application_name>.<domain>and*.<environment>.<application_name>.<domain> - a VPC
- an ECS Cluster
- a Security Group
- etc.
Finally, we initialize a service:
1
2
3
4
5
copilot svc init \
    --app demo-copilot \
    --name nginx \
    --dockerfile ./copilot-101/Dockerfile \
    --svc-type "Load Balanced Web Service"
Where:
--appis the name of the application--nameis the name of the service--dockerfileis the path to the Dockerfile--svc-typeis the type of service
This command:
- creates a local file
nginx/manifest.yml - creates an SSM Parameter
/copilot/applications/demo-copilot/components/nginx - updates the first Cloudformation deployed by the previous command to add an ECR repository named
demo-copilot/nginx
But once again, the service is not automatically deployed. We need to execute another command:
1
2
3
4
copilot svc deploy \
    --app demo-copilot \
    --name nginx \
    --env lab
Where:
--appis the name of the application--nameis the name of the service--envis the name of the environment
This command:
- builds the Docker image
- pushes the image to ECR
- updates a third time the second Cloudformation stack created by the
env initcommand to add an ALB - deploys the last Cloudformation stack with the actual ECS Task Definition and Service
This time the output is:
1
2
Recommended follow-up action:
  - You can access your service at https://nginx.lab.demo-copilot.labs.spikeseed.cloud over the internet.
To have a custom domain and HTTPS we had to execute 5 commands instead of one. However, everything was still extremely easy, and the information provided to each command was not much different from the “single command” one. Only with the additional domain AWS copilot created:
- Hosted Zones
- an TLS certificate
- an ALB Listener on the port 443 linked to the created TLS certificate
- an ALB Listener rule to redirect HTTP requests to HTTPS
- an alias in the Hosted Zone for the custom domain to point to the ALB
At this point to:
- customize the CPU and RAM
- increase the number of tasks
- customize the healthcheck
- use
arm64instead ofx86_64we only have to edit the manifestnginx/manifest.yml(each property is described in the documentation):
1
2
3
4
5
6
7
8
9
10
11
12
13
14
15
16
http:
  path: '/'
  healthcheck:
    path: '/'
    port: 80
    success_codes: '200'
    healthy_threshold: 2
    unhealthy_threshold: 5
    interval: 30s
    timeout: 15s
    grace_period: 60s

cpu: 512
memory: 1024
platform: linux/arm64
count: 2
We can then execute the previous copilot svc deploy ... command and all the changes will be made accordingly to what was specified.
Conclusion
With this introduction we have only scratched the surface of what AWS Copilot can do and how it can help us in our everyday work. Most of the configuration can be done in the manifest files, which are very lightweight compared to Cloudformation templates. Of course, at some point AWS knowledge will be a requirement as will reading the documentation. But AWS Copilot is, without any hesitation, another great tool to add to our toolbox.